Sony DCR-TRV80 Operating Instructions - Page 96
Erasing a title, Superimposing a title on a cassette with Cassette Memory, To return to FN
 |
View all Sony DCR-TRV80 manuals
Add to My Manuals
Save this manual to your list of manuals |
Page 96 highlights
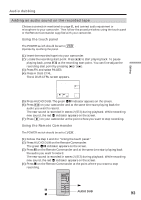
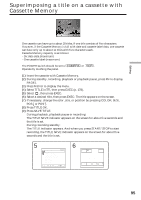
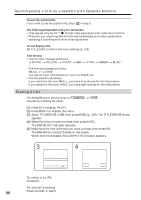
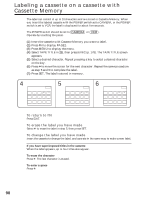
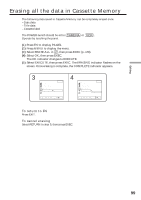
Superimposing a title on a cassette with Cassette Memory To use the custom title If you want to use the custom title, select in step 5. The titles superimposed with your camcorder •They appear only by DV format video equipment with index titler function. •The point you superimposed the title may be detected as an index signal when searching a recording with other video equipment. To not display title Set TITLE DSPL to OFF in the menu settings (p. 178). Title setting •The title color changes as follows: WHITE t YELLOW t VIOLET t RED t CYAN t GREEN t BLUE •The title size changes as follows: SMALL y LARGE You cannot input 13 characters or more in LARGE size. •The title position as follows: If you select the title size SMALL, you have nine choices for the title position. If you select the title size LARGE, you have eight choices for the title position. Erasing a title The POWER switch should be set to Operate by touching the panel. or . (1) Press FN to display PAGE1. (2) Press MENU to display the menu. (3) Select TITLEERASE in , then press EXEC (p. 178). The TITLE ERASE screen appears. (4) Select the title you want to erase, then press EXEC. The ERASE OK? indicator appears. (5) Make sure the title is the one you want to erase, then press OK. The ERASING indicator flashes on the screen. When the title is erased, the COMPLETE indicator appears. 3 T I TLE ERASE 1 HELLO ! 2 CONGRATULAT I ONS ! 3 HAPPY NEW YEAR ! 4 PRESENT 5 GOOD MORN I NG 6 WEDD I NG r R EXEC END 4 T I TLE ERASE 4 PRESENT ERASE OK? OK CAN- CEL To return to FN Press EXIT. To cancel erasing 96 Press CANCEL in step 5.
-
 1
1 -
2
-
3
-
4
-
5
-
6
-
7
-
8
-
9
-
10
-
11
-
12
-
13
-
14
-
15
-
16
-
17
-
18
-
19
-
20
-
21
-
22
-
23
-
24
-
25
-
26
-
27
-
28
-
29
-
30
-
31
-
32
-
33
-
34
-
35
-
36
-
37
-
38
-
39
-
40
-
41
-
42
-
43
-
44
-
45
-
46
-
47
-
48
-
49
-
50
-
51
-
52
-
53
-
54
-
55
-
56
-
57
-
58
-
59
-
60
-
61
-
62
-
63
-
64
-
65
-
66
-
67
-
68
-
69
-
70
-
71
-
72
-
73
-
74
-
75
-
76
-
77
-
78
-
79
-
80
-
81
-
82
-
83
-
84
-
85
-
86
-
87
-
88
-
89
-
90
-
 91
91 -
 92
92 -
 93
93 -
 94
94 -
 95
95 -
 96
96 -
 97
97 -
 98
98 -
 99
99 -
 100
100 -
 101
101 -
102
-
103
-
104
-
105
-
106
-
107
-
108
-
109
-
110
-
111
-
112
-
113
-
114
-
115
-
116
-
117
-
118
-
119
-
120
-
121
-
122
-
123
-
124
-
125
-
126
-
127
-
128
-
129
-
130
-
131
-
132
-
133
-
134
-
135
-
136
-
137
-
138
-
139
-
140
-
141
-
142
-
143
-
144
-
145
-
146
-
147
-
148
-
149
-
150
-
151
-
152
-
153
-
154
-
155
-
156
-
157
-
158
-
159
-
160
-
161
-
162
-
163
-
164
-
165
-
166
-
167
-
168
-
169
-
170
-
171
-
172
-
173
-
174
-
175
-
176
-
177
-
178
-
179
-
180
-
181
-
182
-
183
-
184
-
185
-
186
-
187
-
188
-
189
-
190
-
191
-
192
-
193
-
194
-
195
-
196
-
197
-
198
-
199
-
200
-
201
-
202
-
203
-
204
-
205
-
206
-
207
-
208
-
209
-
210
-
211
-
212
-
213
-
214
-
215
-
216
-
217
-
218
-
219
-
220
 |
 |