Sony J30 Product Manual (J10, J10SDI, J30, and J30SDI Manual) - Page 18
Tape Transport Control,
 |
View all Sony J30 manuals
Add to My Manuals
Save this manual to your list of manuals |
Page 18 highlights
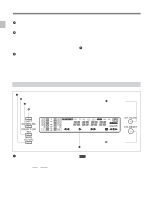
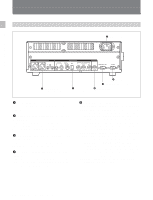
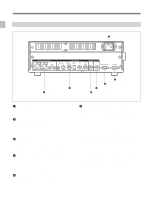
Chapter 2 Location and Function of Parts • If the unit carries out reverse playback in the shuttle mode at -0.5 times or less normal speed for 20 consecutive minutes, the reel motor heat protection circuit automatically functions and the unit enters still mode. 2-1-3 Tape Transport Control Section 1 EJECT button 2 REW button 3 PLAY button 4 F FWD button 5 STOP button 6 STANDBY on/off button 1 EJECT button Press this button to eject the cassette. 2 REW (rewind) button To rewind the tape, press this button. The REW indicator in the display section lights. When you are using a tape containing shot marks, press this button while holding down the SHIFT button to cue-up a shot mark position in the reverse direction. 3 PLAY button To start playback, press this button. The PLAY indicator in the display section lights. When you are using a Betacam/Betacam SP/Betacam SX tape containing shot data, press this button while holding the SHIFT button to display shot data (see page 2-4). When you are using a Digital Betacam/MPEG IMX tape containing UMID, press this button while holding the SHIFT button to display UMID (see page 5-2). To clear the shot data or UMID, again press this button while holding down the SHIFT button. 4 F FWD (fast forward) button To start fast forwarding the tape, press this button. The F FWD indicator in the display section lights. When you are using a tape containing shot marks, press this button while holding down the SHIFT button to cue-up a shot mark position in the forward direction. 5 STOP button To stop playback, press this button. The STOP indicator in the display section lights. If REFERENCE SYSTEM ALARM, extended menu item 105 of the setup menu, has been set to ON, this button flashes when the external reference video signal is not supplied. 6 STANDBY on/off button When a cassette is inserted in the unit and the unit is in the Stop mode, you can toggle the VTR standby mode on and off by pressing this button. In standby mode, the drum rotates and the tape sticks to the drum. As a result, playback starts immediately. If the unit is set to 8 minutes elapse (this value can be varied using STILL TIMER extended menu item 501 of the setup menu) in standby mode, it automatically switches out of standby mode to protect the tape. 2-7 Chapter 2 Location and Function of Parts
-
 1
1 -
2
-
3
-
4
-
5
-
6
-
7
-
8
-
9
-
10
-
11
-
12
-
 13
13 -
 14
14 -
 15
15 -
 16
16 -
 17
17 -
 18
18 -
 19
19 -
 20
20 -
 21
21 -
 22
22 -
 23
23 -
24
-
25
-
26
-
27
-
28
-
29
-
30
-
31
-
32
-
33
-
34
-
35
-
36
-
37
-
38
-
39
-
40
-
41
-
42
-
43
-
44
-
45
-
46
-
47
-
48
-
49
-
50
-
51
-
52
-
53
-
54
-
55
-
56
-
57
 |
 |
