Sony NWZ-X1061F Operation Guide - Page 131
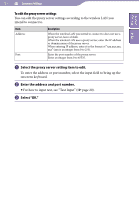
Select one of the items for IP address settings.
 |
View all Sony NWZ-X1061F manuals
Add to My Manuals
Save this manual to your list of manuals |
Page 131 highlights
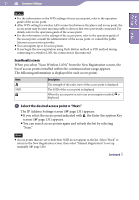
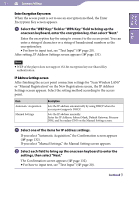
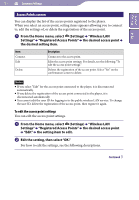
131 Common Settings Table of Contents Index Enter Encryption Key screen When the access point is set to use an encryption method, the Enter Encryption Key screen appears. Select the "WEP Key:" field or "WPA Key:" field to bring up the onscreen keyboard, enter the encryption key, then select "Next." Enter the encryption key for using to connect to the access point. You can enter a string of characters or a string of hexadecimal numbers as the encryption key. For how to input text, see "Text Input" ( page 20). After setting, IP Address Settings screen appears ( page 131). Note WEP of the player does not support 152-bit encryption key nor Shared Key authentication. IP Address Settings screen After finishing the access point connection settings for "Scan Wireless LANs" or "Manual Registration" on the New Registration screen, the IP Address Settings screen appears. Select the setting method according to the access point. Item Automatic Acquisition Manual Settings Description Sets the IP address automatically by using DHCP when the access point supports DHCP. Sets the IP address manually. Enter the IP Address, Subnet Mask, Default Gateway, Primary DNS, and Secondary DNS on the Manual Setting screen. Select one of the items for IP address settings. If you select "Automatic Acquisition," the Confirmation screen appears ( page 132). If you select "Manual Settings," the Manual Setting screen appears. Select each field to bring up the onscreen keyboard to enter the settings, then select "Next." The Confirmation screen appears ( page 132). For how to input text, see "Text Input" ( page 20). Continued
-
 1
1 -
2
-
3
-
4
-
5
-
6
-
7
-
8
-
9
-
10
-
11
-
12
-
13
-
14
-
15
-
16
-
17
-
18
-
19
-
20
-
21
-
22
-
23
-
24
-
25
-
26
-
27
-
28
-
29
-
30
-
31
-
32
-
33
-
34
-
35
-
36
-
37
-
38
-
39
-
40
-
41
-
42
-
43
-
44
-
45
-
46
-
47
-
48
-
49
-
50
-
51
-
52
-
53
-
54
-
55
-
56
-
57
-
58
-
59
-
60
-
61
-
62
-
63
-
64
-
65
-
66
-
67
-
68
-
69
-
70
-
71
-
72
-
73
-
74
-
75
-
76
-
77
-
78
-
79
-
80
-
81
-
82
-
83
-
84
-
85
-
86
-
87
-
88
-
89
-
90
-
91
-
92
-
93
-
94
-
95
-
96
-
97
-
98
-
99
-
100
-
101
-
102
-
103
-
104
-
105
-
106
-
107
-
108
-
109
-
110
-
111
-
112
-
113
-
114
-
115
-
116
-
117
-
118
-
119
-
120
-
121
-
122
-
123
-
124
-
125
-
 126
126 -
 127
127 -
 128
128 -
 129
129 -
 130
130 -
 131
131 -
 132
132 -
 133
133 -
 134
134 -
 135
135 -
 136
136 -
137
-
138
-
139
-
140
-
141
-
142
-
143
-
144
-
145
-
146
-
147
-
148
-
149
-
150
-
151
-
152
-
153
-
154
-
155
-
156
-
157
-
158
-
159
-
160
-
161
-
162
-
163
-
164
-
165
-
166
-
167
-
168
-
169
-
170
-
171
-
172
-
173
-
174
-
175
-
176
-
177
-
178
-
179
-
180
-
181
-
182
 |
 |