Sony VRDMC10 Operating Instructions - Page 40
Copying All Contents (from an 8cm disc
 |
UPC - 027242735675
View all Sony VRDMC10 manuals
Add to My Manuals
Save this manual to your list of manuals |
Page 40 highlights
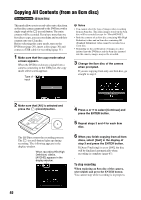
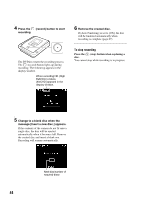
Copying All Contents (from an 8cm disc) This mode allows you to record video onto a disc from an 8cm disc camera connected to the DVDirect with a single tough of the (record) button. The entire contents will be recorded. If you have more than one 8cm disc to copy, you can consolidate and record their contents onto one 12cm disc. Before selecting this copy mode, turn on the DVDirect (page 29), insert a disc (page 30) and connect a USB cable for recording (page 31). 1 Make sure that the copy mode select screen appears. When the DVDirect detects a signal from a camera connecting to the USB port, the copy mode select screen appears. Type of input b Notes • You cannot select the type of images when recording from an 8cm disc. The entire images stored on the 8cm disc will be recorded (except for "PhotoMOVIE"). • Both the contents of an 8cm disc containing HD (High Definition) video and an 8cm disc containing SD (Standard Definition) video cannot be recorded on a 12cm disc. • Depending on the combination of images on a disc inserted into the DVDirect and the 8cm disc inserted into the camera, images may not be recorded. 3 Change the 8cm disc of the camera when prompted. If you are copying from only one 8cm disc, go straight to step 6. 2 Make sure that [All] is selected and press the (record) button. The DVDirect starts the recording process. The (record) button lights up during recording. The following appears in the display window. When recording HD (High Definition) videos, [AVCHD] appears in the display window. 4 Press V or v to select [Continue] and press the ENTER button. 5 Repeat steps 3 and 4 for each 8cm disc. 6 When you finish copying from all 8cm discs, select [Quit] in the display of step 3 and press the ENTER button. If [Auto Finalizing] is set to [ON], the disc will be finalized automatically when recording is complete (page 67). To stop recording When replacing an 8cm disc of the camera, select [Quit] and press the ENTER button. You cannot stop while recording is in progress. 40
-
 1
1 -
2
-
3
-
4
-
5
-
6
-
7
-
8
-
9
-
10
-
11
-
12
-
13
-
14
-
15
-
16
-
17
-
18
-
19
-
20
-
21
-
22
-
23
-
24
-
25
-
26
-
27
-
28
-
29
-
30
-
31
-
32
-
33
-
34
-
 35
35 -
 36
36 -
 37
37 -
 38
38 -
 39
39 -
 40
40 -
 41
41 -
 42
42 -
 43
43 -
 44
44 -
 45
45 -
46
-
47
-
48
-
49
-
50
-
51
-
52
-
53
-
54
-
55
-
56
-
57
-
58
-
59
-
60
-
61
-
62
-
63
-
64
-
65
-
66
-
67
-
68
-
69
-
70
-
71
-
72
-
73
-
74
-
75
-
76
-
77
-
78
-
79
-
80
-
81
-
82
-
83
-
84
 |
 |
