Sony VRDMC10 Operating Instructions - Page 55
Copying Visual Index Lists (Photo
 |
UPC - 027242735675
View all Sony VRDMC10 manuals
Add to My Manuals
Save this manual to your list of manuals |
Page 55 highlights
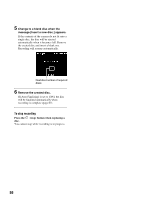
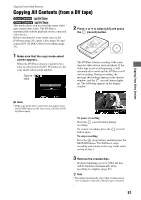
Copying From Video Devices Copying Visual Index Lists (Photo) This method allows you to select and record photos from a camera's memory card onto a disc. You can select them by viewing thumbnails or by the shooting date. Before selecting this copy mode, turn on the DVDirect (page 29), insert a disc and the memory card (pages 30 and 37). 1 Make sure that the copy mode select screen appears. When the DVDirect detects a memory card inserted into any of the memory card slots, the copy mode select screen appears. Number of required discs Type of memory card 2 Press V or v to select [Visual Index] and press b. 3 Make sure that [Photo] is selected and press b. 4 Make sure that the shooting date folders of the photos you wish to copy are marked. Press V or v to select a shooting date folder. Pressing the ENTER button toggles the selection between mark and unmark. To record all photos taken on a particular shooting date, select (mark) the shooting date folder and press the (record) button to start recording. Go straight to step 9. Shooting date Number of selected images of same shooting date 5 Press V or v to select a shooting date folder and press b. 6 Press V or v to select a photo you wish to copy and press the ENTER button to mark. Shooting time (not length of recording time) Thumbnail Marked photo to copy z Hint • If you wish to record all photos, press the (record) button to start recording. Go straight to step 9. b Note • Depending on the photo, thumbnails may not appear. z Hint • The selected photo appears with one press of the b button. The photo can be rotated 90 degrees clockwise with each subsequent press of the b button. 55
-
 1
1 -
2
-
3
-
4
-
5
-
6
-
7
-
8
-
9
-
10
-
11
-
12
-
13
-
14
-
15
-
16
-
17
-
18
-
19
-
20
-
21
-
22
-
23
-
24
-
25
-
26
-
27
-
28
-
29
-
30
-
31
-
32
-
33
-
34
-
35
-
36
-
37
-
38
-
39
-
40
-
41
-
42
-
43
-
44
-
45
-
46
-
47
-
48
-
49
-
 50
50 -
 51
51 -
 52
52 -
 53
53 -
 54
54 -
 55
55 -
 56
56 -
 57
57 -
 58
58 -
 59
59 -
 60
60 -
61
-
62
-
63
-
64
-
65
-
66
-
67
-
68
-
69
-
70
-
71
-
72
-
73
-
74
-
75
-
76
-
77
-
78
-
79
-
80
-
81
-
82
-
83
-
84
 |
 |
