Sony VRDMC10 Operating Instructions - Page 54
Notes on copying manually from a video, device, eject button to eject
 |
UPC - 027242735675
View all Sony VRDMC10 manuals
Add to My Manuals
Save this manual to your list of manuals |
Page 54 highlights
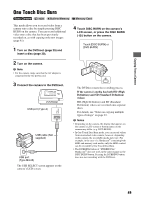
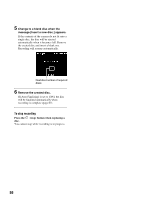
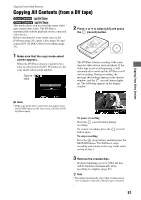
When the DVDirect waits a video signal to resume recording, the message [Waiting for input signal.] appears in the DVDirect's display window. If no video signal is detected for 2 minutes, the DVDirect stops recording. (As video devices always output video signals from their operation screen or TV screen other than playback, some video devices may not operate as above.) 3 Press the (stop) button to stop recording. 4 To record an additional video, repeat steps 2 and 3. 5 Press the Z (eject) button to eject the disc when recording is complete. 6 To finalize the disc, press V or v to select [Yes] and press the ENTER button. If you select [No] and press b, the disc will be ejected without being finalized. You can skip step 7 below. 7 Press V or v to select [OK] and press the ENTER button. When finalizing has completed, the disc tray automatically opens. Notes on copying manually from a video device • When connecting the camera to the DVDirect with a DV (i LINK) cable, a video appears in the DVDirect's display window a little behind appearing in the camera's LCD screen. When copying a video, operate the DVDirect while monitoring the DVDirect 's display window. • Start recording immediately after inserting a disc. The recording process may take a few seconds to start after pressing the (record) button if the disc was inserted more than 10 minutes prior to starting. • When you press the (stop) button, you may hear the noise of the disc turning momentarily. z Hint • To finalize a disc means to make the disc playable on other DVD devices. For details about finalizing, refer to [Auto Finalizing] or [Finalize disc] on page 67. 54
-
 1
1 -
2
-
3
-
4
-
5
-
6
-
7
-
8
-
9
-
10
-
11
-
12
-
13
-
14
-
15
-
16
-
17
-
18
-
19
-
20
-
21
-
22
-
23
-
24
-
25
-
26
-
27
-
28
-
29
-
30
-
31
-
32
-
33
-
34
-
35
-
36
-
37
-
38
-
39
-
40
-
41
-
42
-
43
-
44
-
45
-
46
-
47
-
48
-
 49
49 -
 50
50 -
 51
51 -
 52
52 -
 53
53 -
 54
54 -
 55
55 -
 56
56 -
 57
57 -
 58
58 -
 59
59 -
60
-
61
-
62
-
63
-
64
-
65
-
66
-
67
-
68
-
69
-
70
-
71
-
72
-
73
-
74
-
75
-
76
-
77
-
78
-
79
-
80
-
81
-
82
-
83
-
84
 |
 |
