Sony VRDMC10 Operating Instructions - Page 47
Copying Manually
 |
UPC - 027242735675
View all Sony VRDMC10 manuals
Add to My Manuals
Save this manual to your list of manuals |
Page 47 highlights
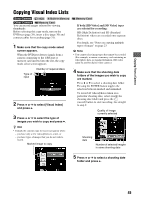
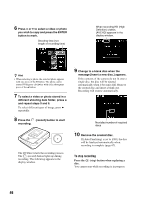
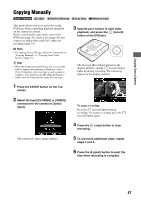
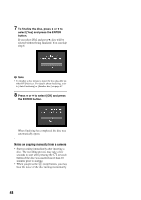
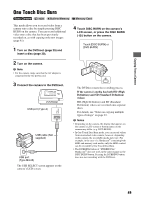
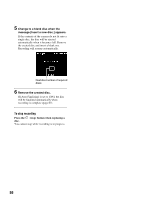
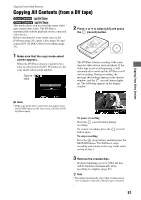
Copying From a Camera Copying Manually This mode allows you to record video on the DVDirect while controlling playback manually on the connected camera. Before selecting this copy mode, turn on the DVDirect (page 29), insert a disc (page 30) and connect an audio/video cable (AV cable) for recording (page 34). b Note • For copying from a DV tape, follow the instructions in "Copying Manually" of "Copying From Video Devices" (page 53). z Hint • When the prompt message [Format disc to record SD video?] appears after inserting a blank disc, select [Yes]. Formatting a disc may take several seconds to complete. You cannot record HD (High Definition) videos onto the formatted disc under this message. 1 Press the ENTER button on the Top screen. 2 Select the input ([S-VIDEO] or [VIDEO]) connected to the camera in [Select input]. The connected camera image appears. 3 Operate your camera to start video playback, and press the (record) button of the DVDirect. The message [Recording] appears in the display window, and the (record) button lights up during recording. The following appears in the display window. To pause recording Press the (record) button during recording. To resume recording, press the (record) button again. 4 Press the (stop) button to stop recording. 5 To record an additional video, repeat steps 3 and 4. 6 Press the Z (eject) button to eject the disc when recording is complete. 47
-
 1
1 -
2
-
3
-
4
-
5
-
6
-
7
-
8
-
9
-
10
-
11
-
12
-
13
-
14
-
15
-
16
-
17
-
18
-
19
-
20
-
21
-
22
-
23
-
24
-
25
-
26
-
27
-
28
-
29
-
30
-
31
-
32
-
33
-
34
-
35
-
36
-
37
-
38
-
39
-
40
-
41
-
 42
42 -
 43
43 -
 44
44 -
 45
45 -
 46
46 -
 47
47 -
 48
48 -
 49
49 -
 50
50 -
 51
51 -
 52
52 -
53
-
54
-
55
-
56
-
57
-
58
-
59
-
60
-
61
-
62
-
63
-
64
-
65
-
66
-
67
-
68
-
69
-
70
-
71
-
72
-
73
-
74
-
75
-
76
-
77
-
78
-
79
-
80
-
81
-
82
-
83
-
84
 |
 |