Stihl FS 360 C-EM Instruction Manual - Page 24
Mounting the Deflector, Mounting the Cutting, Attachment
 |
View all Stihl FS 360 C-EM manuals
Add to My Manuals
Save this manual to your list of manuals |
Page 24 highlights
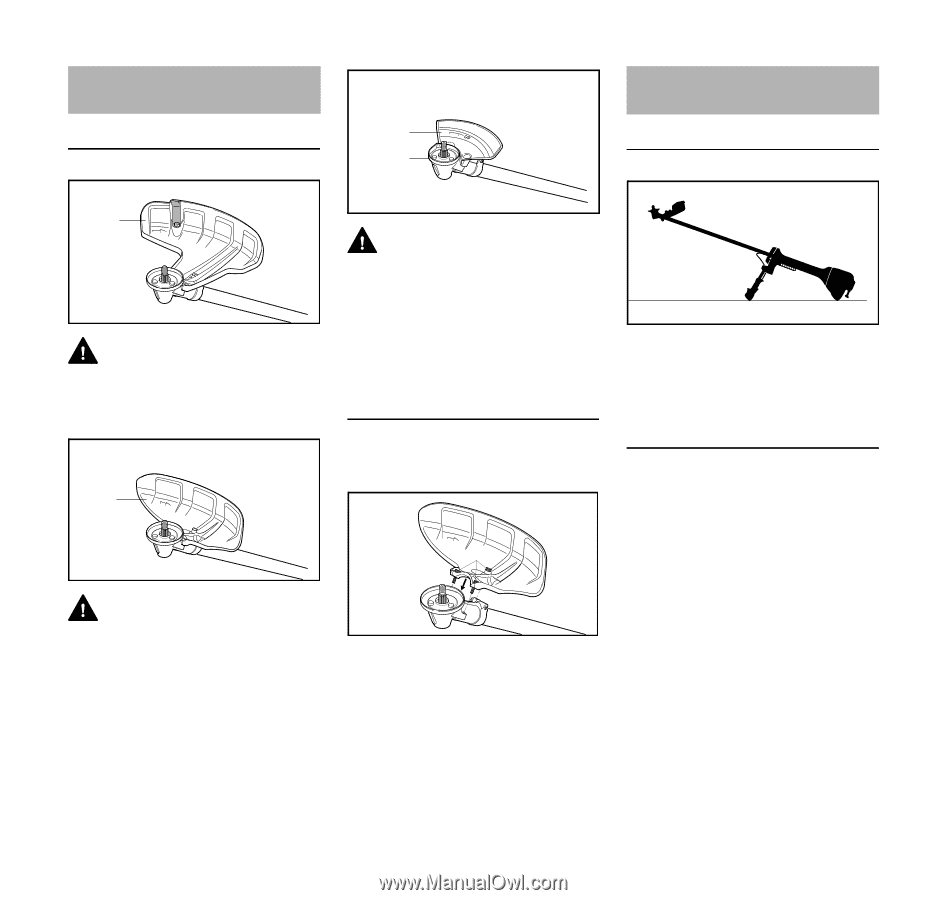
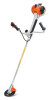
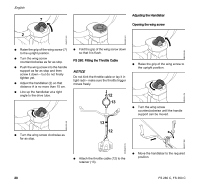
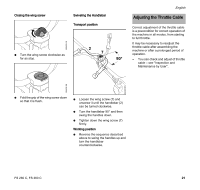
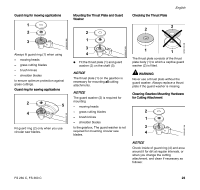
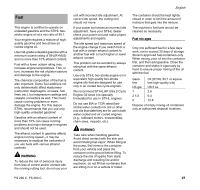
English Mounting the Deflector Use the Right Deflector 3 4 Mounting the Cutting Attachment Placing power tool on the ground 002BA433 KN 002BA406 KN 1 WARNING Deflector (1) is approved for mowing heads only and must therefore be mounted before fitting a mowing head. 2 WARNING Deflector (2) is approved for grass cutting blades and brush knives only and must therefore be mounted before fitting a grass cutting blade or brush knife. 002BA402 KN 002BA401 KN WARNING The limit stop (3) is approved as a deflector for circular saw blades only and must therefore be mounted before fitting a circular saw blade. It is also necessary to change the guard ring (5), see "Mounting the Cutting Attachment" / "Mounting Circular Saw Blades". Mounting the Deflector Deflectors (1 to 3) are mounted to the gearbox in the same way. 6 5 N Remove dirt from joints on gearbox and defelector - make sure that no dirt gets into the screw holes in the gearbox. N Place the deflector on the gearbox (5). N Insert the screws (6) and tighten them down firmly. 002BA434 KN N Shut off the engine. N Lay your power tool on its back so that the cutting attachment mounting face is pointing up. Use the Right Guard Ring Your power tool comes standard with a guard ring. The guard ring is also available as a special accessory. The guard ring must be mounted with particular care. Have this work performed by your servicing dealer. STIHL recommends a STIHL servicing dealer. 22 FS 260 C, FS 360 C
-
 1
1 -
2
-
3
-
4
-
5
-
6
-
7
-
8
-
9
-
10
-
11
-
12
-
13
-
14
-
15
-
16
-
17
-
18
-
 19
19 -
 20
20 -
 21
21 -
 22
22 -
 23
23 -
 24
24 -
 25
25 -
 26
26 -
 27
27 -
 28
28 -
 29
29 -
30
-
31
-
32
-
33
-
34
-
35
-
36
-
37
-
38
-
39
-
40
-
41
-
42
-
43
-
44
-
45
-
46
-
47
-
48
-
49
-
50
-
51
-
52
-
53
-
54
-
55
-
56
-
57
-
58
-
59
-
60
-
61
-
62
-
63
-
64
-
65
-
66
-
67
-
68
-
69
-
70
-
71
-
72
-
73
-
74
-
75
-
76
-
77
-
78
-
79
-
80
-
81
-
82
-
83
-
84
-
85
-
86
-
87
-
88
-
89
-
90
-
91
-
92
-
93
-
94
-
95
-
96
-
97
-
98
-
99
-
100
-
101
-
102
-
103
-
104
-
105
-
106
-
107
-
108
-
109
-
110
-
111
-
112
-
113
-
114
-
115
-
116
-
117
-
118
-
119
-
120
-
121
-
122
-
123
-
124
 |
 |