Stihl FS 360 C-EM Instruction Manual - Page 43
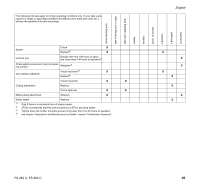
Inspection and Maintenance, by User
 |
View all Stihl FS 360 C-EM manuals
Add to My Manuals
Save this manual to your list of manuals |
Page 43 highlights
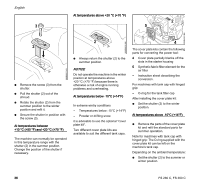
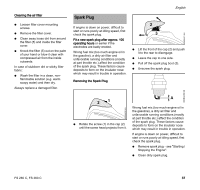
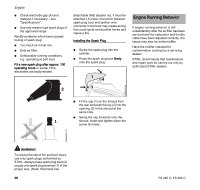
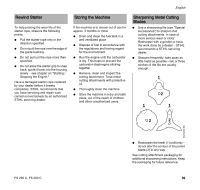
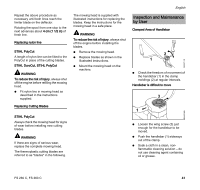
Repeat the above procedure as necessary until both lines reach the limiter blade on the deflector. Rotating the spool from one stop to the next advances about 4 cm (1 1/2 in) of fresh line. Replacing nylon line STIHL PolyCut A length of nylon line can be fitted to the PolyCut in place of the cutting blades. STIHL DuroCut, STIHL PolyCut WARNING To reduce the risk of injury, always shut off the engine before refilling the mowing head. N Fit nylon line in mowing head as described in the instructions supplied. Replacing Cutting Blades STIHL PolyCut Always check the mowing head for signs of wear before installing new cutting blades. WARNING If there are signs of serious wear, replace the complete mowing head. The thermoplastic cutting blades are referred to as "blades" in the following. The mowing head is supplied with illustrated instructions for replacing the blades. Keep the instructions for the mowing head in a safe place. WARNING To reduce the risk of injury, always shut off the engine before installing the blades. N Remove the mowing head. N Replace blades as shown in the illustrated instructions. N Mount the mowing head on the machine. English Inspection and Maintenance by User Clamped Area of Handlebar 2 1 N Check the freedom of movement of the handlebar (1) in the clamp moldings (2) at regular intervals. Handlebar is difficult to move 3 1 N Loosen the wing screw (3) just enough for the handlebar to be moved. N Push the handlebar (1) sideways out of the clamp. N Soak a cloth in a clean, nonflammable cleaning solution - do not use cleaning agent containing oil or grease. 6BA021 KN 6BA022 KN FS 260 C, FS 360 C 41
-
 1
1 -
2
-
3
-
4
-
5
-
6
-
7
-
8
-
9
-
10
-
11
-
12
-
13
-
14
-
15
-
16
-
17
-
18
-
19
-
20
-
21
-
22
-
23
-
24
-
25
-
26
-
27
-
28
-
29
-
30
-
31
-
32
-
33
-
34
-
35
-
36
-
37
-
 38
38 -
 39
39 -
 40
40 -
 41
41 -
 42
42 -
 43
43 -
 44
44 -
 45
45 -
 46
46 -
 47
47 -
 48
48 -
49
-
50
-
51
-
52
-
53
-
54
-
55
-
56
-
57
-
58
-
59
-
60
-
61
-
62
-
63
-
64
-
65
-
66
-
67
-
68
-
69
-
70
-
71
-
72
-
73
-
74
-
75
-
76
-
77
-
78
-
79
-
80
-
81
-
82
-
83
-
84
-
85
-
86
-
87
-
88
-
89
-
90
-
91
-
92
-
93
-
94
-
95
-
96
-
97
-
98
-
99
-
100
-
101
-
102
-
103
-
104
-
105
-
106
-
107
-
108
-
109
-
110
-
111
-
112
-
113
-
114
-
115
-
116
-
117
-
118
-
119
-
120
-
121
-
122
-
123
-
124
 |
 |