TP-Link TL-MR3620 TL-MR3620EU V1 User Guide - Page 63
Specify Wireless Settings, Default Gateway, Interface, System Routing Table, Basic, Wireless
 |
View all TP-Link TL-MR3620 manuals
Add to My Manuals
Save this manual to your list of manuals |
Page 63 highlights
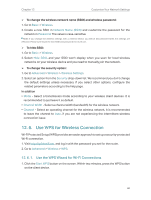
Chapter 12 Customize Your Network Settings enter 255.255.255.255; otherwise, enter the subnet mask of the corresponding network IP. In the example, the destination network is a single IP, so here enter 255.255.255.255. Default Gateway: The IP address of the gateway device to which the data packets will be sent. This IP address must be on the same subnet with the router's IP which sends out data. In the example, the data packets will be sent to the LAN port of Router B and then to the Server, so the default gateway should be 192.168.0.2. Interface: Determined by the port (WAN/LAN) that sends out data packets. In the example, the data are sent to the gateway through the LAN port of Router A, so LAN should be selected. 5. Click Save. 6. Check the System Routing Table below. If you can find the entry you've set, the static routing is set successfully. Done! Open a web browser on your PC. Enter the company server's IP address to visit the company network. 12. 5. Specify Wireless Settings The router's wireless network name (SSID) and password, and security option are preset in the factory. The preset SSID and password can be found on the label of the router. You can customize the wireless settings according to your needs. Visit http://tplinkwifi.net, and log in with the password you set for the router. ¾¾ To enable or disable the wireless function: 1. Go to Basic > Wireless. 2. The wireless radio is enabled by default. If you want to disable the wireless function of the router, just untick the Enable checkbox. In this case, all the wireless settings will be invalid. 59
-
 1
1 -
2
-
3
-
4
-
5
-
6
-
7
-
8
-
9
-
10
-
11
-
12
-
13
-
14
-
15
-
16
-
17
-
18
-
19
-
20
-
21
-
22
-
23
-
24
-
25
-
26
-
27
-
28
-
29
-
30
-
31
-
32
-
33
-
34
-
35
-
36
-
37
-
38
-
39
-
40
-
41
-
42
-
43
-
44
-
45
-
46
-
47
-
48
-
49
-
50
-
51
-
52
-
53
-
54
-
55
-
56
-
57
-
 58
58 -
 59
59 -
 60
60 -
 61
61 -
 62
62 -
 63
63 -
 64
64 -
 65
65 -
 66
66 -
 67
67 -
 68
68 -
69
-
70
-
71
-
72
-
73
-
74
-
75
-
76
-
77
-
78
-
79
-
80
-
81
-
82
-
83
-
84
-
85
-
86
-
87
-
88
-
89
-
90
-
91
-
92
-
93
 |
 |
