TP-Link TL-SC3130G User Guide - Page 10
Step 4: Go to Camera tab. If your, Step 8: Click Insert to insert the IP - ip camera
 |
UPC - 845973054014
View all TP-Link TL-SC3130G manuals
Add to My Manuals
Save this manual to your list of manuals |
Page 10 highlights
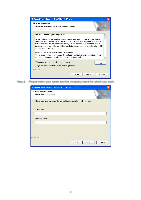
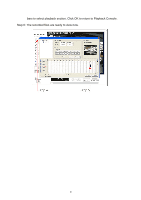
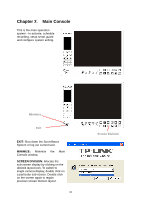
Step 4: Go to Camera tab. If your IP cameras support UPnP. Follow step 5. Otherwise, follow step 8. Step 4 Step 5: Click "Search" to search for the IP cameras that are available at this point. Note: Search function just support the IP cameras with UPnP supported. Step 5 Step 8 Step 6: Select one of the IP cameras that are available; check the option and enter the username and password. Step 7: Click OK to add the camera. Step 8: Click "Insert" to insert the IP cameras. Step 9: Enter the IP address or domain name (check the "Use DNS" option), Http Port, Username, and Password. Step 10: Click "Auto Detect" Step 11: Click OK to add the camera. Click OK to exit the Setting panel. Step 9 Step 10 Step 11 6
-
 1
1 -
2
-
3
-
4
-
 5
5 -
 6
6 -
 7
7 -
 8
8 -
 9
9 -
 10
10 -
 11
11 -
 12
12 -
 13
13 -
 14
14 -
 15
15 -
16
-
17
-
18
-
19
-
20
-
21
-
22
-
23
-
24
-
25
-
26
-
27
-
28
-
29
-
30
-
31
-
32
-
33
-
34
-
35
-
36
-
37
-
38
-
39
-
40
-
41
-
42
-
43
-
44
-
45
-
46
-
47
-
48
-
49
-
50
-
51
-
52
-
53
-
54
-
55
-
56
-
57
-
58
-
59
-
60
-
61
-
62
-
63
-
64
 |
 |

6
Step 4: Go to Camera tab. If your
IP cameras support UPnP.
Follow step 5. Otherwise,
follow step 8.
Step 5: Click “Search” to search for
the IP cameras that are
available at this point.
Note:
Search function just support the IP
cameras with UPnP supported.
Step 6: Select one of the IP cameras that
are available; check the option
and enter the username and
password.
Step 7: Click OK to add the camera.
Step 8: Click “Insert” to insert the IP
cameras.
Step 9: Enter the IP address or domain name (check the “Use DNS” option), Http
Port, Username, and Password.
Step 10:
Click “Auto Detect”
Step 11:
Click OK to add the camera.
Click OK to exit the Setting panel.
Step 9
Step 10
Step 11
Step 4
Step 5
Step 8