TP-Link TL-SC3130G User Guide - Page 11
Set Schedule, Set Smart Guard, Step 1: Go to Start > All programs > IP Surveillance > Main - default ip
 |
UPC - 845973054014
View all TP-Link TL-SC3130G manuals
Add to My Manuals
Save this manual to your list of manuals |
Page 11 highlights
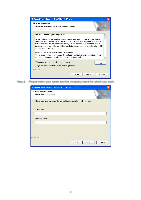
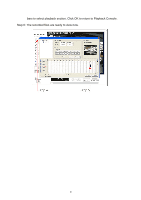
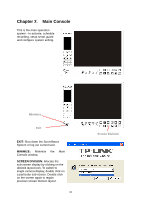
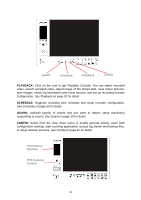
Set Schedule Step 1: Go to Start > All programs > IP Surveillance > Main Console. Step 3 Step 2: Type in user name and password and log on to the system. Step 3: In the Main Console, go to Schedule. Step 4: By default, when inserting a camera to the system, the recording schedule is automatically set to be 24 hours a day, always record. Step 5: Click Configure on the selected camera schedule or double click on any schedule bar to modify the recording mode. Step 6: When satisfied with the schedule setting, click OK to update the recording schedule. Step 7: Click OK again to go back to the Main Console. Set Smart Guard Step 1: Go to Start > All Programs > IP Surveillance > Main Console. Step 3 Step 2: Type in user name and password and log on to the system. Step 3: In the Main Console, go to Guard. Step 4: Select a camera and then click on "Insert Event." Step 5: Select General Motion as the event type, click Step 4 OK. Step 6: In the Alarm Event Configuration panel, set the detection zone as all, and then click OK to exit the panel. Step 7: Click OK to go back to the Main Console. 7
-
 1
1 -
2
-
3
-
4
-
5
-
 6
6 -
 7
7 -
 8
8 -
 9
9 -
 10
10 -
 11
11 -
 12
12 -
 13
13 -
 14
14 -
 15
15 -
 16
16 -
17
-
18
-
19
-
20
-
21
-
22
-
23
-
24
-
25
-
26
-
27
-
28
-
29
-
30
-
31
-
32
-
33
-
34
-
35
-
36
-
37
-
38
-
39
-
40
-
41
-
42
-
43
-
44
-
45
-
46
-
47
-
48
-
49
-
50
-
51
-
52
-
53
-
54
-
55
-
56
-
57
-
58
-
59
-
60
-
61
-
62
-
63
-
64
 |
 |
