TP-Link TL-SC3130G User Guide - Page 52
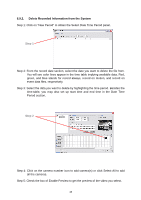
Delete Recorded Information from the System
 |
UPC - 845973054014
View all TP-Link TL-SC3130G manuals
Add to My Manuals
Save this manual to your list of manuals |
Page 52 highlights
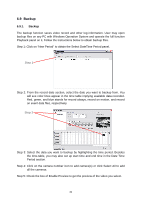
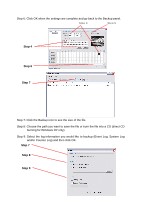
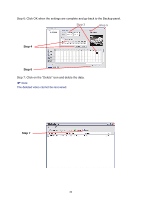
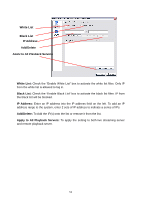
6.9.2. Delete Recorded Information from the System Step 1: Click on "New Period" to obtain the Select Date Time Period panel. Step 1 Step 2: From the record date section, select the date you want to delete the file from. You will see color lines appear in the time table implying available data. Red, green, and blue stands for record always, record on motion, and record on event data files, respectively. Step 3: Select the data you want to delete by highlighting the time period. Besides the time-table, you may also set up start time and end time in the Date Time Period section. Step 2 Step 4: Click on the camera number icon to add camera(s) or click Select All to add all the cameras. Step 5: Check the box of Enable Preview to get the preview of the video you select. 48
-
 1
1 -
2
-
3
-
4
-
5
-
6
-
7
-
8
-
9
-
10
-
11
-
12
-
13
-
14
-
15
-
16
-
17
-
18
-
19
-
20
-
21
-
22
-
23
-
24
-
25
-
26
-
27
-
28
-
29
-
30
-
31
-
32
-
33
-
34
-
35
-
36
-
37
-
38
-
39
-
40
-
41
-
42
-
43
-
44
-
45
-
46
-
 47
47 -
 48
48 -
 49
49 -
 50
50 -
 51
51 -
 52
52 -
 53
53 -
 54
54 -
 55
55 -
 56
56 -
 57
57 -
58
-
59
-
60
-
61
-
62
-
63
-
64
 |
 |
