TP-Link TL-SC3130G User Guide - Page 31
Default:, Holiday:, Custom:, Adjust the Scheduled Setting, Option 1, Time Bar, Con
 |
UPC - 845973054014
View all TP-Link TL-SC3130G manuals
Add to My Manuals
Save this manual to your list of manuals |
Page 31 highlights
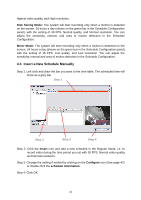
4.5.1. Default: Follow the same process to setup the schedule for every day in a week. 4.5.2. Holiday: You may assign holidays where the system will work according to the setting of Sunday. 4.5.3. Custom: You can assign a particular date(s) on which the system will work according to a special schedule(s) different from the others. 4.6 Adjust the Scheduled Setting You can manually change the setting at any time after you insert or load a period of schedule. Option 1: Move the cursor to the Time Bar and change the length or move the bar sideway to change the start and end points. Time Bar Configure Schedule Information Option 2: Click on the Configure icon or double click on schedule information on the screen (highlighted in blue) to obtain the Encoding Option panel (see page 42) and change the setting as wished. Configure: Click on the configure icon to obtain the Encoding Option panel. 27
-
 1
1 -
2
-
3
-
4
-
5
-
6
-
7
-
8
-
9
-
10
-
11
-
12
-
13
-
14
-
15
-
16
-
17
-
18
-
19
-
20
-
21
-
22
-
23
-
24
-
25
-
 26
26 -
 27
27 -
 28
28 -
 29
29 -
 30
30 -
 31
31 -
 32
32 -
 33
33 -
 34
34 -
 35
35 -
 36
36 -
37
-
38
-
39
-
40
-
41
-
42
-
43
-
44
-
45
-
46
-
47
-
48
-
49
-
50
-
51
-
52
-
53
-
54
-
55
-
56
-
57
-
58
-
59
-
60
-
61
-
62
-
63
-
64
 |
 |
