TP-Link TL-WR840N User Guide - Page 15
Connecting the Router - ip
 |
View all TP-Link TL-WR840N manuals
Add to My Manuals
Save this manual to your list of manuals |
Page 15 highlights
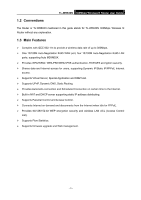
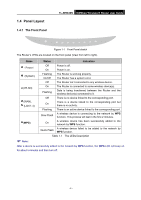
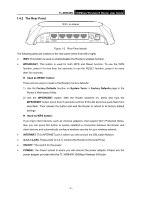
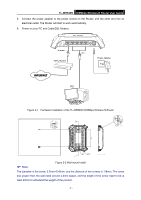
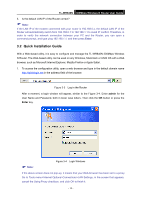
TL-WR840N 300Mbps Wireless N Router User Guide Chapter 2. Connecting the Router 2.1 System Requirements Broadband Internet Access Service (DSL/Cable/Ethernet) One DSL/Cable Modem that has an RJ45 connector (which is not necessary if the Router is connected directly to the Ethernet.) PCs with a working Ethernet Adapter and an Ethernet cable with RJ45 connectors TCP/IP protocol on each PC Web browser, such as Microsoft Internet Explorer, Mozilla Firefox or Apple Safari 2.2 Installation Environment Requirements Place the Router in a well ventilated place far from any heater or heating vent Avoid direct irradiation of any strong light (such as sunlight) Keep at least 2 inches (5 cm) of clear space around the Router Operating Temperature: 0℃~40℃ (32℉~104℉) Operating Humidity: 10%~90%RH, Non-condensing 2.3 Connecting the Router Before installing the Router, make sure your PC is connected to the Internet through the broadband service successfully. If there is any problem, please contact your ISP. After that, please install the Router according to the following steps. Don't forget to pull out the power plug and keep your hands dry. 1. Power off your PC, Cable/DSL Modem, and the Router. 2. Locate an optimum location for the Router. The best place is usually at the center of your wireless network. 3. Connect the PC(s) and each Switch/Hub in your LAN to the LAN Ports on the Router, shown in Figure 2-1. (If you have the wireless NIC and want to use the wireless function, you can skip this step.) 4. Connect the DSL/Cable Modem to the WAN port on the Router, shown in Figure 2-1. - 6 -
-
 1
1 -
2
-
3
-
4
-
5
-
6
-
7
-
8
-
9
-
 10
10 -
 11
11 -
 12
12 -
 13
13 -
 14
14 -
 15
15 -
 16
16 -
 17
17 -
 18
18 -
 19
19 -
 20
20 -
21
-
22
-
23
-
24
-
25
-
26
-
27
-
28
-
29
-
30
-
31
-
32
-
33
-
34
-
35
-
36
-
37
-
38
-
39
-
40
-
41
-
42
-
43
-
44
-
45
-
46
-
47
-
48
-
49
-
50
-
51
-
52
-
53
-
54
-
55
-
56
-
57
-
58
-
59
-
60
-
61
-
62
-
63
-
64
-
65
-
66
-
67
-
68
-
69
-
70
-
71
-
72
-
73
-
74
-
75
-
76
-
77
-
78
-
79
-
80
-
81
-
82
-
83
-
84
-
85
-
86
-
87
-
88
-
89
-
90
-
91
-
92
-
93
-
94
-
95
-
96
-
97
-
98
-
99
-
100
-
101
-
102
-
103
-
104
 |
 |