TP-Link TL-WR840N User Guide - Page 67
TL-WR840N, IP Address, Target Port, Protocol, Common Service Port, Domain Name, Schedule Description
 |
View all TP-Link TL-WR840N manuals
Add to My Manuals
Save this manual to your list of manuals |
Page 67 highlights
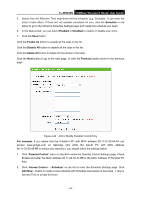
TL-WR840N 300Mbps Wireless N Router User Guide IP Address - Enter the IP address (or address range) of the target (targets) in dotted-decimal format (e.g. 192.168.0.23). Target Port - Specify the port or port range for the target. For some common service ports, you can make use of the Common Service Port item below. Protocol - Here are four options, All, TCP, UDP, and ICMP. Select one of them from the drop-down list for the target. Common Service Port - Here lists some common service ports. Select one from the drop-down list, and the corresponding port number will be filled in the Target Port field automatically. For example, if you select "FTP", "21" will be filled in the Target Port automatically. If the Domain Name is selected, you will see the following items: Domain Name - Here you can enter 4 domain names, either the full name or the keywords (for example, google). Any domain name with keywords in it (www.google.com, www.google.cn) will be blocked or allowed. 3. Click Next when finishing creating the access target entry, and the next screen will appear as shown in Figure 4-49. Figure 4-49 Quick Setup - Create an Advanced Schedule Entry Schedule Description - In this field, create a description for the schedule. Note that this description should be unique (e.g. Schedule_1). Day - Choose Select Days and select the certain day (days), or choose Everyday. Time - Select "24 hours", or specify the Start Time and Stop Time yourself. Start Time - Enter the start time in HHMM format (HHMM are 4 numbers). For example 0800 is 8:00. Stop Time - Enter the stop time in HHMM format (HHMM are 4 numbers). For example 2000 is 20:00. - 58 -
-
 1
1 -
2
-
3
-
4
-
5
-
6
-
7
-
8
-
9
-
10
-
11
-
12
-
13
-
14
-
15
-
16
-
17
-
18
-
19
-
20
-
21
-
22
-
23
-
24
-
25
-
26
-
27
-
28
-
29
-
30
-
31
-
32
-
33
-
34
-
35
-
36
-
37
-
38
-
39
-
40
-
41
-
42
-
43
-
44
-
45
-
46
-
47
-
48
-
49
-
50
-
51
-
52
-
53
-
54
-
55
-
56
-
57
-
58
-
59
-
60
-
61
-
 62
62 -
 63
63 -
 64
64 -
 65
65 -
 66
66 -
 67
67 -
 68
68 -
 69
69 -
 70
70 -
 71
71 -
 72
72 -
73
-
74
-
75
-
76
-
77
-
78
-
79
-
80
-
81
-
82
-
83
-
84
-
85
-
86
-
87
-
88
-
89
-
90
-
91
-
92
-
93
-
94
-
95
-
96
-
97
-
98
-
99
-
100
-
101
-
102
-
103
-
104
 |
 |
