TP-Link TL-WR840N User Guide - Page 38
MAC Clone
 |
View all TP-Link TL-WR840N manuals
Add to My Manuals
Save this manual to your list of manuals |
Page 38 highlights
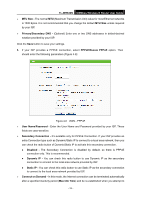
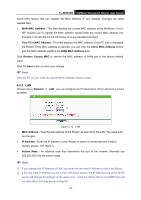
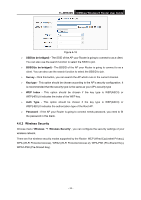
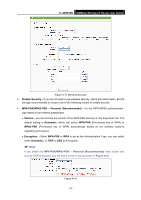
TL-WR840N 300Mbps Wireless N Router User Guide Connect Automatically - Connect automatically after the Router is disconnected. To use this option, check the radio button. Connect Manually - You can configure the Router to make it connect or disconnect manually. After a specified period of inactivity (Max Idle Time), the Router will disconnect from your Internet connection, and you will not be able to re-establish your connection automatically as soon as you attempt to access the Internet again. To use this option, click the radio button. If you want your Internet connection to remain active at all times, enter "0" in the Max Idle Time field. Otherwise, enter the number in minutes that you wish to have the Internet connecting last unless a new link is requested. Caution: Sometimes the connection cannot be disconnected although you specify a time to Max Idle Time because some applications are visiting the Internet continually in the background. Click the Save button to save your settings. Note: If you don't know how to choose the appropriate connection type, click the Detect button to allow the Router to automatically search your Internet connection for servers and protocols. The connection type will be reported when an active Internet service is successfully detected by the Router. This report is for your reference only. To make sure the connection type your ISP provides, please refer to the ISP. The various types of Internet connections that the Router can detect are as follows: PPPoE - Connections which use PPPoE that requires a user name and password. Dynamic IP - Connections which use dynamic IP address assignment. Static IP - Connections which use static IP address assignment. The Router can not detect PPTP/L2TP/BigPond connections with your ISP. If your ISP uses one of these protocols, then you must configure your connection manually. 4.5.2 MAC Clone Choose menu "Network → MAC Clone", you can configure the MAC address of the WAN on the screen below, Figure 4-12: Figure 4-12 MAC Address Clone - 29 -
-
 1
1 -
2
-
3
-
4
-
5
-
6
-
7
-
8
-
9
-
10
-
11
-
12
-
13
-
14
-
15
-
16
-
17
-
18
-
19
-
20
-
21
-
22
-
23
-
24
-
25
-
26
-
27
-
28
-
29
-
30
-
31
-
32
-
 33
33 -
 34
34 -
 35
35 -
 36
36 -
 37
37 -
 38
38 -
 39
39 -
 40
40 -
 41
41 -
 42
42 -
 43
43 -
44
-
45
-
46
-
47
-
48
-
49
-
50
-
51
-
52
-
53
-
54
-
55
-
56
-
57
-
58
-
59
-
60
-
61
-
62
-
63
-
64
-
65
-
66
-
67
-
68
-
69
-
70
-
71
-
72
-
73
-
74
-
75
-
76
-
77
-
78
-
79
-
80
-
81
-
82
-
83
-
84
-
85
-
86
-
87
-
88
-
89
-
90
-
91
-
92
-
93
-
94
-
95
-
96
-
97
-
98
-
99
-
100
-
101
-
102
-
103
-
104
 |
 |
