TRENDnet AC1750 User's Guide
TRENDnet AC1750 Manual
 |
View all TRENDnet AC1750 manuals
Add to My Manuals
Save this manual to your list of manuals |
TRENDnet AC1750 manual content summary:
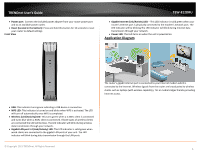
- TRENDnet AC1750 | User's Guide - Page 1
TRENDnet User's Guide Cover Page - TRENDnet AC1750 | User's Guide - Page 2
Wireless MAC Filters ...26 Advanced Router Setup 27 Access your router management page 27 Using the Configuration Menu 27 Change your router login password 28 Change your router device name 28 Manually configure your Internet connection 28 Clone a MAC address 28 Change your router IP address - TRENDnet AC1750 | User's Guide - Page 3
Connect to a Scanner 49 Router Maintenance & Monitoring 50 Reset your router to factory defaults 50 Router Default Settings 50 Backup and restore your router configuration settings 50 Reboot your router ...51 Upgrade your router firmware 52 Remotely check router status 52 View your router log - TRENDnet AC1750 | User's Guide - Page 4
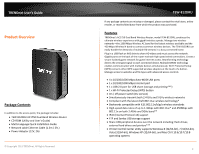
to the access point, the package includes: • TEW-812DRU AC1750 Dual Band Wireless Router • CD-ROM (Utility and User's Guide) • Multi-Language Quick Installation Guide • Network cable Ethernet Cable (1.5m / 5ft.) • Power Adapter (12V, 2A) © Copyright 2013 TRENDnet. All Rights Reserved. TEW-812DRU If - TRENDnet AC1750 | User's Guide - Page 5
TRENDnet User's Guide • Compatible with most popular cable / DSL Internet Service Providers using Dynamic / Static IP, PPPoE, L2TP, and PPTP connection • Firewall protection with Network Address Translation (NAT) • Wireless Distribution System (WDS) support for wireless network bridging • Advance - TRENDnet AC1750 | User's Guide - Page 6
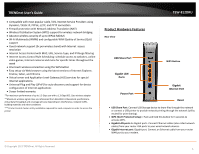
TRENDnet User's Guide • Power port: Connect the included power adapter from your router power port and to an available power outlet. • Reset (located in the bottom): Press and hold this button for 10 seconds to reset your router to default settings Front View TEW-812DRU • Gigabit Internet (Link/ - TRENDnet AC1750 | User's Guide - Page 7
router, you will need an additional switch to add more wired connections. How to set up a home network 1. For a network that includes Internet access, you'll need: • Computers/devices with an Ethernet port (also called network port) or wireless networking capabilities. • A modem and Internet service - TRENDnet AC1750 | User's Guide - Page 8
to this User's Guide, you can find help below: • http://www.trendnet.com/support (documents, downloads, and FAQs are available from this Web page) TEW-812DRU Router Installation Before you Install Many Internet Service Providers (ISPs) allow your router to connect to the Internet without verifying - TRENDnet AC1750 | User's Guide - Page 9
(Dynamic IP or Static IP) User Name: _________ Password Verify Password IP Address e.g. 215.24.24.129) © Copyright 2013 TRENDnet. All Rights Reserved. Hardware Installation TEW-812DRU 1. Verify that you have an Internet connection when connecting your computer directly to your modem. 2. Turn - TRENDnet AC1750 | User's Guide - Page 10
TRENDnet User's Guide 6. Plug in the power adapter, connect it to the router's power port, and then push the On/Off Power Switch to the "On" position (pushed in). 7. Turn on your modem. TEW-812DRU 2. Enter the default user name and password and then click Login. Default User Name: admin Default - TRENDnet AC1750 | User's Guide - Page 11
TRENDnet User's Guide 4. Click "Launch Internet Connection Setup Wizard" to setup your Internet connection on the router. TEW-812DRU 7. Verify if your settings are correct and click Apply to complete the Internet Setup Wizard. 8. Click OK to apply your settings. 5. Click Next to begin the wizard - TRENDnet AC1750 | User's Guide - Page 12
TRENDnet User's Guide 2. Click "Launch Wireless Security Setup Wizard". TEW-812DRU 3. Select which wireless network you would like to configure and click Next to begin. 6. Enter the password or encryption key assigned to your wireless network. Click Next to continue. 7. Verify your wireless - TRENDnet AC1750 | User's Guide - Page 13
(also called TCP/IP settings) are configured to obtain IP address settings automatically (also called dynamic IP address or DHCP) and to Obtain DNS Server address settings automatically. Gigabit LAN Ports © Copyright 2013 TRENDnet. All Rights Reserved. TEW-812DRU Wireless Networking and Security - TRENDnet AC1750 | User's Guide - Page 14
WPA2 encryption, then set your router to either WPA or WPA-Auto encryption. Note: Check the specifications of your wireless network adapters and wireless appliances to verify the highest level of encryption supported. TEW-812DRU Below is brief comparison chart of the wireless security types and - TRENDnet AC1750 | User's Guide - Page 15
network" on page 13), you can set up wireless security. 1. Log into your router management page (see "Access your router management page" on page 26). TEW-812DRU Selecting WEP: If selecting WEP (Wired Equivalent Privacy), please review the WEP settings to configure and click Apply to save the - TRENDnet AC1750 | User's Guide - Page 16
2013 TRENDnet. All Rights Reserved. TEW-812DRU Connect wireless devices to your router A variety of wireless network devices can connect to your wireless network such as: • Gaming Consoles • Internet enabled TVs • Network media players • Smart Phones • Wireless Laptop computers • Wireless IP - TRENDnet AC1750 | User's Guide - Page 17
on the wireless device (consult wireless device's User's Guide for length of time), you are TEW-812DRU connecting, then in your router management page under WPS action click on the Add Enrollee button. PIN (Personal Identification Number) Wireless >WiFi Protected Setup If your wireless device has - TRENDnet AC1750 | User's Guide - Page 18
support 802.11b will not be able to connect to a wireless network that is set to 802.11g only mode. • Wireless Name (SSID): This acronym stands for Service Set Identifier and is the name of your wireless network. It differentiates your wireless network from others around you. By default, the router - TRENDnet AC1750 | User's Guide - Page 19
how to setup your wireless network on the 2.4GHz wireless band and available management options. Multiple SSID feature has to be used to configure your wireless guest network. 1. Log into your router management page (see "Access your router management page" on page 26). TEW-812DRU o Guest: Select - TRENDnet AC1750 | User's Guide - Page 20
. By default, the router wireless name is unique to the device. If you choose to change the SSID, change it to a name that you can easily remember. TEW-812DRU • Frequency (Channel): To manually set the channel on which the router will broadcast, uncheck Auto Channel, then click the drop-down list - TRENDnet AC1750 | User's Guide - Page 21
into the access point to establish the WDS or bridge connection. This wireless router supports up to 4 WDS connections. 4. Log into your access point and enter the MAC address of your router. Please see the access point's user manual for more information on how to configure WDS mode. 5. To save - TRENDnet AC1750 | User's Guide - Page 22
into the access point to establish the WDS or bridge connection. This wireless router supports up to 4 WDS connections. 4. Log into your access point and enter the MAC address of your router. Please see the access point's user manual for more information on how to configure WDS mode. 5. To save - TRENDnet AC1750 | User's Guide - Page 23
TRENDnet User's Guide Default Value: 100 milliseconds (range: 25-1000) • DTIM: A DTIM is a countdown informing clients of the next window for listening to broadcast and multicast messages. When the wireless router has buffered broadcast or multicast messages for associated clients, it sends the next - TRENDnet AC1750 | User's Guide - Page 24
Internet. 1. Log into your router management page (see "Access your router management page" on page 26). 2. Click on Advance, click on Access Control. 3. Select Enable to enable LAN Client Filter Function. TEW-812DRU 4. Review the settings under LAN Client Filter Rules section • IP Range - Enter - TRENDnet AC1750 | User's Guide - Page 25
network. 1. Log into your router management page (see "Access your router management page" on page 26). 2. Click on Advanced, click on Filter. 4. Review the settings under LAN Client Filter Rules section. Click Apply to save settings. • IP Range - Enter the IP address or IP address range to apply - TRENDnet AC1750 | User's Guide - Page 26
computers and other devices from using this router's wireless network. 1. Log into your router management page (see "Access your router management page" on page 26). 2. Click on Wireless, click on Security. TEW-812DRU is easier to determine the MAC addresses of devices in your network then to - TRENDnet AC1750 | User's Guide - Page 27
Enter the default user name and password and then click Login. Default User Name: admin Default Password: admin Using the Configuration Menu Whenever you want to configure your TEW-812DRU you can access the Configuration Menu by opening the Web-browser and typing in the IP Address of the TEW-812DRU - TRENDnet AC1750 | User's Guide - Page 28
TRENDnet. All Rights Reserved. TEW-812DRU 3. Under the Device Name Settings section, in the Device Name field, enter the new device name to show up on your network as reference to the router. 4. To save changes, click Apply. Manually configure your Internet connection Network > WAN Setting 1. Log - TRENDnet AC1750 | User's Guide - Page 29
on this procedure, refer to your modem's User Guide/Manual or contact your ISP. 1. Log into your router management page (see "Access your router management page" on page 26). TEW-812DRU 4. To save changes, click Apply. Change your router IP address Network > LAN Setting In most cases, you do not - TRENDnet AC1750 | User's Guide - Page 30
TRENDnet User's Guide TEW-812DRU 3. In LAN Interface Setting section enter the Internal Network section review the below settings to apply. • IP Address: Enter the new router IP address. (e.g. 192.168.200.1) • Subnet Mask: Enter the new router subnet mask. (e.g. 255.255.255.0) Note: The DHCP - TRENDnet AC1750 | User's Guide - Page 31
TRENDnet User's Guide Set up DHCP reservation Network > LAN Setting DHCP (Dynamic Host Configuration Protocol) reservation (also called Static DHCP) allows your router to assign a fixed IP address from the DHCP server IP address range to a specific device on your network. Assigning a fixed IP - TRENDnet AC1750 | User's Guide - Page 32
TRENDnet User's Guide 2. Click on Network, and click on IPv6 Setting. 3. In WAN IPv6 Setting section, enter your IPv6 settings provided by your ISP (Internet Service Provider) to configure your router's IPv6 WAN settings. Click Apply to save settings. TEW-812DRU o 6to4 + Native IPv6: Supports 6to4 - TRENDnet AC1750 | User's Guide - Page 33
on Administrator, and click on Time. TEW-812DRU 1. Log into your router management page (see "Access your router management page" on page 26). 2. Click on Network, and click on QoS. 3. Review the QoS settings. 3. Review the Schedule settings. Click Apply to save settings. • Rule Name: Enter a name - TRENDnet AC1750 | User's Guide - Page 34
(Internet Service Provider). 6. Review the QoS Rule settings. • IP/MAC Address Filter: Select from the pull down menu the IP address or MAC you would like to apply and enter the IP address of MAC address. • Protocol Filter: Select the protocol you would like to apply on the QoS Rule. • Port Filter - TRENDnet AC1750 | User's Guide - Page 35
establishing a DMZ link) has a static IP address. Signing up for a Dynamic DNS service (outlined in Identify Your Network section pg.39) will provide identification of the router's network from the Internet. 2. Log into your router management page (see "Access your router management page" on page 26 - TRENDnet AC1750 | User's Guide - Page 36
IP address, to be able to access the Virtual Server port(s) from the Internet it is recommended to setup Dynamic DNS service (outlined in Identify Your Network section pg.39). 1. Log into your router management page (see "Access your router management page" on page 26). © Copyright 2013 TRENDnet - TRENDnet AC1750 | User's Guide - Page 37
2. Access TRENDnet IP Camera management page and forward Port 80 (see product documentation) 3. Make sure to configure your network/IP camera to use a static IP address. Note: You may need to reference your camera documentation on configuring a static IP address. 4. Log into your router management - TRENDnet AC1750 | User's Guide - Page 38
IP address, to be able to access the Virtual Server port(s) from the Internet it is recommended to setup Dynamic DNS service (see "Identify your network over the Internet" section on page 39). 1. Log into your router management page (see "Access your router management page" on page 26). TEW-812DRU - TRENDnet AC1750 | User's Guide - Page 39
you have some general networking knowledge. 1. Log into your router management page (see "Access your router management page" on page 26). TEW-812DRU 3. Review the WAN Static Routes section. Click Apply to save settings. • IP Address: Enter the IP network address of the destination network for the - TRENDnet AC1750 | User's Guide - Page 40
needed. 1. Log into your router management page (see "Access your router management page" on page 26). 2. Click on Advanced, and click on Advanced Network. TEW-812DRU Note: It is recommended to leave this setting enabled, otherwise, you may encounter issues with applications that utilize UPnP in - TRENDnet AC1750 | User's Guide - Page 41
TRENDnet User's Guide TEW-812DRU 4. Review the DDNS Settings section. Click Apply to save settings. • Dynamic DNS Provider: Select your DDNS service. • Host Name: Personal URL provided to you by your Dynamic DNS service provider (e.g. www.trendnet.dyndns.biz) • User Name: The user name needed to - TRENDnet AC1750 | User's Guide - Page 42
TRENDnet User's Guide • User Name: Enter the user name to be used to access your files. • Password: Enter the password for the user name. TEW-812DRU 5. Review the User Account List section. Click Apply to save settings • User Name: Enter the user name to be used to access your files. • Password: - TRENDnet AC1750 | User's Guide - Page 43
For remote troubleshooting purposes, you may want to check your routers status in a remote location. 1. Log into your router management page (see "Access your router management page" on page 26). 2. Click on Administrator, and click on Management. TEW-812DRU Note: If you have configured port 8080 - TRENDnet AC1750 | User's Guide - Page 44
TRENDnet User's Guide 3. Follow the installation instructions and click Finish when prompted. Make sure to click Launch TRENDnet USB Control Center Utility to run the utility. TEW-812DRU 2. Open the CD contents and locate the "TRENDnet USB Control Center Utility Installer" (.dmg) file. Double-click - TRENDnet AC1750 | User's Guide - Page 45
will see the model name and IP address of your print server listed. When USB devices are connected, they will be listed under the model name and IP address of the print server. 7. Run the TRENDnet USB Control Center Utility. The utility will automatically find your router and USB printer. Launching - TRENDnet AC1750 | User's Guide - Page 46
the software/driver version and support contact information. © Copyright 2013 TRENDnet. All Rights Reserved. Windows OS MAC OS X To verify if you are connected to the USB device, a message will appear next to the USB device displaying a message that the USB device is "Manually connected by - TRENDnet AC1750 | User's Guide - Page 47
to it. To verify if another computer is connected to the device, a message will appear next to the USB device displaying a message that the USB device is "Manually connected by ". Windows OS MAC OS X TEW-812DRU If a USB device is currently being used by another computer - TRENDnet AC1750 | User's Guide - Page 48
TRENDnet User's Guide TEW-812DRU MAC OS X To send t a request to connect to a USB device, click the Request to Connect button. The local computer sending the request will show the status message below. If the remote computer accepts the request, the local computer will display - TRENDnet AC1750 | User's Guide - Page 49
TRENDnet User's Guide Once the printer drivers are installed properly on your computer, 1. Select the printer listed in the utility. TEW-812DRU 2. Click Connect to connect your computer to the printer. 3. Once your computer is connected, you can send print jobs to the printer. 4. After you have - TRENDnet AC1750 | User's Guide - Page 50
(see "Access your router management page" on page 26). 3. Under Load Factory Default, click Load Default. When prompted to confirm this action, click OK. Router Default Settings Administrator User Name Administrator Password Router IP Address Router Subnet Mask DHCP Server IP Range Wireless 2.4GHz - TRENDnet AC1750 | User's Guide - Page 51
to the web browser settings default download folder. (Default Filename: .cfg) To restore your router configuration: 1. Log into your router management page (see "Access your router management page" on page 26). TEW-812DRU 3. Under Import Settings, next to Settings file location, depending on - TRENDnet AC1750 | User's Guide - Page 52
the firmware using a wireless connection, only using a wired network connection. © Copyright 2013 TRENDnet. All Rights Reserved. TEW-812DRU • Any interruptions during the firmware upgrade process may permanently damage your router. 1. Log into your router management page (see "Access your router - TRENDnet AC1750 | User's Guide - Page 53
Administrator > Status You may want to check the system information of your router such as WAN (Internet) connectivity, wireless and wired network settings, router MAC address, and firmware version. 1. Log into your router management page (see "Access your router management page" on page 26). 53 - TRENDnet AC1750 | User's Guide - Page 54
without a restart/power cycle (hard or soft reboot) or reset. Internet Configurations TEW-812DRU • Connected Type: The WAN connection type applied on your router. • IP Address - The current IP address assigned to your router WAN port or interface configuration. • Subnet Mask - The current subnet - TRENDnet AC1750 | User's Guide - Page 55
TRENDnet User's Guide 2.4GHz Wireless LAN • MAC Address: The MAC address of your router's wireless LAN or interface configuration. • Channel - Displays the current wireless channel your router is operating. • Network Name (SSID)/ Security Mode: Displays the current wireless network name assigned to - TRENDnet AC1750 | User's Guide - Page 56
TRENDnet User's Guide 2.4GHz Wireless Station List Wireless > Station List You can view the list of active 2.4GHz wireless devices currently connected to your router. 1. Log into your router management page (see "Access your router management page" on page 26). TEW-812DRU 5GHz Wireless Station List - TRENDnet AC1750 | User's Guide - Page 57
26). TEW-812DRU IPv6 Status Administrator > IPv6 Status You can view the current IPv6 status on your router. 1. Log into your router management page (see "Access your router management page" on page 26). 2. Click on Wireless, and click on Station List • Rule no. The QoS rule number. • Address Type - TRENDnet AC1750 | User's Guide - Page 58
TRENDnet User's Guide Management Page Structure Network • Internet Wizard • Wireless Wizard Network • WAN Setting o Clone MAC Address • LAN Setting o DHCP Reservation • IPV6 Setting • QoS • DHCP Client List Wireless 2.4GHz • Basic o WDS • Advanced • Security o MAC Filter • Guest Network • WPS • - TRENDnet AC1750 | User's Guide - Page 59
, upgrade firmware, backup / restore configuration via web browser, internal system log, ping test tool Supported Internet Explorer 6.0 or above, Firefox 2.0 or above, Chrome, Opera, © Copyright 2013 TRENDnet. All Rights Reserved. TEW-812DRU Web Browser LED Indicator Power Adapter Power - TRENDnet AC1750 | User's Guide - Page 60
and other conditions. TEW-812DRU Troubleshooting Q: I typed http://192.168.10.1 in my Internet Browser Address Bar, but an error message says "The page cannot be displayed." How can I access the router management page? Answer: 1. Check your hardware settings again. See "Router Installation" on page - TRENDnet AC1750 | User's Guide - Page 61
TRENDnet(model_number). 4. To verify whether or not wireless is enabled, login to the router management page, click on Wireless. 5. Please see "Steps to improve wireless connectivity" on page 22 if you continue to have wireless connectivity problems. TEW-812DRU Appendix How to find your IP address - TRENDnet AC1750 | User's Guide - Page 62
the Control Panel, click Network and Sharing Center. b. Click Change Adapter Settings, right-click the Local Area Connection icon. c. Then click Properties and click Internet Protocol Version 4 (TCP/IPv4). d. Then click Obtain an IP address automatically and click OK. Windows Vista a. Go into the - TRENDnet AC1750 | User's Guide - Page 63
TRENDnet User's Guide How to connect to a wireless network using the built-in Windows utility? Note: Please note that although the following procedures provided to follow for your operating system on configuring your network settings can be used as general guidelines, however, it is strongly - TRENDnet AC1750 | User's Guide - Page 64
wireless services. This device may not be used for setting up outdoor radio links in France and in some areas the RF output power may be limited to 10 mW EIRP in the frequency range of © Copyright 2013 TRENDnet. All Rights Reserved. TEW-812DRU 2454 - 2483.5 MHz. For detailed information the end-user - TRENDnet AC1750 | User's Guide - Page 65
TRENDnet User's Guide Limited Warranty TRENDnet warrants its products against defects in material and workmanship, under normal use and service, for the following lengths of time from the date of purchase. TEW-812DRU - 3 Years Warranty AC/DC Power Adapter, Cooling Fan, and Power Supply carry 1 year - TRENDnet AC1750 | User's Guide - Page 66
-
 1
1 -
 2
2 -
 3
3 -
 4
4 -
 5
5 -
 6
6 -
 7
7 -
8
-
9
-
10
-
11
-
12
-
13
-
14
-
15
-
16
-
17
-
18
-
19
-
20
-
21
-
22
-
23
-
24
-
25
-
26
-
27
-
28
-
29
-
30
-
31
-
32
-
33
-
34
-
35
-
36
-
37
-
38
-
39
-
40
-
41
-
42
-
43
-
44
-
45
-
46
-
47
-
48
-
49
-
50
-
51
-
52
-
53
-
54
-
55
-
56
-
57
-
58
-
59
-
60
-
61
-
62
-
63
-
64
-
65
-
66
 |
 |

TRENDnet User’s Guide
Cover Page