TRENDnet AC1750 User's Guide - Page 39
Add static routes to your router, Schedule, Enabled, Advanced, Routing, WAN Static Routes, Apply
 |
View all TRENDnet AC1750 manuals
Add to My Manuals
Save this manual to your list of manuals |
Page 39 highlights
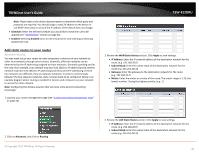
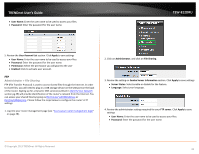
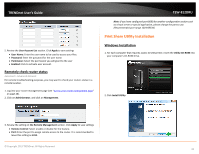
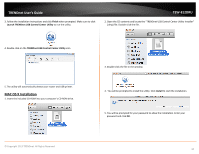
TRENDnet User's Guide Note: Please refer to the device documentation to determine which ports and protocols are required. You should assign a static IP address to the device or use DHCP reservation to ensure the IP address of the device does not change. • Schedule: Select the defined schedule you would like to have the rule to be applied (see "Set Schedule" section on page 32). • Enabled: Selecting Enabled turns on the virtual server and selecting unchecking disables the rule. Add static routes to your router Advanced > Routing You may want set up your router to route computers or devices on your network to other local networks through other routers. Generally, different networks can be determined by the IP addressing assigned to those networks. Generally speaking and for the case of an example, your network may have 192.168.10.x IP addressing and another network may have 192.168.20.x IP addressing and because the IP addressing of these two networks are different, they are separate networks. In order to communicate between the two separate networks, static routing needs to be configured. Below is an example diagram where routing is needed for devices and computers on your network to access the other network. Note: Configuring this feature assumes that you have some general networking knowledge. 1. Log into your router management page (see "Access your router management page" on page 26). TEW-812DRU 3. Review the WAN Static Routes section. Click Apply to save settings. • IP Address: Enter the IP network address of the destination network for the route. (e.g. 192.168.20.0) • Subnet Mask: Enter the subnet mask of the destination network for the route.(e.g. 255.255.255.0) • Gateway: Enter the gateway to the destination network for the route. (e.g. 192.168.10.2) • Metric: Enter the metric or priority of the route. The metric range is 1-15, the lowest number 1 being the highest priority. (e.g. 1 ) 2. Click on Advanced, and click on Routing. © Copyright 2013 TRENDnet. All Rights Reserved. 4. Review the LAN Static Routes section. Click Apply to save settings. • IP Address: Enter the IP network address of the destination network for the route. (e.g. 192.168.20.0) • Subnet Mask: Enter the subnet mask of the destination network for the route.(e.g. 255.255.255.0) 39
-
 1
1 -
2
-
3
-
4
-
5
-
6
-
7
-
8
-
9
-
10
-
11
-
12
-
13
-
14
-
15
-
16
-
17
-
18
-
19
-
20
-
21
-
22
-
23
-
24
-
25
-
26
-
27
-
28
-
29
-
30
-
31
-
32
-
33
-
 34
34 -
 35
35 -
 36
36 -
 37
37 -
 38
38 -
 39
39 -
 40
40 -
 41
41 -
 42
42 -
 43
43 -
 44
44 -
45
-
46
-
47
-
48
-
49
-
50
-
51
-
52
-
53
-
54
-
55
-
56
-
57
-
58
-
59
-
60
-
61
-
62
-
63
-
64
-
65
-
66
 |
 |
