TRENDnet AC1750 User's Guide - Page 41
Share Files, Samba - usb
 |
View all TRENDnet AC1750 manuals
Add to My Manuals
Save this manual to your list of manuals |
Page 41 highlights
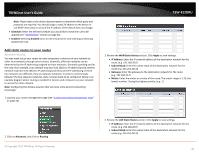
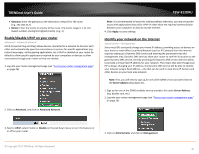
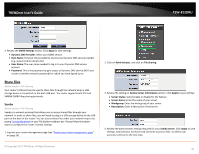
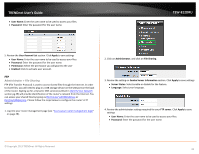
TRENDnet User's Guide TEW-812DRU 4. Review the DDNS Settings section. Click Apply to save settings. • Dynamic DNS Provider: Select your DDNS service. • Host Name: Personal URL provided to you by your Dynamic DNS service provider (e.g. www.trendnet.dyndns.biz) • User Name: The user name needed to log in to your Dynamic DNS service account • Password: This is the password to gain access to Dynamic DNS service (NOT your router or wireless network password) for which you have signed up to. Share Files Administrator > File Sharing Your router's USB port can be used to share files through the network when a USB storage device is connected on the back USB port. The router supports both FTP and SAMBA (SMB) filing sharing protocols. Samba Administrator > File Sharing Samba is a network protocol that allows you to access shared files through your network. In order to share files, you will need to plug in a USB storage device on the USB port on the back of the router. You can access these files under your network map or by typing \\routerIPaddress on your File Explorer address bar. Please follow the below steps to configure the router's Samba settings 1. Log into your router management page (see "Access your router management page" on page 26). 2. Click on Administrator, and click on File Sharing. 3. Review the setting on Samba Server Information section. Click Apply to save settings • Server Status: Select enable or disable for the feature. • Server Name: Enter the name of your server. • Workgroup: Enter the work group of your server. • Description: Enter a description of the server. 4. Review the administrator settings required for your Samba server. Click Apply to save settings. Administrator will have read and write access to files. To define user accounts continue to the next step. © Copyright 2013 TRENDnet. All Rights Reserved. 41
-
 1
1 -
2
-
3
-
4
-
5
-
6
-
7
-
8
-
9
-
10
-
11
-
12
-
13
-
14
-
15
-
16
-
17
-
18
-
19
-
20
-
21
-
22
-
23
-
24
-
25
-
26
-
27
-
28
-
29
-
30
-
31
-
32
-
33
-
34
-
35
-
 36
36 -
 37
37 -
 38
38 -
 39
39 -
 40
40 -
 41
41 -
 42
42 -
 43
43 -
 44
44 -
 45
45 -
 46
46 -
47
-
48
-
49
-
50
-
51
-
52
-
53
-
54
-
55
-
56
-
57
-
58
-
59
-
60
-
61
-
62
-
63
-
64
-
65
-
66
 |
 |
