TRENDnet AC1750 User's Guide - Page 40
Enable/disable UPnP on your router, Identify your network on the Internet, Server Address - range issues
 |
View all TRENDnet AC1750 manuals
Add to My Manuals
Save this manual to your list of manuals |
Page 40 highlights
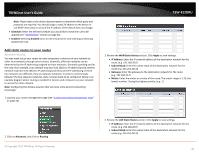
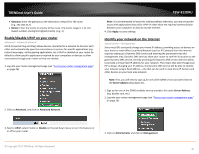
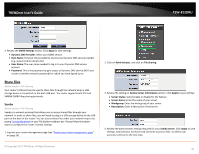
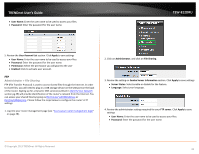
TRENDnet User's Guide • Gateway: Enter the gateway to the destination network for the route. (e.g. 192.168.10.2) • Metric: Enter the metric or priority of the route. The metric range is 1-15, the lowest number 1 being the highest priority. (e.g. 1 ) Enable/disable UPnP on your router Advanced > Advanced Network UPnP (Universal Plug and Play) allows devices connected to a network to discover each other and automatically open the connections or services for specific applications (e.g. instant messenger, online gaming applications, etc.) UPnP is enabled on your router by default to allow specific applications required by your computers or devices to allow connections through your router as they are needed. 1. Log into your router management page (see "Access your router management page" on page 26). 2. Click on Advanced, and click on Advanced Network. TEW-812DRU Note: It is recommended to leave this setting enabled, otherwise, you may encounter issues with applications that utilize UPnP in order allow the required communication between your computers or devices and the Internet. 4. Click Apply, to save settings. Identify your network on the Internet Administrator > Management Since most ISPs constantly change your home IP address, providing access to devices on your home or small office Local Area Network (such as IP Cameras) from the Internet requires setting up a Dynamic DNS service and entering the parameters into this management area. Dynamic DNS services allow your router to confirm its location to the given Dynamic DNS service, thereby providing the Dynamic DNS service with the ability to provide a virtual fixed IP address for your network. This means that even though your ISP is always changing your IP address, the Dynamic DNS service will be able to identify your network using a fixed address-one that can be used to view home IP Camera and other devices on your local area network. Note: First, you will need to sign up for one of the DDNS service providers listed in the Server Address drop-down list. 1. Sign up for one of the DDNS available service providers list under Server Address. (e.g. dyndns.com, etc.) 2. Log into your router management page (see "Access your router management page" on page 26). 3. Next to UPnP, select Enable or Disable on the pull down menu to turn the feature on or off on your router. 3. Click on Administrator and click on Management. © Copyright 2013 TRENDnet. All Rights Reserved. 40
-
 1
1 -
2
-
3
-
4
-
5
-
6
-
7
-
8
-
9
-
10
-
11
-
12
-
13
-
14
-
15
-
16
-
17
-
18
-
19
-
20
-
21
-
22
-
23
-
24
-
25
-
26
-
27
-
28
-
29
-
30
-
31
-
32
-
33
-
34
-
 35
35 -
 36
36 -
 37
37 -
 38
38 -
 39
39 -
 40
40 -
 41
41 -
 42
42 -
 43
43 -
 44
44 -
 45
45 -
46
-
47
-
48
-
49
-
50
-
51
-
52
-
53
-
54
-
55
-
56
-
57
-
58
-
59
-
60
-
61
-
62
-
63
-
64
-
65
-
66
 |
 |
