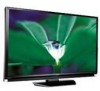
Toshiba 52XF550U Owner's Manual - English - Page 37
Setting the Auto Input feature - 52
 |
UPC - 022265001264
View all Toshiba 52XF550U manuals
Add to My Manuals
Save this manual to your list of manuals |
Page 37 highlights
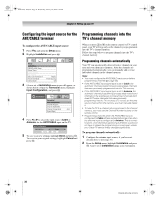
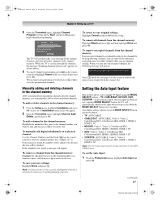
40XF550U_EN.book Page 37 Wednesday, January 30, 2008 3:55 PM Chapter 5: Setting up your TV 3 Open the Terrestrial menu, highlight Channel Program to bring up the Start, and press T again to begin channel programming. ANT/CABLE Cable Scanning channels, please wait ... 5% Number of Channels Found - 52 Scanning Analog Channels Found Channel - 55 Cancel The TV will automatically cycle through all the antenna channels, and store all active channels in the channel memory. While the TV is cycling through the channels, the message "Scanning channels, please wait" appears (as shown above). 4 To cancel channel programming, press O on the remote control (or highlight Cancel in the on-screen display and press T). When channel programming is finished, press < or , to view the programmed channels. Manually adding and deleting channels in the channel memory After automatically programming channels into the channel memory, you can manually add or delete individual channels. To add or delete channels in the channel memory: 1 From the Setup menu, highlight Installation and press T. A new set of Installation menu icons will appear. 2 Open the Terrestrial menu, highlight Channel Add/ Delete, and then press T. To add a channel to the channel memory: Highlight the unchecked box next to the channel number you want to add, and then press T to check the box. To manually add digital subchannels on a physical channel: Use the Channel Numbers and the Dash (=) on the remote control to enter the channel number (for example, 56-1). If the channel is found, the number will be added to the list and the box will be checked. If the channel is not found, a message will appear. To remove a channel from the channel memory: Highlight the checked box next to the channel number you want to remove, and then press T to uncheck the box. To save your new settings: Highlight Done and press T. Note: A video preview of the currently highlighted channel is provided to assist you in adding/deleting channels. To revert to your original settings: Highlight Cancel and press T before saving. To remove all channels from the channel memory: Highlight Reset and press T, and then highlight Done and press T. To remove encrypted channels from the channel memory: If an encrypted channel is accidentally added to the channel list by programming channels, you can remove the unwanted encrypted (non-viewable) channel while you are channel surfing. When you tune into an encrypted channel, the following message will appear. Digital Channel Is Encrypted - Press 1 on remote to remove channel Press 1 while the message is on the screen to remove the unnecessary channel from the channel list. Setting the Auto Input feature This feature allows you to change TV inputs using the MODE SELECT buttons-TV, CABLE/SAT, HD DVD, DVD, VCR/PVR-on the remote control. Once an input has been set for a specific MODE SELECT button, the TV will automatically switch to the input when you press and hold the MODE SELECT button for 2 seconds. Auto Input settings options for each MODE SELECT button are shown below. • TV: ANT/CABLE • CABLE/SAT: ANT/CABLE, Video 1, Video 2, ColorStream HD1, ColorStream HD2, HDMI 1, HDMI 2, HDMI 3, PC • HD DVD: Video 1, Video 2, ColorStream HD1, ColorStream HD2, HDMI 1, HDMI 2, HDMI 3, PC • DVD: Video 1, Video 2, ColorStream HD1, ColorStream HD2, HDMI 1, HDMI 2, HDMI 3, PC • VCR/PVR: ANT/CABLE, Video 1, Video 2, ColorStream HD1, ColorStream HD2, HDMI 1, HDMI 2, HDMI 3, PC Note: The TV mode select button will be restricted to the ANT/ CABLE input. To set the Auto Input: 1 From the Preferences menu, highlight Auto Input and press T. (continued) 37 XF550U (E/F) Web 213:276
-
 1
1 -
2
-
3
-
4
-
5
-
6
-
7
-
8
-
9
-
10
-
11
-
12
-
13
-
14
-
15
-
16
-
17
-
18
-
19
-
20
-
21
-
22
-
23
-
24
-
25
-
26
-
27
-
28
-
29
-
30
-
31
-
 32
32 -
 33
33 -
 34
34 -
 35
35 -
 36
36 -
 37
37 -
 38
38 -
 39
39 -
 40
40 -
 41
41 -
 42
42 -
43
-
44
-
45
-
46
-
47
-
48
-
49
-
50
-
51
-
52
-
53
-
54
-
55
-
56
-
57
-
58
-
59
-
60
-
61
-
62
-
63
-
64
-
65
-
66
-
67
-
68
-
69
-
70
-
71
-
72
-
73
-
74
 |
 |
