Toshiba 52XF550U Owner's Manual - English - Page 52
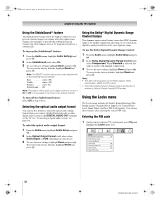
Using the Locks menu
 |
UPC - 022265001264
View all Toshiba 52XF550U manuals
Add to My Manuals
Save this manual to your list of manuals |
Page 52 highlights
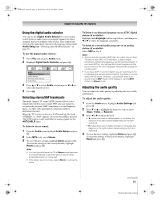
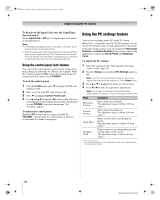
40XF550U_EN.book Page 52 Wednesday, January 30, 2008 3:55 PM Chapter 6: Using the TV's features Using the StableSound® feature The StableSound® feature limits the highest volume level to prevent extreme changes in volume when the signal source changes (for example, to prevent the sudden increase in volume that often happens when a TV program switches to a commercial). To turn on the StableSound® feature: 1 From the Audio menu, highlight Audio Settings and press T. 2 In the StableSound field, select On. 3 To save the new settings, highlight Done and press T. To revert to the factory defaults, highlight Reset and press T. Note: The RESET function returns your audio adjustments to the following factory settings: Bass center (50) Treble center (50) Balance center (0) StableSound . . Off Note: This feature will be gray out in digital channels, to turn it On or Off, it's necessary to be tuned in an analog channel. To turn off the StableSound feature: Select Off in step 2 above. Selecting the optical audio output format You can use this feature to select the optical audio output format when you connect a Dolby Digital decoder or other digital audio system to the DIGITAL AUDIO OUT terminal on the TV (see "Connecting a digital audio system" on page 18). To select the optical audio output format: 1 From the Audio menu, highlight Audio Setup and press T. 2 In the Optical Output Format field, select either Dolby Digital or PCM, depending on your device. 3 To save the new settings, highlight Done and press T. To revert to the factory defaults, highlight Reset and press T. Using the Dolby® Digital Dynamic Range Control feature This dynamic range control feature causes the ATSC dynamic range to be further compressed, allowing you to switch from digital to analog broadcasts at the same dynamic range. To use the Dolby Digital Dynamic Range Control: 1 From the Audio menu, highlight Audio Setup and press T. 2 In the Dolby Digital Dynamic Range Control field, select Compressed. When Standard is selected, the audio is output with minimal compression. 3 To save the new settings, highlight Done and press T. To revert to the factory defaults, highlight Reset and press T. Note: • This item will be grayed out for NTSC signals, Video, ColorStream, HDMI, and PC inputs. • The Dolby Digital Dynamic Range Control will function in relation to Optical Output Format (PCM mode). Using the Locks menu The Locks menu includes the Enable Rating Blocking, Edit Rating Limits, Channels Block, Input Lock, Control Panel Lock, Game Timer, and New PIN Code features. You can use these features after entering the correct PIN code. Entering the PIN code 1 On the remote control or TV control panel, press Y and highlight the Locks menu icon. Locks Enable Rating Blocking Off Edit Rating Limits Channels Block Input Lock Off Control Panel Lock Off Game Timer Off New PIN Code 52 XF550U (E/F) Web 213:276
-
 1
1 -
2
-
3
-
4
-
5
-
6
-
7
-
8
-
9
-
10
-
11
-
12
-
13
-
14
-
15
-
16
-
17
-
18
-
19
-
20
-
21
-
22
-
23
-
24
-
25
-
26
-
27
-
28
-
29
-
30
-
31
-
32
-
33
-
34
-
35
-
36
-
37
-
38
-
39
-
40
-
41
-
42
-
43
-
44
-
45
-
46
-
 47
47 -
 48
48 -
 49
49 -
 50
50 -
 51
51 -
 52
52 -
 53
53 -
 54
54 -
 55
55 -
 56
56 -
 57
57 -
58
-
59
-
60
-
61
-
62
-
63
-
64
-
65
-
66
-
67
-
68
-
69
-
70
-
71
-
72
-
73
-
74
 |
 |
