Toshiba 52XF550U Owner's Manual - English - Page 7

Contents - regza

Page 7 highlights

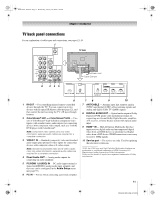
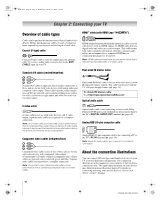
40XF550U_EN.book Page 7 Wednesday, January 30, 2008 3:55 PM Contents Important Safety Instructions 3 Installation, Care, and Service 3 Chapter 1: Introduction 9 Features of your new TV 9 Overview of steps for installing, setting up, and using your new TV 9 TV front and side panel controls and connections 10 TV back panel connections 11 Chapter 2: Connecting your TV 12 Overview of cable types 12 About the connection illustrations 12 Connecting a VCR (or a VCR with S-video) and antenna, Cable TV or Camcorder 13 Connecting a DVD player with ColorStream® (component video), a VCR, and a satellite receiver 14 Connecting a device to the IR OUT infrared terminal using the IR blaster cable for IR pass-through device control 15 Connecting an HDMI™ or DVI device to the HDMI input . 16 REGZA-LINK connection 17 Connecting a digital audio system 18 Connecting an audio system 18 Connecting a personal computer (PC 19 Chapter 3: Using the remote control 20 Preparing the remote control for use 20 Installing the remote control batteries 20 Learning about the remote control 21 Remote Control functional key chart 22 Using the remote control to operate your other devices . . . . 24 Programming the remote control to operate your other devices 24 Device code setup 24 Searching and sampling the code of a device (8500). . . 25 Using the volume lock feature (8000 25 Operational feature reset (8900 25 Multi-brand remote control device codes 26 Chapter 4: Menu layout and navigation 33 Main menu layout 33 Setup/Installation menu layout 33 THINC™ menu 33 Navigating the menu system 34 Chapter 5: Setting up your TV 35 Setting the Demo Mode 35 Selecting the menu language 35 Configuring the input source for the ANT/CABLE terminal 36 Programming channels into the TV's channel memory . . . . 36 Programming channels automatically 36 Manually adding and deleting channels in the channel memory 37 Setting the Auto Input feature 37 Labeling channels 38 Setting the HDMI™ audio mode 39 Viewing the digital signal meter 39 Setting the time zone 39 Viewing the system status 40 Selecting the Blue LED Illumination level 40 Selecting the Power-On Mode 40 Selecting the Demo Mode 40 Chapter 6: Using the TV's features 41 Selecting the video input source to view 41 Labeling the video input sources 41 Tuning channels 42 Tuning channels using the Channel Browser 42 Setting the Channel Tuning Mode 44 Tuning to the next programmed channel 44 Tuning to a specific channel (programmed or unprogrammed 44 Switching between two channels using Channel Return 45 Switching between two channels using SurfLock™. . . . 45 Selecting the picture size 45 Scrolling the TheaterWide® picture (TheaterWide 2 and 3 only 47 Using the auto aspect ratio feature 47 Using the FREEZE feature 48 Adjusting the picture 48 Selecting the picture mode 48 Adjusting the picture quality 48 Using the TheaterLock™ feature 49 Using the closed caption mode 49 Base closed captions 49 Digital CC Settings 50 CC Selector 50 Using the Closed Caption button on the remote control 50 Adjusting the audio 50 Muting the sound 50 Using the digital audio selector 51 Selecting stereo/SAP broadcasts 51 Adjusting the audio quality 51 Using the StableSound® feature 52 Selecting the optical audio output format 52 Using the Dolby® Digital Dynamic Range Control feature 52 Using the Locks menu 52 Entering the PIN code 52 If you cannot remember your PIN code 53 Changing your PIN code 53 Blocking TV programs and movies by rating (V-Chip) 53 Downloading an additional rating system for blocking TV programs and movies 54 Blocking channels 55 Unlocking programs temporarily 55 Using the input lock feature 55 Using the GameTimer 55 Using the control panel lock feature 56 Using the PC settings feature 56 Setting the PC Audio 57 Setting the sleep timer 57 Using REGZA-LINK 57 REGZA-LINK playback device (HD DVD player, etc.) control 57 REGZA-LINK input source selection 58 VOLUME and MUTE controls of Audio Receiver . . . . 58 Other REGZA-LINK functions 58 Using the HDMI settings feature 59 Displaying TV status information 60 Understanding the auto power off feature 60 Understanding the last mode memory feature 60 (continued) 7 XF550U (E/F) Web 213:276

  • 1
  • 2
  • 3
  • 4
  • 5
  • 6
  • 7
  • 8
  • 9
  • 10
  • 11
  • 12
  • 13
  • 14
  • 15
  • 16
  • 17
  • 18
  • 19
  • 20
  • 21
  • 22
  • 23
  • 24
  • 25
  • 26
  • 27
  • 28
  • 29
  • 30
  • 31
  • 32
  • 33
  • 34
  • 35
  • 36
  • 37
  • 38
  • 39
  • 40
  • 41
  • 42
  • 43
  • 44
  • 45
  • 46
  • 47
  • 48
  • 49
  • 50
  • 51
  • 52
  • 53
  • 54
  • 55
  • 56
  • 57
  • 58
  • 59
  • 60
  • 61
  • 62
  • 63
  • 64
  • 65
  • 66
  • 67
  • 68
  • 69
  • 70
  • 71
  • 72
  • 73
  • 74

XF550U (E/F) Web 213:276
7
Contents
Important Safety Instructions
..........................................
3
Installation, Care, and Service
........................................
3
Chapter 1: Introduction . . . . . . . . . . . . . . . . . . . . . . . . . . . . 9
Features of your new TV . . . . . . . . . . . . . . . . . . . . . . . . . . . . 9
Overview of steps for installing, setting up, and using
your new TV . . . . . . . . . . . . . . . . . . . . . . . . . . . . . . . . . . 9
TV front and side panel controls and connections . . . . . . . . 10
TV back panel connections. . . . . . . . . . . . . . . . . . . . . . . . . . 11
Chapter 2: Connecting your TV . . . . . . . . . . . . . . . . . . . . . . .12
Overview of cable types . . . . . . . . . . . . . . . . . . . . . . . . . . . . 12
About the connection illustrations . . . . . . . . . . . . . . . . . . . . 12
Connecting a VCR (or a VCR with S-video) and antenna,
Cable TV or Camcorder. . . . . . . . . . . . . . . . . . . . . . . . . 13
Connecting a DVD player with ColorStream
®
(component
video), a VCR, and a satellite receiver. . . . . . . . . . . . . . 14
Connecting a device to the IR OUT infrared terminal
using the IR blaster cable for IR pass-through device
control . . . . . . . . . . . . . . . . . . . . . . . . . . . . . . . . . . . . . . 15
Connecting an HDMI
or DVI device to the HDMI input . 16
REGZA-LINK connection . . . . . . . . . . . . . . . . . . . . . . . . . . 17
Connecting a digital audio system . . . . . . . . . . . . . . . . . . . . 18
Connecting an audio system . . . . . . . . . . . . . . . . . . . . . . . . . 18
Connecting a personal computer (PC) . . . . . . . . . . . . . . . . . 19
Chapter 3: Using the remote control . . . . . . . . . . . . . . . . . . .20
Preparing the remote control for use. . . . . . . . . . . . . . . . . . . 20
Installing the remote control batteries . . . . . . . . . . . . . . . . . 20
Learning about the remote control . . . . . . . . . . . . . . . . . . . . 21
Remote Control functional key chart . . . . . . . . . . . . . . . . . . 22
Using the remote control to operate your other devices . . . . 24
Programming the remote control to operate your other
devices . . . . . . . . . . . . . . . . . . . . . . . . . . . . . . . . . . . . . . 24
Device code setup . . . . . . . . . . . . . . . . . . . . . . . . . . . . . 24
Searching and sampling the code of a device (8500). . . 25
Using the volume lock feature (8000) . . . . . . . . . . . . . . 25
Operational feature reset (8900). . . . . . . . . . . . . . . . . . . 25
Multi-brand remote control device codes . . . . . . . . . . . . . . . 26
Chapter 4: Menu layout and navigation . . . . . . . . . . . . . . . . .33
Main menu layout. . . . . . . . . . . . . . . . . . . . . . . . . . . . . . . . . 33
Setup/Installation menu layout . . . . . . . . . . . . . . . . . . . . . . . 33
THINC
menu . . . . . . . . . . . . . . . . . . . . . . . . . . . . . . . . . . . 33
Navigating the menu system. . . . . . . . . . . . . . . . . . . . . . . . . 34
Chapter 5: Setting up your TV. . . . . . . . . . . . . . . . . . . . . . . .35
Setting the Demo Mode . . . . . . . . . . . . . . . . . . . . . . . . . . . . 35
Selecting the menu language . . . . . . . . . . . . . . . . . . . . . . . . 35
Configuring the input source for the
ANT/CABLE terminal. . . . . . . . . . . . . . . . . . . . . . . . . . 36
Programming channels into the TV’s channel memory . . . . 36
Programming channels automatically . . . . . . . . . . . . . . 36
Manually adding and deleting channels in the channel
memory . . . . . . . . . . . . . . . . . . . . . . . . . . . . . . . . . . 37
Setting the Auto Input feature. . . . . . . . . . . . . . . . . . . . . . . . 37
Labeling channels . . . . . . . . . . . . . . . . . . . . . . . . . . . . . . . . . 38
Setting the HDMI
audio mode . . . . . . . . . . . . . . . . . . . . . . 39
Viewing the digital signal meter. . . . . . . . . . . . . . . . . . . . . . 39
Setting the time zone. . . . . . . . . . . . . . . . . . . . . . . . . . . . . . . 39
Viewing the system status. . . . . . . . . . . . . . . . . . . . . . . . . . . 40
Selecting the Blue LED Illumination level. . . . . . . . . . . . . . 40
Selecting the Power-On Mode . . . . . . . . . . . . . . . . . . . . . . . 40
Selecting the Demo Mode. . . . . . . . . . . . . . . . . . . . . . . . . . . 40
Chapter 6: Using the TV’s features . . . . . . . . . . . . . . . . . . . . 41
Selecting the video input source to view . . . . . . . . . . . . . . . 41
Labeling the video input sources . . . . . . . . . . . . . . . . . . . . . 41
Tuning channels . . . . . . . . . . . . . . . . . . . . . . . . . . . . . . . . . . 42
Tuning channels using the Channel Browser
. . . . . . . 42
Setting the Channel Tuning Mode . . . . . . . . . . . . . . . . . 44
Tuning to the next programmed channel . . . . . . . . . . . . 44
Tuning to a specific channel (programmed or
unprogrammed) . . . . . . . . . . . . . . . . . . . . . . . . . . . . 44
Switching between two channels using Channel
Return . . . . . . . . . . . . . . . . . . . . . . . . . . . . . . . . . . . 45
Switching between two channels using SurfLock
. . . . 45
Selecting the picture size . . . . . . . . . . . . . . . . . . . . . . . . . . . 45
Scrolling the TheaterWide
®
picture
(TheaterWide 2 and 3 only) . . . . . . . . . . . . . . . . . . . . . . 47
Using the auto aspect ratio feature . . . . . . . . . . . . . . . . . . . . 47
Using the FREEZE feature . . . . . . . . . . . . . . . . . . . . . . . . . . 48
Adjusting the picture. . . . . . . . . . . . . . . . . . . . . . . . . . . . . . . 48
Selecting the picture mode. . . . . . . . . . . . . . . . . . . . . . . 48
Adjusting the picture quality . . . . . . . . . . . . . . . . . . . . . 48
Using the TheaterLock
feature. . . . . . . . . . . . . . . . . . . . . . 49
Using the closed caption mode . . . . . . . . . . . . . . . . . . . . . . . 49
Base closed captions . . . . . . . . . . . . . . . . . . . . . . . . . . . 49
Digital CC Settings . . . . . . . . . . . . . . . . . . . . . . . . . . . . 50
CC Selector . . . . . . . . . . . . . . . . . . . . . . . . . . . . . . . . . . 50
Using the Closed Caption button on the remote
control . . . . . . . . . . . . . . . . . . . . . . . . . . . . . . . . . . . 50
Adjusting the audio. . . . . . . . . . . . . . . . . . . . . . . . . . . . . . . . 50
Muting the sound . . . . . . . . . . . . . . . . . . . . . . . . . . . . . . 50
Using the digital audio selector . . . . . . . . . . . . . . . . . . . 51
Selecting stereo/SAP broadcasts . . . . . . . . . . . . . . . . . . 51
Adjusting the audio quality . . . . . . . . . . . . . . . . . . . . . . 51
Using the StableSound
®
feature. . . . . . . . . . . . . . . . . . . 52
Selecting the optical audio output format . . . . . . . . . . . 52
Using the Dolby
®
Digital Dynamic Range Control
feature . . . . . . . . . . . . . . . . . . . . . . . . . . . . . . . . . . . 52
Using the Locks menu . . . . . . . . . . . . . . . . . . . . . . . . . . . . . 52
Entering the PIN code . . . . . . . . . . . . . . . . . . . . . . . . . . 52
If you cannot remember your PIN code. . . . . . . . . . . . . 53
Changing your PIN code . . . . . . . . . . . . . . . . . . . . . . . . 53
Blocking TV programs and movies by rating (V-Chip) 53
Downloading an additional rating system for blocking
TV programs and movies . . . . . . . . . . . . . . . . . . . . 54
Blocking channels . . . . . . . . . . . . . . . . . . . . . . . . . . . . . 55
Unlocking programs temporarily . . . . . . . . . . . . . . . . . . 55
Using the input lock feature. . . . . . . . . . . . . . . . . . . . . . 55
Using the GameTimer
®
. . . . . . . . . . . . . . . . . . . . . . . . . 55
Using the control panel lock feature . . . . . . . . . . . . . . . 56
Using the PC settings feature . . . . . . . . . . . . . . . . . . . . . . . . 56
Setting the PC Audio . . . . . . . . . . . . . . . . . . . . . . . . . . . . . . 57
Setting the sleep timer. . . . . . . . . . . . . . . . . . . . . . . . . . . . . . 57
Using REGZA-LINK . . . . . . . . . . . . . . . . . . . . . . . . . . . . . . 57
REGZA-LINK playback device (HD DVD player, etc.)
control . . . . . . . . . . . . . . . . . . . . . . . . . . . . . . . . . . . 57
REGZA-LINK input source selection . . . . . . . . . . . . . . 58
VOLUME and MUTE controls of Audio Receiver . . . . 58
Other REGZA-LINK functions . . . . . . . . . . . . . . . . . . . 58
Using the HDMI settings feature . . . . . . . . . . . . . . . . . . . . . 59
Displaying TV status information. . . . . . . . . . . . . . . . . . . . . 60
Understanding the auto power off feature . . . . . . . . . . . . . . 60
Understanding the last mode memory feature . . . . . . . . . . . 60
(continued)
40XF550U_EN.book
Page 7
Wednesday, January 30, 2008
3:55 PM