Toshiba GSC-R30 Owners Manual - Page 119
Writing Print Information DPOF Settings, Specifying Individual DPOF Settings
 |
View all Toshiba GSC-R30 manuals
Add to My Manuals
Save this manual to your list of manuals |
Page 119 highlights
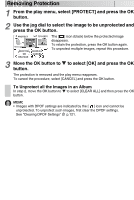
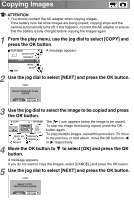
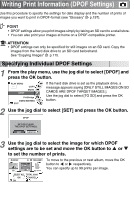
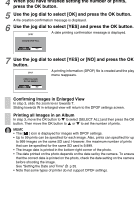
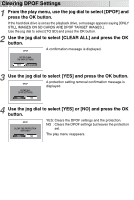
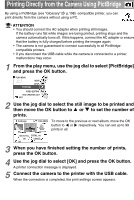
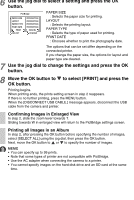
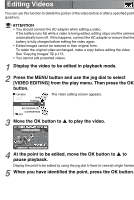
Writing Print Information (DPOF Settings) Use this procedure to specify the settings for date display and the number of prints of images you want to print in DPOF-format (see "Glossary" p.197). POINT • DPOF settings allow you print images simply by taking an SD card to a retail store. • You can also print your images at home on a DPOF-compatible printer. ATTENTION • DPOF settings can only be specified for still images on an SD card. Copy the images from the hard disk drive to an SD card beforehand. See "Copying Images" p.115. Specifying Individual DPOF Settings 1 From the play menu, use the jog dial to select [DPOF] and press the OK button. PLAY MENU DPOF COPY MOVE PictBridge VIDEO EDITING EXIT If the hard disk drive is set as the playback drive, a message appears saying [ONLY STILL IMAGES ON SD CARDS ARE DPOF TARGET IMAGES.]. Use the jog dial to select [TO SD] and press the OK button. 2 Use the jog dial to select [SET] and press the OK button. DPOF SET OR CLEAR THE DPOF SETTINGS. SET CLEAR ALL 3 Use the jog dial to select the image for which DPOF settings are to be set and move the OK button to or to set the number of prints. DPOF 100-0021 00 00 NEXT ALBUM SELECT ALL TOTAL 0000 OK CANCEL OK To move to the previous or next album, move the OK button to or respectively. You can specify up to 99 prints per image.
-
 1
1 -
2
-
3
-
4
-
5
-
6
-
7
-
8
-
9
-
10
-
11
-
12
-
13
-
14
-
15
-
16
-
17
-
18
-
19
-
20
-
21
-
22
-
23
-
24
-
25
-
26
-
27
-
28
-
29
-
30
-
31
-
32
-
33
-
34
-
35
-
36
-
37
-
38
-
39
-
40
-
41
-
42
-
43
-
44
-
45
-
46
-
47
-
48
-
49
-
50
-
51
-
52
-
53
-
54
-
55
-
56
-
57
-
58
-
59
-
60
-
61
-
62
-
63
-
64
-
65
-
66
-
67
-
68
-
69
-
70
-
71
-
72
-
73
-
74
-
75
-
76
-
77
-
78
-
79
-
80
-
81
-
82
-
83
-
84
-
85
-
86
-
87
-
88
-
89
-
90
-
91
-
92
-
93
-
94
-
95
-
96
-
97
-
98
-
99
-
100
-
101
-
102
-
103
-
104
-
105
-
106
-
107
-
108
-
109
-
110
-
111
-
112
-
113
-
 114
114 -
 115
115 -
 116
116 -
 117
117 -
 118
118 -
 119
119 -
 120
120 -
 121
121 -
 122
122 -
 123
123 -
 124
124 -
125
-
126
-
127
-
128
-
129
-
130
-
131
-
132
-
133
-
134
-
135
-
136
-
137
-
138
-
139
-
140
-
141
-
142
-
143
-
144
-
145
-
146
-
147
-
148
-
149
-
150
-
151
-
152
-
153
-
154
-
155
-
156
-
157
-
158
-
159
-
160
-
161
-
162
-
163
-
164
-
165
-
166
-
167
-
168
-
169
-
170
-
171
-
172
-
173
-
174
-
175
-
176
-
177
-
178
-
179
-
180
-
181
-
182
-
183
-
184
-
185
-
186
-
187
-
188
-
189
-
190
-
191
-
192
-
193
-
194
-
195
-
196
-
197
-
198
-
199
-
200
-
201
-
202
-
203
-
204
-
205
-
206
-
207
-
208
-
209
-
210
-
211
-
212
-
213
-
214
-
215
-
216
-
217
-
218
-
219
-
220
-
221
-
222
-
223
-
224
-
225
-
226
-
227
-
228
-
229
-
230
-
231
-
232
-
233
-
234
-
235
-
236
-
237
-
238
-
239
-
240
-
241
-
242
-
243
-
244
-
245
-
246
-
247
-
248
-
249
-
250
-
251
-
252
-
253
-
254
-
255
-
256
-
257
-
258
-
259
-
260
-
261
-
262
-
263
-
264
-
265
-
266
-
267
 |
 |
