Toshiba GSC-R30 Owners Manual - Page 168
Click [View data using ACDSee
 |
View all Toshiba GSC-R30 manuals
Add to My Manuals
Save this manual to your list of manuals |
Page 168 highlights
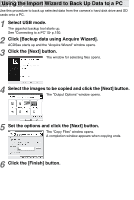
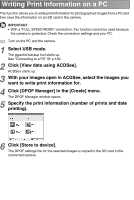
Copying Still Images from a PC to the Camera Use this procedure to copy images saved on a PC to the camera's hard disk drive. IMPORTANT • With a "FULL SPEED MODE" connection, this function cannot be used because the camera is protected. Check the connection settings and your PC. Turn on the PC and the camera. 1 Select USB mode. The gigashot backup tool starts up. See "Connecting to a PC" p.150. 2 Click [View data using ACDSee]. ACDSee starts up. 3 Select the images you want to copy to the camera and click [Copy to Camera] in the [Create] menu. 4 Select the image conversion size and click [OK]. The images are copied to the camera's hard disk drive and stored in the "XXXACDSE" folder under file names in the "ACDSXXXX.jpg" format. Copies all the images at 640 × 480 pixels, regardless of the original image size. Copies images as is without resizing. The sizes of the resized images vary depending on the source image size. Images larger than 640 ✕ 480 Images are resized to 1024 ✕ 768. Where the original image is smaller than 1024 ✕ 768, a black border appears around the image. Images smaller than 640 ✕ 480 Images are resized to 640 ✕ 480. Where the original image is smaller than 640 ✕ 480, a black border appears around the image. MEMO • If you select "Do not resize", you may not be able to view some image sizes correctly on the camera. • You may be unable to display copied images that were not shot on this camera.
-
 1
1 -
2
-
3
-
4
-
5
-
6
-
7
-
8
-
9
-
10
-
11
-
12
-
13
-
14
-
15
-
16
-
17
-
18
-
19
-
20
-
21
-
22
-
23
-
24
-
25
-
26
-
27
-
28
-
29
-
30
-
31
-
32
-
33
-
34
-
35
-
36
-
37
-
38
-
39
-
40
-
41
-
42
-
43
-
44
-
45
-
46
-
47
-
48
-
49
-
50
-
51
-
52
-
53
-
54
-
55
-
56
-
57
-
58
-
59
-
60
-
61
-
62
-
63
-
64
-
65
-
66
-
67
-
68
-
69
-
70
-
71
-
72
-
73
-
74
-
75
-
76
-
77
-
78
-
79
-
80
-
81
-
82
-
83
-
84
-
85
-
86
-
87
-
88
-
89
-
90
-
91
-
92
-
93
-
94
-
95
-
96
-
97
-
98
-
99
-
100
-
101
-
102
-
103
-
104
-
105
-
106
-
107
-
108
-
109
-
110
-
111
-
112
-
113
-
114
-
115
-
116
-
117
-
118
-
119
-
120
-
121
-
122
-
123
-
124
-
125
-
126
-
127
-
128
-
129
-
130
-
131
-
132
-
133
-
134
-
135
-
136
-
137
-
138
-
139
-
140
-
141
-
142
-
143
-
144
-
145
-
146
-
147
-
148
-
149
-
150
-
151
-
152
-
153
-
154
-
155
-
156
-
157
-
158
-
159
-
160
-
161
-
162
-
 163
163 -
 164
164 -
 165
165 -
 166
166 -
 167
167 -
 168
168 -
 169
169 -
 170
170 -
 171
171 -
 172
172 -
 173
173 -
174
-
175
-
176
-
177
-
178
-
179
-
180
-
181
-
182
-
183
-
184
-
185
-
186
-
187
-
188
-
189
-
190
-
191
-
192
-
193
-
194
-
195
-
196
-
197
-
198
-
199
-
200
-
201
-
202
-
203
-
204
-
205
-
206
-
207
-
208
-
209
-
210
-
211
-
212
-
213
-
214
-
215
-
216
-
217
-
218
-
219
-
220
-
221
-
222
-
223
-
224
-
225
-
226
-
227
-
228
-
229
-
230
-
231
-
232
-
233
-
234
-
235
-
236
-
237
-
238
-
239
-
240
-
241
-
242
-
243
-
244
-
245
-
246
-
247
-
248
-
249
-
250
-
251
-
252
-
253
-
254
-
255
-
256
-
257
-
258
-
259
-
260
-
261
-
262
-
263
-
264
-
265
-
266
-
267
 |
 |
