Toshiba GSC-R30 Owners Manual - Page 163
Using the Synchronize Function to Back Up Data to a PC, Select USB mode.
 |
View all Toshiba GSC-R30 manuals
Add to My Manuals
Save this manual to your list of manuals |
Page 163 highlights
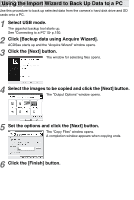
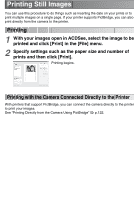
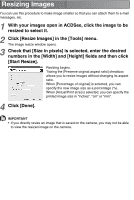
Using the Synchronize Function to Back Up Data to a PC Use this procedure to back up your photographed images onto the hard disk drive in a PC. Because it synchronizes the data on the PC and camera, it can back up the latest data on your camera. Note that this function only works with the data on your camera's hard disk drive. 1 Select USB mode. The gigashot backup tool starts up. See "Connecting to a PC" p.150. 2 Click [Backup data to PC using synchronization]. The "Toshiba Synchronization Wizard" window opens. 3 Click the [Next] button. Specify a save folder other than the folder shown, click the [Browse] button. The folder browsing window opens. Specify the folder to be used for saving the data and click the [OK] button. The data in the specified folder will now be synchronized with the data on the camera. 4 Select the folder to be copied and click the [Next] button. Each folder on camera : Selects all the saved folders on the camera. Specified camera folder : Selects folders to be copied. If you have ticked the [Delete files from camera after synchronizing to hard drive] checkbox, the data on the camera is deleted after synchronization ends. Note that you cannot use this function with a "FULL SPEED MODE" connection. Synchronization begins. A completion message is displayed when synchronization ends. 5 Click the [Finish] button. The ACDSee main window appears. If the [Open ACDSee and browse synchronized files] checkbox is not ticked, ACDSee does not start up.
-
 1
1 -
2
-
3
-
4
-
5
-
6
-
7
-
8
-
9
-
10
-
11
-
12
-
13
-
14
-
15
-
16
-
17
-
18
-
19
-
20
-
21
-
22
-
23
-
24
-
25
-
26
-
27
-
28
-
29
-
30
-
31
-
32
-
33
-
34
-
35
-
36
-
37
-
38
-
39
-
40
-
41
-
42
-
43
-
44
-
45
-
46
-
47
-
48
-
49
-
50
-
51
-
52
-
53
-
54
-
55
-
56
-
57
-
58
-
59
-
60
-
61
-
62
-
63
-
64
-
65
-
66
-
67
-
68
-
69
-
70
-
71
-
72
-
73
-
74
-
75
-
76
-
77
-
78
-
79
-
80
-
81
-
82
-
83
-
84
-
85
-
86
-
87
-
88
-
89
-
90
-
91
-
92
-
93
-
94
-
95
-
96
-
97
-
98
-
99
-
100
-
101
-
102
-
103
-
104
-
105
-
106
-
107
-
108
-
109
-
110
-
111
-
112
-
113
-
114
-
115
-
116
-
117
-
118
-
119
-
120
-
121
-
122
-
123
-
124
-
125
-
126
-
127
-
128
-
129
-
130
-
131
-
132
-
133
-
134
-
135
-
136
-
137
-
138
-
139
-
140
-
141
-
142
-
143
-
144
-
145
-
146
-
147
-
148
-
149
-
150
-
151
-
152
-
153
-
154
-
155
-
156
-
157
-
 158
158 -
 159
159 -
 160
160 -
 161
161 -
 162
162 -
 163
163 -
 164
164 -
 165
165 -
 166
166 -
 167
167 -
 168
168 -
169
-
170
-
171
-
172
-
173
-
174
-
175
-
176
-
177
-
178
-
179
-
180
-
181
-
182
-
183
-
184
-
185
-
186
-
187
-
188
-
189
-
190
-
191
-
192
-
193
-
194
-
195
-
196
-
197
-
198
-
199
-
200
-
201
-
202
-
203
-
204
-
205
-
206
-
207
-
208
-
209
-
210
-
211
-
212
-
213
-
214
-
215
-
216
-
217
-
218
-
219
-
220
-
221
-
222
-
223
-
224
-
225
-
226
-
227
-
228
-
229
-
230
-
231
-
232
-
233
-
234
-
235
-
236
-
237
-
238
-
239
-
240
-
241
-
242
-
243
-
244
-
245
-
246
-
247
-
248
-
249
-
250
-
251
-
252
-
253
-
254
-
255
-
256
-
257
-
258
-
259
-
260
-
261
-
262
-
263
-
264
-
265
-
266
-
267
 |
 |
