Toshiba GSC-R30 Owners Manual - Page 183
Troubleshooting
 |
View all Toshiba GSC-R30 manuals
Add to My Manuals
Save this manual to your list of manuals |
Page 183 highlights
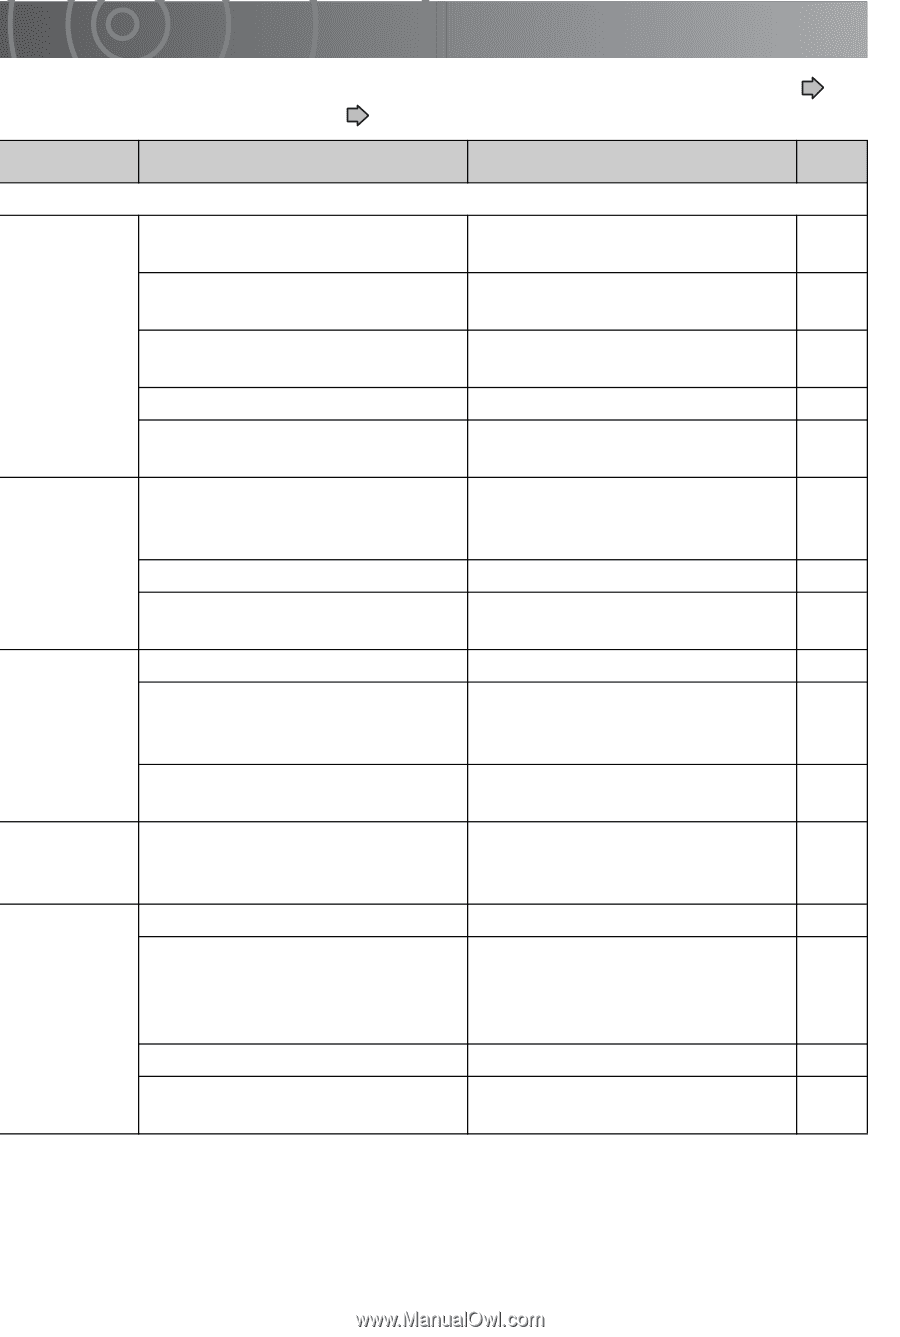
Troubleshooting If an error or fault occurs, first check the error message displayed on the screen ( p.195) and the status of the LEDs ( p.25). Then refer to the information given below. Problem Cause Solution Page Power/Preparation I can't charge The battery is not loaded in the Reload the battery correctly. the battery. correct direction. 28 The AC adapter is not connected. Connect the AC adapter. 30 The camera is not set in the cradle properly. Set the camera in the cradle correctly. 30 The camera is turned on. Turn the camera off. 34 The camera or battery is overheated. Allow the camera or battery to cool fully before charging. 30 The camera The battery is not loaded in the Reload the battery correctly. 28 won't turn on. correct direction, or the AC Connect the AC adapter. 30 adapter is not connected. The battery is out of charge. Charge the battery. 30 The battery has reached the end of its service life. Replace it with a new battery. 28 The camera runs out of power too quickly. The battery is out of charge. The terminals are soiled. Charge the battery. 30 Wipe the terminals on the battery and in the camera with a 32 clean, dry cloth. The battery has reached the end of its service life. Replace it with a new battery. 28 The camera The Auto power off function was Turn the camera back on. 34 suddenly lost activated. Change the Auto power off 139 power. settings. Auto power off Auto play is running. Stop Auto play. 111 does not work. You are connected to a DVD Auto power off is not available recorder with DVR, computer, when connected to a DVD or printer. recorder with DVR, computer, 139 or printer. The camera is in LAN mode. Change the mode. 26 The camera is connected to a Exit PictBridge. printer with PictBridge. 123
-
 1
1 -
2
-
3
-
4
-
5
-
6
-
7
-
8
-
9
-
10
-
11
-
12
-
13
-
14
-
15
-
16
-
17
-
18
-
19
-
20
-
21
-
22
-
23
-
24
-
25
-
26
-
27
-
28
-
29
-
30
-
31
-
32
-
33
-
34
-
35
-
36
-
37
-
38
-
39
-
40
-
41
-
42
-
43
-
44
-
45
-
46
-
47
-
48
-
49
-
50
-
51
-
52
-
53
-
54
-
55
-
56
-
57
-
58
-
59
-
60
-
61
-
62
-
63
-
64
-
65
-
66
-
67
-
68
-
69
-
70
-
71
-
72
-
73
-
74
-
75
-
76
-
77
-
78
-
79
-
80
-
81
-
82
-
83
-
84
-
85
-
86
-
87
-
88
-
89
-
90
-
91
-
92
-
93
-
94
-
95
-
96
-
97
-
98
-
99
-
100
-
101
-
102
-
103
-
104
-
105
-
106
-
107
-
108
-
109
-
110
-
111
-
112
-
113
-
114
-
115
-
116
-
117
-
118
-
119
-
120
-
121
-
122
-
123
-
124
-
125
-
126
-
127
-
128
-
129
-
130
-
131
-
132
-
133
-
134
-
135
-
136
-
137
-
138
-
139
-
140
-
141
-
142
-
143
-
144
-
145
-
146
-
147
-
148
-
149
-
150
-
151
-
152
-
153
-
154
-
155
-
156
-
157
-
158
-
159
-
160
-
161
-
162
-
163
-
164
-
165
-
166
-
167
-
168
-
169
-
170
-
171
-
172
-
173
-
174
-
175
-
176
-
177
-
 178
178 -
 179
179 -
 180
180 -
 181
181 -
 182
182 -
 183
183 -
 184
184 -
 185
185 -
 186
186 -
 187
187 -
 188
188 -
189
-
190
-
191
-
192
-
193
-
194
-
195
-
196
-
197
-
198
-
199
-
200
-
201
-
202
-
203
-
204
-
205
-
206
-
207
-
208
-
209
-
210
-
211
-
212
-
213
-
214
-
215
-
216
-
217
-
218
-
219
-
220
-
221
-
222
-
223
-
224
-
225
-
226
-
227
-
228
-
229
-
230
-
231
-
232
-
233
-
234
-
235
-
236
-
237
-
238
-
239
-
240
-
241
-
242
-
243
-
244
-
245
-
246
-
247
-
248
-
249
-
250
-
251
-
252
-
253
-
254
-
255
-
256
-
257
-
258
-
259
-
260
-
261
-
262
-
263
-
264
-
265
-
266
-
267
 |
 |