Toshiba GSC-R30 Owners Manual - Page 34
Turning the Camera On and Off, Turning the Camera On and Off by Opening and Closing the LCD Monitor
 |
View all Toshiba GSC-R30 manuals
Add to My Manuals
Save this manual to your list of manuals |
Page 34 highlights
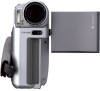
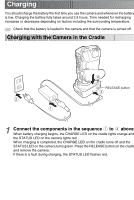
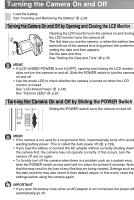
Turning the Camera On and Off Load the battery. See "Inserting and Removing the Battery" p.28. Turning the Camera On and Off by Opening and Closing the LCD Monitor Opening the LCD monitor turns the camera on and closing the LCD monitor turns the camera off. The first time you use the camera, or when the battery has been left out of the camera for a long period, the screen for setting the date and time appears. Set the date and time. See "Setting the Date and Time" p.35. MEMO • If [LCD-LINKED POWER] is set to [OFF], opening and closing the LCD monitor does not turn the camera on and off. Slide the POWER switch to turn the camera on and off. • Use the mode LED to check whether the camera is turned on when the LCD monitor is closed. See "LCD-linked Power" p.140. See "Camera LEDs" p.25. Turning the Camera On and Off by Sliding the POWER Switch Sliding the POWER switch turns the camera on and off. MEMO • If the camera is not used for a set period of time, it automatically turns off to avoid wasting battery power. This is called the Auto power off ( p.139). • If you load the battery or connect the AC adapter without correctly shutting down the camera first, the camera may not operate correctly. If this occurs, turn the camera off and on again. • To forcibly turn off the camera when there is a problem such as a system error, slide the POWER switch across and hold it in place for at least 5 seconds. Note that this may result in the loss of any files that are being created. Settings such as the date and time may also revert to their default values. In this event, reset the settings before using the camera again. IMPORTANT • If you open the battery cover when an AC adapter is not connected, the power will automatically go off.
-
 1
1 -
2
-
3
-
4
-
5
-
6
-
7
-
8
-
9
-
10
-
11
-
12
-
13
-
14
-
15
-
16
-
17
-
18
-
19
-
20
-
21
-
22
-
23
-
24
-
25
-
26
-
27
-
28
-
 29
29 -
 30
30 -
 31
31 -
 32
32 -
 33
33 -
 34
34 -
 35
35 -
 36
36 -
 37
37 -
 38
38 -
 39
39 -
40
-
41
-
42
-
43
-
44
-
45
-
46
-
47
-
48
-
49
-
50
-
51
-
52
-
53
-
54
-
55
-
56
-
57
-
58
-
59
-
60
-
61
-
62
-
63
-
64
-
65
-
66
-
67
-
68
-
69
-
70
-
71
-
72
-
73
-
74
-
75
-
76
-
77
-
78
-
79
-
80
-
81
-
82
-
83
-
84
-
85
-
86
-
87
-
88
-
89
-
90
-
91
-
92
-
93
-
94
-
95
-
96
-
97
-
98
-
99
-
100
-
101
-
102
-
103
-
104
-
105
-
106
-
107
-
108
-
109
-
110
-
111
-
112
-
113
-
114
-
115
-
116
-
117
-
118
-
119
-
120
-
121
-
122
-
123
-
124
-
125
-
126
-
127
-
128
-
129
-
130
-
131
-
132
-
133
-
134
-
135
-
136
-
137
-
138
-
139
-
140
-
141
-
142
-
143
-
144
-
145
-
146
-
147
-
148
-
149
-
150
-
151
-
152
-
153
-
154
-
155
-
156
-
157
-
158
-
159
-
160
-
161
-
162
-
163
-
164
-
165
-
166
-
167
-
168
-
169
-
170
-
171
-
172
-
173
-
174
-
175
-
176
-
177
-
178
-
179
-
180
-
181
-
182
-
183
-
184
-
185
-
186
-
187
-
188
-
189
-
190
-
191
-
192
-
193
-
194
-
195
-
196
-
197
-
198
-
199
-
200
-
201
-
202
-
203
-
204
-
205
-
206
-
207
-
208
-
209
-
210
-
211
-
212
-
213
-
214
-
215
-
216
-
217
-
218
-
219
-
220
-
221
-
222
-
223
-
224
-
225
-
226
-
227
-
228
-
229
-
230
-
231
-
232
-
233
-
234
-
235
-
236
-
237
-
238
-
239
-
240
-
241
-
242
-
243
-
244
-
245
-
246
-
247
-
248
-
249
-
250
-
251
-
252
-
253
-
254
-
255
-
256
-
257
-
258
-
259
-
260
-
261
-
262
-
263
-
264
-
265
-
266
-
267
 |
 |