Toshiba GSC-R30 Owners Manual - Page 73
Changing the Type of an Album on the Hard Disk Drive, to select [CHANGE ALBUM]
 |
View all Toshiba GSC-R30 manuals
Add to My Manuals
Save this manual to your list of manuals |
Page 73 highlights
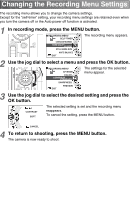
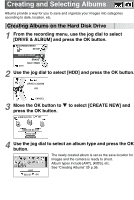
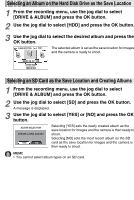
Changing the Type of an Album on the Hard Disk Drive 1 From the recording menu, use the jog dial to select [DRIVE & ALBUM] and press the OK button. 2 Use the jog dial to select [HDD] and press the OK button. 3 Use the jog dial to select the album you want to change. ALBUM SELECTION 101 2006_04_03_101 CHANGE ALBUM CREATE NEW 4 Move the OK button to press the OK button. ALBUM SELECTION 101 to select [CHANGE ALBUM] and 2006_04_03_101 CHANGE ALBUM CREATE NEW 5 Use the jog dial to select the album type and press the OK button. The changed album is set as the save location for images and the camera is ready to shoot. LOVE SELECT OK
-
 1
1 -
2
-
3
-
4
-
5
-
6
-
7
-
8
-
9
-
10
-
11
-
12
-
13
-
14
-
15
-
16
-
17
-
18
-
19
-
20
-
21
-
22
-
23
-
24
-
25
-
26
-
27
-
28
-
29
-
30
-
31
-
32
-
33
-
34
-
35
-
36
-
37
-
38
-
39
-
40
-
41
-
42
-
43
-
44
-
45
-
46
-
47
-
48
-
49
-
50
-
51
-
52
-
53
-
54
-
55
-
56
-
57
-
58
-
59
-
60
-
61
-
62
-
63
-
64
-
65
-
66
-
67
-
 68
68 -
 69
69 -
 70
70 -
 71
71 -
 72
72 -
 73
73 -
 74
74 -
 75
75 -
 76
76 -
 77
77 -
 78
78 -
79
-
80
-
81
-
82
-
83
-
84
-
85
-
86
-
87
-
88
-
89
-
90
-
91
-
92
-
93
-
94
-
95
-
96
-
97
-
98
-
99
-
100
-
101
-
102
-
103
-
104
-
105
-
106
-
107
-
108
-
109
-
110
-
111
-
112
-
113
-
114
-
115
-
116
-
117
-
118
-
119
-
120
-
121
-
122
-
123
-
124
-
125
-
126
-
127
-
128
-
129
-
130
-
131
-
132
-
133
-
134
-
135
-
136
-
137
-
138
-
139
-
140
-
141
-
142
-
143
-
144
-
145
-
146
-
147
-
148
-
149
-
150
-
151
-
152
-
153
-
154
-
155
-
156
-
157
-
158
-
159
-
160
-
161
-
162
-
163
-
164
-
165
-
166
-
167
-
168
-
169
-
170
-
171
-
172
-
173
-
174
-
175
-
176
-
177
-
178
-
179
-
180
-
181
-
182
-
183
-
184
-
185
-
186
-
187
-
188
-
189
-
190
-
191
-
192
-
193
-
194
-
195
-
196
-
197
-
198
-
199
-
200
-
201
-
202
-
203
-
204
-
205
-
206
-
207
-
208
-
209
-
210
-
211
-
212
-
213
-
214
-
215
-
216
-
217
-
218
-
219
-
220
-
221
-
222
-
223
-
224
-
225
-
226
-
227
-
228
-
229
-
230
-
231
-
232
-
233
-
234
-
235
-
236
-
237
-
238
-
239
-
240
-
241
-
242
-
243
-
244
-
245
-
246
-
247
-
248
-
249
-
250
-
251
-
252
-
253
-
254
-
255
-
256
-
257
-
258
-
259
-
260
-
261
-
262
-
263
-
264
-
265
-
266
-
267
 |
 |
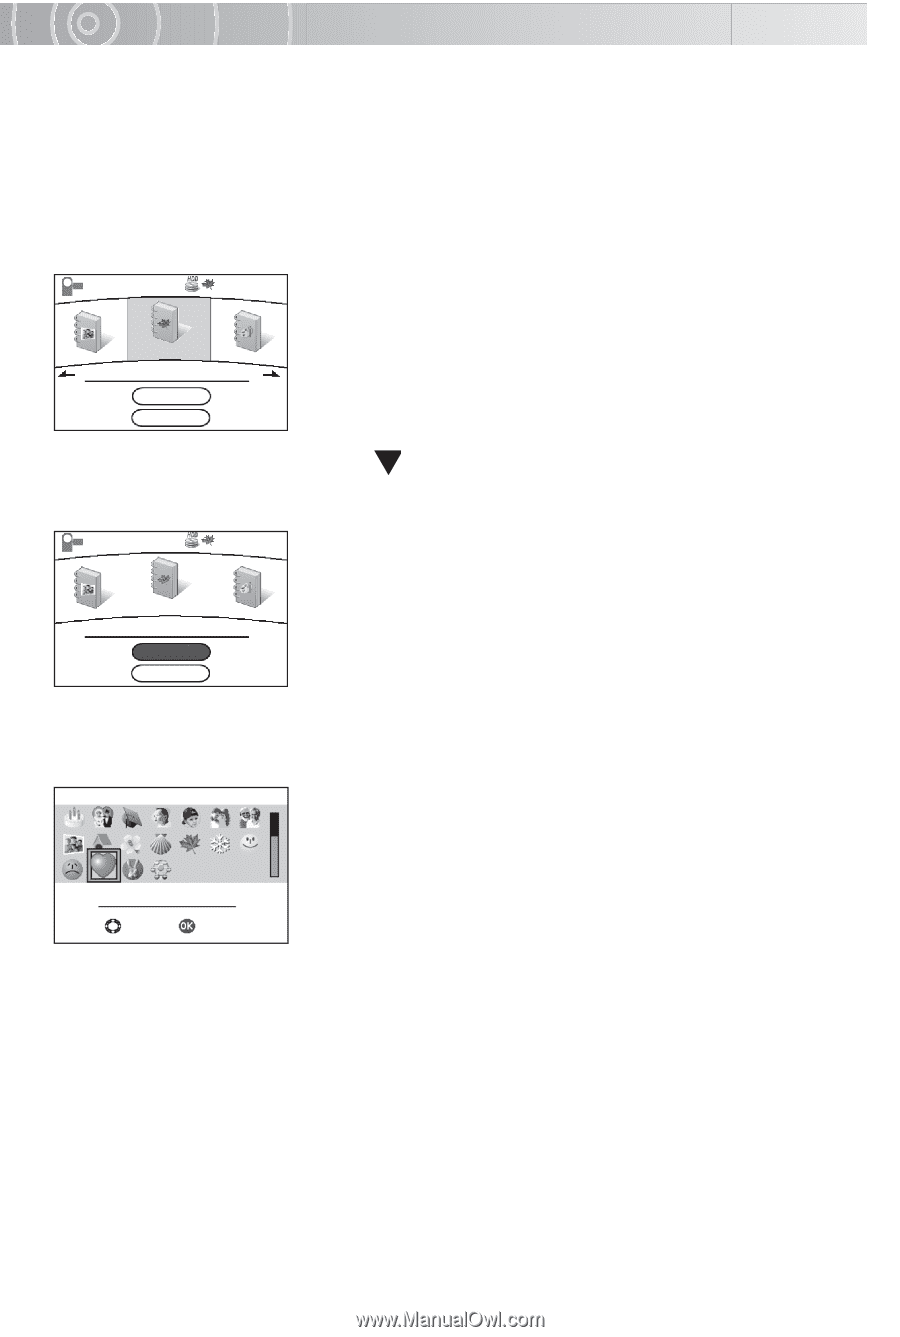
Changing the Type of an Album on the Hard Disk Drive
1
From the recording menu, use the jog dial to select
[DRIVE & ALBUM] and press the OK button.
2
Use the jog dial to select [HDD] and press the OK button.
3
Use the jog dial to select the album you want to change.
4
Move the OK button to
to select [CHANGE ALBUM] and
press the OK button.
5
Use the jog dial to select the album type and press the OK
button.
The changed album is set as the save location for images
and the camera is ready to shoot.
ALBUM SELECTION
101
2006
_
04
_
03
_
101
CHANGE ALBUM
CREATE NEW
ALBUM SELECTION
CHANGE ALBUM
CREATE NEW
2006
_
04
_
03
_
101
101
SELECT
LOVE
OK