Toshiba NB100 PLL10C-01403N Users Manual Canada; English - Page 52
Using the microphone, Capture Still Image, Video Recording, Function, About, Player, Effects
 |
View all Toshiba NB100 PLL10C-01403N manuals
Add to My Manuals
Save this manual to your list of manuals |
Page 52 highlights
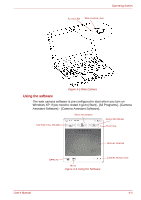
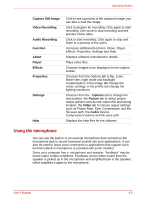
Operating Basics Capture Still Image Video Recording Audio Recording Function About Player Effects Properties Settings Help Click to see a preview of the captured image; you can also e-mail the image. Click to prepare for recording. Click again to start recording. One more to stop recording and see preview of the video. Click to start recording, Click again to stop and listen to a preview of the audio. Accesses additional functions: About, Player, Effects, Properties, Settings and Help. Displays software manufacturer details. Plays video files. Chooses images to be displayed on the capture screen. Chooses from the Options tab to flip, zoom, flicker rate, night mode and backlight compensation; in the Image tab change the colour settings; in the profile tab change the lighting conditions. Chooses from the : Options tab to change the tool position; the Picture tab to select picture output options such as size, export file and saving location; the Video tab to choose output settings such as Frame Rate, Size, Compression and the file save path; the Audio Device, Compression,Volume and file save path. Displays the help files for the software. Using the microphone You can use the built-in or an external microphone that connects to the microphone jack to record monaural sounds into your applications. It can also be used to issue voice commands to applications that support such functions.(Built-in microphone is provided with some models) Since your computer has a microphone and speaker, "feedback" may be heard under certain conditions. Feedback occurs when sound from the speaker is picked up in the microphone and amplified back to the speaker, which amplifies it again to the microphone. User's Manual 4-5
-
 1
1 -
2
-
3
-
4
-
5
-
6
-
7
-
8
-
9
-
10
-
11
-
12
-
13
-
14
-
15
-
16
-
17
-
18
-
19
-
20
-
21
-
22
-
23
-
24
-
25
-
26
-
27
-
28
-
29
-
30
-
31
-
32
-
33
-
34
-
35
-
36
-
37
-
38
-
39
-
40
-
41
-
42
-
43
-
44
-
45
-
46
-
 47
47 -
 48
48 -
 49
49 -
 50
50 -
 51
51 -
 52
52 -
 53
53 -
 54
54 -
 55
55 -
 56
56 -
 57
57 -
58
-
59
-
60
-
61
-
62
-
63
-
64
-
65
-
66
-
67
-
68
-
69
-
70
-
71
-
72
-
73
-
74
-
75
-
76
-
77
-
78
-
79
-
80
-
81
-
82
-
83
-
84
-
85
-
86
-
87
-
88
-
89
-
90
-
91
-
92
-
93
-
94
-
95
-
96
-
97
-
98
-
99
-
100
-
101
-
102
-
103
-
104
-
105
-
106
-
107
-
108
-
109
-
110
-
111
-
112
-
113
-
114
-
115
-
116
-
117
-
118
-
119
-
120
-
121
-
122
-
123
-
124
-
125
-
126
-
127
-
128
-
129
-
130
-
131
-
132
-
133
 |
 |
