Toshiba RD-XS34 User Manual - Page 114
Rate conversion dubbing for multiple parts
 |
View all Toshiba RD-XS34 manuals
Add to My Manuals
Save this manual to your list of manuals |
Page 114 highlights
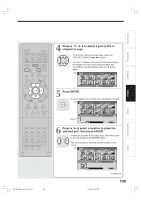
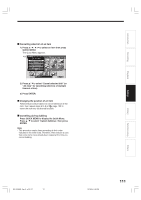
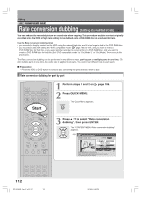
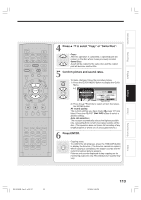
Editing Rate conversion dubbing (Dubbing at a modified bit rate) (Continued) Rate conversion dubbing for multiple parts IP FRAME OPEN/CLOSE DVD TOP MENU MENU RETURN ANGLE SUBTITLE AUDIO CHANNEL Start HDD TIMESLIP DVD INSTANT REPLAY INSTANT SKIP EASY NAVI REC MENU EDIT MENU LIBRARY CONTENT MENU OW SK SL SEARCH ENTER /ADJUST PAUSE STOP PICTURE PLAY REC QUICK MENU REMAIN DISPLAY TIME BAR CHP DIVIDE DIMMER FL SELECT ZOOM P in P TV PROGRESSIVE TV/VIDEO CHANNEL VOLUME INPUT SELECT SAT.CONT. SAT.MONI. TV/DVR 1 During playback or stop, press EDIT MENU. EDIT MENU The "EDIT MENU Main Menu" appears. 2 Press / to select "Rate Conv. Items", then press ENTER. The "EDIT MENU Rate Conv. Items" appears. ENTER e.g. EDIT MENU Rate Conv. Items HDD Title Original Source will be Title. Dubbing Media: DVD 3 Collect parts to be dubbed, using steps 4 to 6 B A on page 109. Each of the collected parts is recorded on the destination media as a title. You can cancel selection of an individual part. 1) Press the / / / buttons to select an item then press the QUICK MENU button. The Quick Menu appears. 2) Press the / buttons to select "Cancel selected title" (or "All clear" for cancelling selection of multiple items at a time). 3) Press the ENTER button. 4 Check the rate for picture and sound quality. To change the setting, perform the following steps. 1) Press the QUICK MENU button to display the Quick Menu. 2) Press the / buttons to select "AV record quality" and press the ENTER button. 3) Press the ADJUST ( / ) button to select the setting number and press the ENTER button. When "Copy" on the bottom shows "X", the selected parts are beyond the disc capacity. Change the rate for picture and sound quality or reduce parts to dub. 114 RD-XS34SB_Ope_E_p103-117 114 12/18/04, 5:48 PM
-
 1
1 -
2
-
3
-
4
-
5
-
6
-
7
-
8
-
9
-
10
-
11
-
12
-
13
-
14
-
15
-
16
-
17
-
18
-
19
-
20
-
21
-
22
-
23
-
24
-
25
-
26
-
27
-
28
-
29
-
30
-
31
-
32
-
33
-
34
-
35
-
36
-
37
-
38
-
39
-
40
-
41
-
42
-
43
-
44
-
45
-
46
-
47
-
48
-
49
-
50
-
51
-
52
-
53
-
54
-
55
-
56
-
57
-
58
-
59
-
60
-
61
-
62
-
63
-
64
-
65
-
66
-
67
-
68
-
69
-
70
-
71
-
72
-
73
-
74
-
75
-
76
-
77
-
78
-
79
-
80
-
81
-
82
-
83
-
84
-
85
-
86
-
87
-
88
-
89
-
90
-
91
-
92
-
93
-
94
-
95
-
96
-
97
-
98
-
99
-
100
-
101
-
102
-
103
-
104
-
105
-
106
-
107
-
108
-
 109
109 -
 110
110 -
 111
111 -
 112
112 -
 113
113 -
 114
114 -
 115
115 -
 116
116 -
 117
117 -
 118
118 -
 119
119 -
120
-
121
-
122
-
123
-
124
-
125
-
126
-
127
-
128
-
129
-
130
-
131
-
132
-
133
-
134
-
135
-
136
-
137
-
138
-
139
-
140
-
141
-
142
-
143
-
144
-
145
-
146
-
147
-
148
-
149
-
150
-
151
-
152
-
153
-
154
-
155
-
156
-
157
-
158
-
159
-
160
-
161
-
162
-
163
-
164
-
165
-
166
-
167
-
168
-
169
-
170
-
171
-
172
-
173
-
174
-
175
 |
 |
