Toshiba RD-XS34 User Manual - Page 45
Time Shift - specifications
 |
View all Toshiba RD-XS34 manuals
Add to My Manuals
Save this manual to your list of manuals |
Page 45 highlights
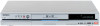
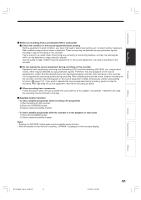
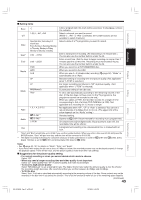
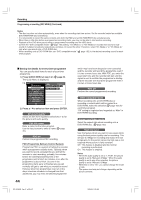
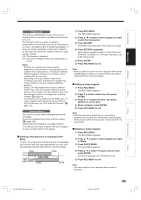
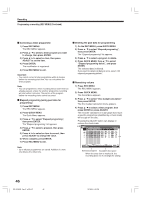
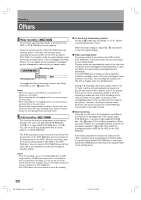
Introduction Recording Playback Editing Chap. mute This feature automatically creates divisions for chapters when no audio (no audible sound) portion is found. For example, when you have recorded a programme of music clips, you can use this feature to jump to the beginning of a clip during playback. It does not create completely independent chapters or automatically divide into chapters when no audio portion is found. Off : This feature is disabled. On : Division for chapters when no audio portion is found. Notes • Divisions for chapters may not be created, depending on the contents of the programme or the condition of no audio portion, or it may be created at different positions. A division for a chapter may be created within a music clip. • Depending on the specification made for the recording sound level, a division for a chapter may not be created or it may be created at different positions. • Setting "On" may create many chapters, and their number may reach the maximum allowed. At that point, no more chapters can be created. In this case, decrease the chapters, for example by combining chapters ( page 94). • This feature is not available on DVD-R/RW discs. To create chapters automatically during recording on DVD-R/RW discs, set "DVD-Video:CHP create." ( page 162). Genre setting You can set a genre before setting programmed recording. To see the registered list, refer to Genre setting ( page 163). Set the genre according to recording contents. The selection you have made for the timer program is shown at the bottom of the display. Shifting a time period of a recording (Time Shift) If a prior TV programme extends beyond its scheduled time and into one that you programmed, you can shift the programmed start and end time of the recording. 13:00 13:54 Time Shift 20 minutes extend 13:20 14:14 1) Press REC MENU. The REC MENU appears. 2) Press / to select a timer program you want to shift the time period. 3) Press EXTEND. "Start time" and "End time" are ready to be input. 4) Press EXTEND repeatedly. Each time you press the button, "Start time" and "End time" is shifted in 10 minutes intervals to, up to 60 minutes later. 5) Press ENTER. 6) Press REC MENU to exit. Note • After you shifted the time of a timer program which will be repeated daily or weekly, you should restore the original start/stop time for future recordings. Adding a timer program 1) Press REC MENU. The REC MENU appears. 2) Press to select a blank line, then press ENTER. 3) Press / to select the item, then press ADJUST to set the item. 4) When complete, press ENTER. 5) Press REC MENU to exit. Note • While the recorder is preparing for or executing a programmed recording, you cannot add a timer program which will start within 5 minutes and 15 seconds from the current time. Deleting a timer program 1) Press REC MENU. The REC MENU appears. 2) Press / to select a timer program you want to delete. 3) Press QUICK MENU. The Quick Menu appears. 4) Press / to select "Program cancel", then press ENTER. Check the message, then delete the entry. 5) Press REC MENU to exit. Note • You cannot delete a timer program while another is executed. Library Function setup Others RD-XS34SB_Ope_E_p039-047 45 12/20/04, 6:48 PM 45
-
 1
1 -
2
-
3
-
4
-
5
-
6
-
7
-
8
-
9
-
10
-
11
-
12
-
13
-
14
-
15
-
16
-
17
-
18
-
19
-
20
-
21
-
22
-
23
-
24
-
25
-
26
-
27
-
28
-
29
-
30
-
31
-
32
-
33
-
34
-
35
-
36
-
37
-
38
-
39
-
 40
40 -
 41
41 -
 42
42 -
 43
43 -
 44
44 -
 45
45 -
 46
46 -
 47
47 -
 48
48 -
 49
49 -
 50
50 -
51
-
52
-
53
-
54
-
55
-
56
-
57
-
58
-
59
-
60
-
61
-
62
-
63
-
64
-
65
-
66
-
67
-
68
-
69
-
70
-
71
-
72
-
73
-
74
-
75
-
76
-
77
-
78
-
79
-
80
-
81
-
82
-
83
-
84
-
85
-
86
-
87
-
88
-
89
-
90
-
91
-
92
-
93
-
94
-
95
-
96
-
97
-
98
-
99
-
100
-
101
-
102
-
103
-
104
-
105
-
106
-
107
-
108
-
109
-
110
-
111
-
112
-
113
-
114
-
115
-
116
-
117
-
118
-
119
-
120
-
121
-
122
-
123
-
124
-
125
-
126
-
127
-
128
-
129
-
130
-
131
-
132
-
133
-
134
-
135
-
136
-
137
-
138
-
139
-
140
-
141
-
142
-
143
-
144
-
145
-
146
-
147
-
148
-
149
-
150
-
151
-
152
-
153
-
154
-
155
-
156
-
157
-
158
-
159
-
160
-
161
-
162
-
163
-
164
-
165
-
166
-
167
-
168
-
169
-
170
-
171
-
172
-
173
-
174
-
175
 |
 |