Toshiba RD-XS34 User Manual - Page 40
Start
 |
View all Toshiba RD-XS34 manuals
Add to My Manuals
Save this manual to your list of manuals |
Page 40 highlights
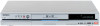
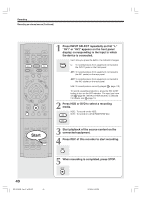
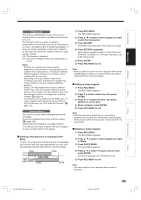
Recording Recording an external source (Continued) IP FRAME OPEN/CLOSE DVD TOP MENU MENU RETURN ANGLE SUBTITLE AUDIO CHANNEL HDD TIMESLIP DVD EASY NAVI INSTANT REPLAY INSTANT SKIP REC MENU EDIT MENU LIBRARY CONTENT MENU OW SK SL SEARCH ENTER /ADJUST PAUSE STOP PICTURE PLAY REC QUICK MENU REMAIN DISPLAY TIME BAR CHP DIVIDE DIMMER FL SELECT ZOOM P in P Start TV PROGRESSIVE TV/VIDEO CHANNEL VOLUME INPUT SELECT SAT.CONT. SAT.MONI. TV/DVR 1 Press INPUT SELECT repeatedly so that "L," "AV1" or "AV2" appears on the front panel display, corresponding to the input in which the device is connected. INPUT SELECT Each time you press the button, the indicator changes. L: To record pictures from equipment connected to the INPUT jacks on the front panel. AV1: To record pictures from equipment connected to the AV1 socket on the rear panel. AV2: To record pictures from equipment connected to the AV2 socket on the rear panel. L-U: To record pictures currently played ( page 116). To record a satellite programme, press the SAT.CONT. button to turn on the SAT indicator. The input you have set ( page 49, INSTALLATION GUIDE) is selected. For details, see page 19. 2 Press HDD or DVD to select a recording media. HDD : To record on the HDD. DVD : To record on a DVD-RAM/R/RW disc. HDD DVD 3 Start playback of the source content on the connected equipment. 4 Press REC of this recorder to start recording. REC 5 When recording is completed, press STOP. STOP 40 RD-XS34SB_Ope_E_p039-047 40 12/18/04, 5:43 PM
-
 1
1 -
2
-
3
-
4
-
5
-
6
-
7
-
8
-
9
-
10
-
11
-
12
-
13
-
14
-
15
-
16
-
17
-
18
-
19
-
20
-
21
-
22
-
23
-
24
-
25
-
26
-
27
-
28
-
29
-
30
-
31
-
32
-
33
-
34
-
 35
35 -
 36
36 -
 37
37 -
 38
38 -
 39
39 -
 40
40 -
 41
41 -
 42
42 -
 43
43 -
 44
44 -
 45
45 -
46
-
47
-
48
-
49
-
50
-
51
-
52
-
53
-
54
-
55
-
56
-
57
-
58
-
59
-
60
-
61
-
62
-
63
-
64
-
65
-
66
-
67
-
68
-
69
-
70
-
71
-
72
-
73
-
74
-
75
-
76
-
77
-
78
-
79
-
80
-
81
-
82
-
83
-
84
-
85
-
86
-
87
-
88
-
89
-
90
-
91
-
92
-
93
-
94
-
95
-
96
-
97
-
98
-
99
-
100
-
101
-
102
-
103
-
104
-
105
-
106
-
107
-
108
-
109
-
110
-
111
-
112
-
113
-
114
-
115
-
116
-
117
-
118
-
119
-
120
-
121
-
122
-
123
-
124
-
125
-
126
-
127
-
128
-
129
-
130
-
131
-
132
-
133
-
134
-
135
-
136
-
137
-
138
-
139
-
140
-
141
-
142
-
143
-
144
-
145
-
146
-
147
-
148
-
149
-
150
-
151
-
152
-
153
-
154
-
155
-
156
-
157
-
158
-
159
-
160
-
161
-
162
-
163
-
164
-
165
-
166
-
167
-
168
-
169
-
170
-
171
-
172
-
173
-
174
-
175
 |
 |