Toshiba RD-XS34 User Manual - Page 125
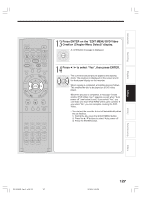
Press, to select Next, then press, ENTER., to set the items.
 |
View all Toshiba RD-XS34 manuals
Add to My Manuals
Save this manual to your list of manuals |
Page 125 highlights
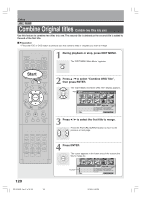
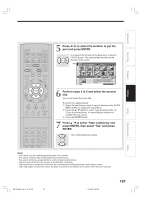
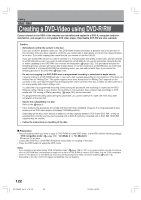
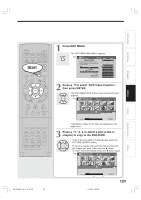
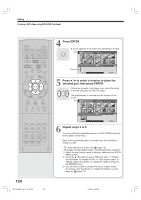
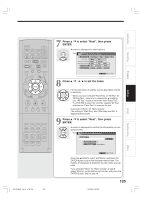
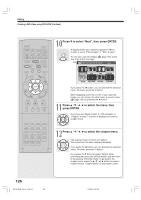
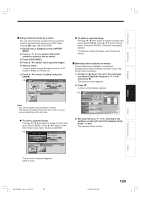
IP FRAME OPEN/CLOSE DVD TOP MENU MENU RETURN ANGLE SUBTITLE AUDIO CHANNEL HDD TIMESLIP DVD EASY NAVI INSTANT REPLAY INSTANT SKIP REC MENU EDIT MENU LIBRARY CONTENT MENU OW SK SL SEARCH ENTER /ADJUST PAUSE STOP PICTURE PLAY REC QUICK MENU REMAIN DISPLAY TIME BAR CHP DIVIDE DIMMER FL SELECT ZOOM P in P TV PROGRESSIVE TV/VIDEO CHANNEL VOLUME INPUT SELECT SAT.CONT. SAT.MONI. TV/DVR RD-XS34SB_Ope_E_p118-125 125 7 Press / to select "Next", then press ENTER. A screen is displayed to select options. ENTER e.g. EDIT MENU DVD Video Creation(Option Settings) Menu Create Title+Chapter Title Chapter Start Play Menu Title 1 After play one title Menu Next Title After play final title Menu Title 1 Stop Writing Test None Parts Test All Test Set aspect ratio Original 4:3 fixed 16:9 fixed None B A Return Next 8 Press / / / to set the items. For the instruction of setting, see the description shown at selection. ENTER • When you have selected "Parts Test" or "All Test" for "Writing Test", extra time is required for pre-writing test. "All Test" requires more time than "Parts Test". If a DVD-RW is used, the recorder regards "All Test" selection as "Parts Test" to execute the test. If you select "None" for "Menu Create": The setting of "Start Play" and "After play one title" is skipped automatically. 9 Press / to select "Next", then press ENTER. A screen is displayed to confirm the information you are going to write. ENTER e.g. EDIT MENU DVD Video Creation(Disc Information) Disc Name Edit Name Total title number 11 Total time 1 hour 24 min. Return Next B A Press the button to select "Edit Name" and press the ENTER button to go to the character entry screen. The number of characters is limited for the disc name you can enter. If you selected "None" for "Menu Create" at step 8, select "Writing" on the bottom right corner, and press the ENTER button. Skip to step 14. 125 12/18/04, 5:48 PM Others Function setup Library Editing Playback Recording Introduction
-
 1
1 -
2
-
3
-
4
-
5
-
6
-
7
-
8
-
9
-
10
-
11
-
12
-
13
-
14
-
15
-
16
-
17
-
18
-
19
-
20
-
21
-
22
-
23
-
24
-
25
-
26
-
27
-
28
-
29
-
30
-
31
-
32
-
33
-
34
-
35
-
36
-
37
-
38
-
39
-
40
-
41
-
42
-
43
-
44
-
45
-
46
-
47
-
48
-
49
-
50
-
51
-
52
-
53
-
54
-
55
-
56
-
57
-
58
-
59
-
60
-
61
-
62
-
63
-
64
-
65
-
66
-
67
-
68
-
69
-
70
-
71
-
72
-
73
-
74
-
75
-
76
-
77
-
78
-
79
-
80
-
81
-
82
-
83
-
84
-
85
-
86
-
87
-
88
-
89
-
90
-
91
-
92
-
93
-
94
-
95
-
96
-
97
-
98
-
99
-
100
-
101
-
102
-
103
-
104
-
105
-
106
-
107
-
108
-
109
-
110
-
111
-
112
-
113
-
114
-
115
-
116
-
117
-
118
-
119
-
 120
120 -
 121
121 -
 122
122 -
 123
123 -
 124
124 -
 125
125 -
 126
126 -
 127
127 -
 128
128 -
 129
129 -
 130
130 -
131
-
132
-
133
-
134
-
135
-
136
-
137
-
138
-
139
-
140
-
141
-
142
-
143
-
144
-
145
-
146
-
147
-
148
-
149
-
150
-
151
-
152
-
153
-
154
-
155
-
156
-
157
-
158
-
159
-
160
-
161
-
162
-
163
-
164
-
165
-
166
-
167
-
168
-
169
-
170
-
171
-
172
-
173
-
174
-
175
 |
 |