Toshiba RD-XS34 User Manual - Page 145
Playback, Recording, Editing, Function setup, Others, Introduction
 |
View all Toshiba RD-XS34 manuals
Add to My Manuals
Save this manual to your list of manuals |
Page 145 highlights
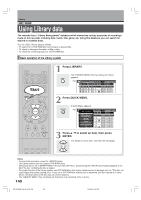
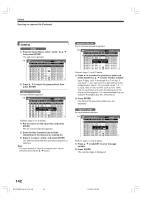
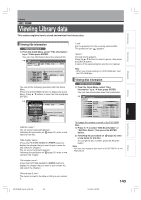
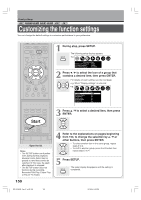
Introduction Recording Playback Editing Erasing unnecessary data When the Library database is full (3000 entries).→ Select "Del title information". 1) Press LIBRARY. Deleting all the Library information only Use this feature when you want to rearrange the whole Library information from the beginning. 1) Press LIBRARY. 2) Press / to select a title. 2) Press QUICK MENU. 3) Press QUICK MENU. 4) Press / to select "Library management" then press ENTER. 5) Press / to select "Del title information", then press ENTER. 6) Press / to select "Yes", then press ENTER. Library data of the title selected in step 2) is erased. To cancel, select "No". 3) Press / to select "Library management" and press ENTER. 4) Press / to select "Delete All DVD-RAM information" or "Delete all library information". Delete all DVD-RAM information: Deletes all Library information from the DVD-RAM disc, leaving the Library information on the HDD. Delete all library information: Deletes all Library information from the HDD and DVD-RAM disc. 5) Press ENTER. To delete information of all titles in the specified data → Select "Del title information by disc". 1) Press LIBRARY. 2) Press / to select a title. 3) Press QUICK MENU. 4) Press / to select "Library management" then press ENTER. 5) Press / to select "Del title information by disc", then press ENTER. 6) Press / to select "Yes", then press ENTER. Library data of all titles in the disc you selected in step 2) is erased. To cancel, select "No". 6) Press / to select "Yes" and press ENTER. Forced deletion of disc numbers A number of an inactive disc can be deleted from the Library Management, so that it can be assigned to a new disc. 1) Press LIBRARY. 2) Press QUICK MENU. 3) Press / to select "Library management", then press ENTER. 4) Press / to select "Del disc no. from Library", then press ENTER. 5) Press ADJUST to select a number to delete, then press ENTER. Note • Deleting a disc number also deletes data of all titles in the disc. Library Function setup Others RD-XS34SB_Ope_E_p139-148 145 12/18/04, 5:52 PM 145
-
 1
1 -
2
-
3
-
4
-
5
-
6
-
7
-
8
-
9
-
10
-
11
-
12
-
13
-
14
-
15
-
16
-
17
-
18
-
19
-
20
-
21
-
22
-
23
-
24
-
25
-
26
-
27
-
28
-
29
-
30
-
31
-
32
-
33
-
34
-
35
-
36
-
37
-
38
-
39
-
40
-
41
-
42
-
43
-
44
-
45
-
46
-
47
-
48
-
49
-
50
-
51
-
52
-
53
-
54
-
55
-
56
-
57
-
58
-
59
-
60
-
61
-
62
-
63
-
64
-
65
-
66
-
67
-
68
-
69
-
70
-
71
-
72
-
73
-
74
-
75
-
76
-
77
-
78
-
79
-
80
-
81
-
82
-
83
-
84
-
85
-
86
-
87
-
88
-
89
-
90
-
91
-
92
-
93
-
94
-
95
-
96
-
97
-
98
-
99
-
100
-
101
-
102
-
103
-
104
-
105
-
106
-
107
-
108
-
109
-
110
-
111
-
112
-
113
-
114
-
115
-
116
-
117
-
118
-
119
-
120
-
121
-
122
-
123
-
124
-
125
-
126
-
127
-
128
-
129
-
130
-
131
-
132
-
133
-
134
-
135
-
136
-
137
-
138
-
139
-
 140
140 -
 141
141 -
 142
142 -
 143
143 -
 144
144 -
 145
145 -
 146
146 -
 147
147 -
 148
148 -
 149
149 -
 150
150 -
151
-
152
-
153
-
154
-
155
-
156
-
157
-
158
-
159
-
160
-
161
-
162
-
163
-
164
-
165
-
166
-
167
-
168
-
169
-
170
-
171
-
172
-
173
-
174
-
175
 |
 |
