Weider Pro 8500 Smith Cage Bench English Manual - Page 12
Attach the Carriage Guides 64 to the Center
 |
View all Weider Pro 8500 Smith Cage Bench manuals
Add to My Manuals
Save this manual to your list of manuals |
Page 12 highlights
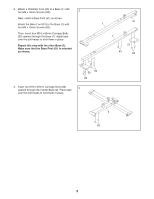
8. Attach an Upright (3) to the left Base (1) with the indicated two M10 x 65mm Carriage Bolts (83) 8 and two M10 Locknuts (79). Do not tighten the Locknuts yet. Repeat this step with the other Upright (not shown). 3 1 79 1 9. Orient the two Carriage Guides (64) so that the rings are near the bottom. 9 Attach the Carriage Guides (64) to the Center Base (2) with an M10 x 155mm Bolt (99), two M10 Washers (84), two 6mm Spacers (75), and an M10 Locknut (79). Do not tighten the Locknut yet. Slide two Carriage Bumpers (27) onto the Carriage Guides (64). Slide the Weight Carriage (41) onto the Carriage Guides as shown. 83 64 99 27 84 64 41 27 75 84 79 2 12
-
 1
1 -
2
-
3
-
4
-
5
-
6
-
 7
7 -
 8
8 -
 9
9 -
 10
10 -
 11
11 -
 12
12 -
 13
13 -
 14
14 -
 15
15 -
 16
16 -
 17
17 -
18
-
19
-
20
-
21
-
22
-
23
-
24
-
25
-
26
-
27
-
28
-
29
-
30
-
31
-
32
-
33
-
34
-
35
-
36
-
37
-
38
-
39
-
40
-
41
-
42
-
43
-
44
 |
 |

12
9.
Orient the two Carriage Guides (64) so that the
rings are near the bottom.
Attach the Carriage Guides (64) to the Center
Base (2) with an M10 x 155mm Bolt (99), two
M10 Washers (84), two 6mm Spacers (75),
and an M10 Locknut (79).
Do not tighten the
Locknut yet.
Slide two Carriage Bumpers (27) onto the
Carriage Guides (64). Slide the Weight Carriage
(41) onto the Carriage Guides as shown.
9
99
84
84
79
2
75
27
41
64
64
27
8.
Attach an Upright (3) to the left Base (1) with the
indicated two M10 x 65mm Carriage Bolts (83)
and two M10 Locknuts (79).
Do not tighten the
Locknuts yet
.
Repeat this step with the other Upright (not
shown).
79
1
1
83
3
8