Weider Pro 8500 Smith Cage Bench English Manual - Page 25
M6 Locknut 100 to the High Cable 54
 |
View all Weider Pro 8500 Smith Cage Bench manuals
Add to My Manuals
Save this manual to your list of manuals |
Page 25 highlights
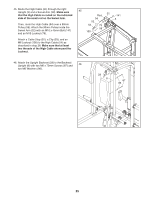
45. Route the High Cable (54) through the right Upright (3) and a Swivel Arm (32). Make sure that the High Cable is routed on the indicated side of the small rod on the Swivel Arm. Then, route the High Cable (54) over a 90mm Pulley (58). Attach the 90mm Pulley inside the Swivel Arm (32) with an M10 x 45mm Bolt (141) and an M10 Locknut (79). Attach a Cable Stop (52), a Clip (53), and an M6 Locknut (100) to the High Cable (54) as described in step 28. Make sure that at least two threads of the High Cable show past the Locknut. 45 Rod 32 141 54 52 3 53 79 58 100 46. Attach the Upright Backrest (29) to the Backrest Upright (8) with two M6 x 70mm Screws (87) and 46 two M6 Washers (86). 29 8 86 87 25
-
 1
1 -
2
-
3
-
4
-
5
-
6
-
7
-
8
-
9
-
10
-
11
-
12
-
13
-
14
-
15
-
16
-
17
-
18
-
19
-
 20
20 -
 21
21 -
 22
22 -
 23
23 -
 24
24 -
 25
25 -
 26
26 -
 27
27 -
 28
28 -
 29
29 -
 30
30 -
31
-
32
-
33
-
34
-
35
-
36
-
37
-
38
-
39
-
40
-
41
-
42
-
43
-
44
 |
 |

25
45. Route the High Cable (54) through the right
Upright (3) and a Swivel Arm (32).
Make sure
that the High Cable is routed on the indicated
side of the small rod on the Swivel Arm.
Then, route the High Cable (54) over a 90mm
Pulley (58). Attach the 90mm Pulley inside the
Swivel Arm (32) with an M10 x 45mm Bolt (141)
and an M10 Locknut (79).
Attach a Cable Stop (52), a Clip (53), and an
M6 Locknut (100) to the High Cable (54) as
described in step 28.
Make sure that at least
two threads of the High Cable show past the
Locknut.
46
52
100
53
141
Rod
45
79
58
54
32
3
29
86
87
8
46. Attach the Upright Backrest (29) to the Backrest
Upright (8) with two M6 x 70mm Screws (87) and
two M6 Washers (86).