ZyXEL N220 User Guide - Page 156
Windows XP,
 |
View all ZyXEL N220 manuals
Add to My Manuals
Save this manual to your list of manuals |
Page 156 highlights
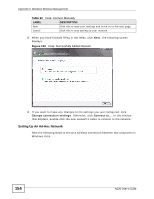
Appendix C Windows Wireless Management 4 Enter the Security key/Passphrase. Everybody on the network must enter this key in their computer's wireless client in order to access the network. If you want to see the characters you entered, select the Display characters box. Otherwise, leave it empty (dots display instead of the characters). 5 If you will use this ad-hoc network again, select the Save this network box. If you do this, the next time you click Start > Connect to, you can select the network from the list. 6 Click Next. The following screen displays. Figure 126 Vista: Ad-hoc Network Ready 7 If you want to share files with other computers on the ad-hoc network, or let other computers use your Internet connection, click the Network and Sharing Center link. Otherwise, click Close. Windows XP Be sure you have the Windows XP service pack 2 installed on your computer. Otherwise, you should at least have the Windows XP service pack 1 already on your computer and download the support patch for WPA from the Microsoft web site. Windows XP SP2 screen shots are shown unless otherwise specified. Click the help icon ( ) in most screens, move the cursor to the item that you want the information about and click to view the help. 156 N220 User's Guide
-
 1
1 -
2
-
3
-
4
-
5
-
6
-
7
-
8
-
9
-
10
-
11
-
12
-
13
-
14
-
15
-
16
-
17
-
18
-
19
-
20
-
21
-
22
-
23
-
24
-
25
-
26
-
27
-
28
-
29
-
30
-
31
-
32
-
33
-
34
-
35
-
36
-
37
-
38
-
39
-
40
-
41
-
42
-
43
-
44
-
45
-
46
-
47
-
48
-
49
-
50
-
51
-
52
-
53
-
54
-
55
-
56
-
57
-
58
-
59
-
60
-
61
-
62
-
63
-
64
-
65
-
66
-
67
-
68
-
69
-
70
-
71
-
72
-
73
-
74
-
75
-
76
-
77
-
78
-
79
-
80
-
81
-
82
-
83
-
84
-
85
-
86
-
87
-
88
-
89
-
90
-
91
-
92
-
93
-
94
-
95
-
96
-
97
-
98
-
99
-
100
-
101
-
102
-
103
-
104
-
105
-
106
-
107
-
108
-
109
-
110
-
111
-
112
-
113
-
114
-
115
-
116
-
117
-
118
-
119
-
120
-
121
-
122
-
123
-
124
-
125
-
126
-
127
-
128
-
129
-
130
-
131
-
132
-
133
-
134
-
135
-
136
-
137
-
138
-
139
-
140
-
141
-
142
-
143
-
144
-
145
-
146
-
147
-
148
-
149
-
150
-
 151
151 -
 152
152 -
 153
153 -
 154
154 -
 155
155 -
 156
156 -
 157
157 -
 158
158 -
 159
159 -
 160
160 -
 161
161 -
162
-
163
-
164
-
165
-
166
-
167
-
168
-
169
-
170
-
171
-
172
-
173
-
174
-
175
-
176
-
177
-
178
-
179
-
180
-
181
-
182
-
183
-
184
-
185
-
186
-
187
 |
 |
