Apple M8760LL Service Guide
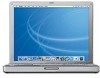
Apple M8760LL - PowerBook G4 - PowerPC 867 MHz Manual
 |
UPC - 718908426234
View all Apple M8760LL manuals
Add to My Manuals
Save this manual to your list of manuals |
Apple M8760LL manual content summary:
- Apple M8760LL | Service Guide - Page 1
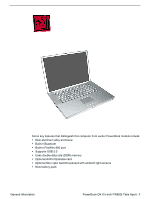
Service Source PowerBook G4 (15-inch FW800) 16 September 2003 © 2003 Apple Computer, Inc. All rights reserved. - Apple M8760LL | Service Guide - Page 2
Service Source Take Apart PowerBook G4 (15-inch FW800) © 2003 Apple Computer, Inc. All rights reserved. - Apple M8760LL | Service Guide - Page 3
enclosure • Built-in Bluetooth • Built-in FireWire 800 port • Supports USB 2.0 • Uses double-data rate (DDR) memory • Optional AirPort Extreme card • Optional fiber optic backlit keyboard with ambient light sensors • New battery pack General Information PowerBook G4 (15-inch FW800) Take Apart - 1 - Apple M8760LL | Service Guide - Page 4
screw tray (such as a plastic ice cube tray) • Double-stick tape • Kapton® tape (922-1731) • Voltmeter (for troubleshooting) • Small low-power magnet (for troubleshooting) • Apple Pro keyboard and mouse (for troubleshooting) 2 - PowerBook G4 (15-inch FW800) Take Apart General Information - Apple M8760LL | Service Guide - Page 5
Serial Number Location The serial number is located in the battery bay. General Information PowerBook G4 (15-inch FW800) Take Apart - 3 - Apple M8760LL | Service Guide - Page 6
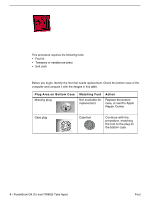
table: Plug Area on Bottom Case Missing plug Matching Foot Not available for replacement Action Replace the bottom case, or send to Apple Repair Center. Case plug Case foot Continue with the procedure, matching the foot to the plug on the bottom case. 4 - PowerBook G4 (15-inch FW800) Take - Apple M8760LL | Service Guide - Page 7
so that only the hard plastic plug is visible (as shown below). Important: Notice the inner ring of the plug. When positioning the foot, make sure the textured plane of the rubber foot fits into the compatible ring in the plug. This ensures a balanced and level fitting. Foot PowerBook G4 (15-inch - Apple M8760LL | Service Guide - Page 8
touch the glue at any time. Before opening the glue, review the safety instructions at the end of this document. Important: The glue tube Apply one drop of glue to the plug on the bottom case. Do not spread the glue. 6. Using tweezers or needlenose pliers PowerBook G4 (15-inch FW800) Take Apart Foot - Apple M8760LL | Service Guide - Page 9
Coin Part Location Preliminary Steps Warning: Always shut down the computer before opening it to avoid damaging its internal components or causing injury. After you shut down the computer, the internal components can be very hot. Let the computer cool down before continuing. Battery PowerBook G4 - Apple M8760LL | Service Guide - Page 10
the power cord and any other cables connected to the computer. 3. Place the computer face down on a soft cloth. 4. Insert a coin in the battery lock slot and turn it one quarter turn clockwise. The battery should raise up slightly. Lift the battery out of the battery bay. 8 - PowerBook G4 (15 - Apple M8760LL | Service Guide - Page 11
Memory Door and Memory Cards Tools This procedure requires the following tools: • Soft cloth • #0 Phillips screwdriver Part Location Preliminary Steps Before you begin, remove the battery. Memory Door and Memory Cards PowerBook G4 (15-inch FW800) Take Apart - 9 - Apple M8760LL | Service Guide - Page 12
from the memory door then remove the door. Note: If only one memory card is installed, the factory installs it in the bottom memory slot. Note: Memory must be removed from the top slot before removing from the bottom slot. 10 - PowerBook G4 (15-inch FW800) Take Apart Memory Door and Memory Cards - Apple M8760LL | Service Guide - Page 13
3. To remove memory cards, carefully spread the two locking tabs for the slot (top or bottom) away from the card on both sides and allow the card to pop up slightly. 4. Pull the card straight back and out of the memory slot. Memory Door and Memory Cards PowerBook G4 (15-inch FW800) Take Apart - - Apple M8760LL | Service Guide - Page 14
bottom slot first. • Align the notch in the memory card with the tooth in the slot before inserting. 1. To install a memory card into the bottom slot, insert the card at a low angle behind the locking tabs of the top slot. 12 - PowerBook G4 (15-inch FW800) Take Apart Memory Door and Memory Cards - Apple M8760LL | Service Guide - Page 15
fully into the slot. 3. Carefully spread the two locking tabs for the bottom slot away from the card on both sides while pushing the card straight down until the tabs click onto both sides of the card, locking it into place. Memory Door and Memory Cards PowerBook G4 (15-inch FW800) Take Apart - 13 - Apple M8760LL | Service Guide - Page 16
card at a 30-degree angle, above the locking tabs. 5. Push the card in until it is firmly seated. 6. As with the bottom slot, spread the locking tabs for the top slot while pushing the card straight down until it locks into place. 14 - PowerBook G4 (15-inch FW800) Take Apart Memory Door and Memory - Apple M8760LL | Service Guide - Page 17
door. 9. Replace the battery. 10. Use Apple System Profiler to verify that the memory is recognized. (Choose the menu bar Apple logo () > About This Mac, click More Info..., select the System Profile tab, open the Memory Overview.) Memory Door and Memory Cards PowerBook G4 (15-inch FW800) Take - Apple M8760LL | Service Guide - Page 18
AirPort Extreme Card Tools This procedure requires the following tools: • Black stick (or other nonconductive nylon or plastic flat-blade tool) Part Location Preliminary Steps Before you begin, remove the battery. 16 - PowerBook G4 (15-inch FW800) Take Apart AirPort Extreme Card - Apple M8760LL | Service Guide - Page 19
Procedure 1. Pull outward on the slot to open the AirPort Extreme Card door. 2. Use a black stick to pull out the card's clear plastic pull tab, tucked underneath. AirPort Extreme Card PowerBook G4 (15-inch FW800) Take Apart - 17 - Apple M8760LL | Service Guide - Page 20
3. Gently disconnect the AirPort Extreme antenna cable. 4. Use the pull tab to pull out the card. 18 - PowerBook G4 (15-inch FW800) Take Apart AirPort Extreme Card - Apple M8760LL | Service Guide - Page 21
5. Slide the replacement AirPort Extreme Card into the slot, as shown. 6. Push the card into the slot until fully seated. AirPort Extreme Card PowerBook G4 (15-inch FW800) Take Apart - 19 - Apple M8760LL | Service Guide - Page 22
7. Connect the end of the antenna cable to the card. 8. Loop the clear plastic tab down around the antenna cable and tuck it into the slot under the card so that it secures the cable. 20 - PowerBook G4 (15-inch FW800) Take Apart AirPort Extreme Card - Apple M8760LL | Service Guide - Page 23
9. Close the AirPort door, reassemble and test the computer. AirPort Extreme Card PowerBook G4 (15-inch FW800) Take Apart - 21 - Apple M8760LL | Service Guide - Page 24
) • Dental pick (with up to a ninety-degree bend) • Black stick (or other nonconductive nylon or plastic flat-blade tool) • Soft cloth • Multi-compartment screw tray Part Location 22 - PowerBook G4 (15-inch FW800) Take Apart Top Case - Apple M8760LL | Service Guide - Page 25
is removable only after removing the top case. 1. Place the computer face down on a soft cloth. 2. Remove the two screws inside the battery bay. 3. Remove the two screws from the memory bay. 4. Remove the four screws along the back edge. Top Case PowerBook G4 (15-inch FW800) Take Apart - 23 - Apple M8760LL | Service Guide - Page 26
5. With the display open, rest the computer on one side. Remove the three screws. 6. Turn over the computer and remove the three screws on the other side. 24 - PowerBook G4 (15-inch FW800) Take Apart Top Case - Apple M8760LL | Service Guide - Page 27
the computer right side up and open the display slightly past 90-degrees. 9. Remove the two hex screws at the back corners of the top case (a Torx T6 can also be used). Top Case PowerBook G4 (15-inch FW800) Take Apart - 25 - Apple M8760LL | Service Guide - Page 28
10. Use a black stick along the seam of the top and bottom case to help release the top case at the back sides (gently twisting the black stick may help). 26 - PowerBook G4 (15-inch FW800) Take Apart Top Case - Apple M8760LL | Service Guide - Page 29
along the seam of the top and bottom case to add slight upward pressure so that the top case will pop up when the clip is released. Then insert a dental pick behind the clip and pull out slightly to release the clip and the top case. Top Case PowerBook G4 (15-inch FW800) Take Apart - 27 - Apple M8760LL | Service Guide - Page 30
, pivoting along the back, to rest the top case against the display. Do not strain the cables connected to the logic board. Important: Adjust the display so that there is no strain on the top case cables and so the top case will not fall forward. 28 - PowerBook G4 (15-inch FW800) Take Apart Top - Apple M8760LL | Service Guide - Page 31
cable as guides. Warning: If the flex cable is inserted crooked, some signals may not be connected or signals may short together. Note: If a cable is not securing properly, verify that it is inserted on the correct side of the locking bar. 15. Lift off the top case. Top Case PowerBook G4 (15-inch - Apple M8760LL | Service Guide - Page 32
nothing raised up or incorrectly over a component. 2. Check perimeter wiring, where shown, to verify that it will not be caught or pinched by the top case during replacement. 3. Verify that the LVDS cable is secured with Kapton tape and lays flat. 30 - PowerBook G4 (15-inch FW800) Take Apart Top - Apple M8760LL | Service Guide - Page 33
, check cable connections and routing. Note: The top case below has the wires and connector for the fiber optics for the optional backlit keyboard (right and can break off easily. Be extremely careful to gently straighten tabs, if needed. Top Case PowerBook G4 (15-inch FW800) Take Apart - 31 - Apple M8760LL | Service Guide - Page 34
hole to push on the boss slightly. Important: The tabs are fragile. Do not apply too much pressure or bend them. Important: The top case should lay flat along the sides and top, if not, make sure that cables and components are not interfering. 32 - PowerBook G4 (15-inch FW800) Take Apart Top - Apple M8760LL | Service Guide - Page 35
the proper attachment of the top case. 10. Reinstall the side screws in the order shown, below. Replacement Note: Do NOT insert side screws into the DVI port screw holes. The screws can jam in the holes, requiring removing the logic board to remove. Top Case PowerBook G4 (15-inch FW800) Take Apart - Apple M8760LL | Service Guide - Page 36
15. Replace the battery. 16. Testing the computer should include powering on, checking the keyboard and trackpad function. If the computer has the optional keyboard backlight feature, operate the computer in a darkened room to check for keyboard backlight function. 34 - PowerBook G4 (15-inch FW800 - Apple M8760LL | Service Guide - Page 37
Tools This procedure requires the following tools: • #0 Phillips screwdriver • Black stick (or other nonconductive nylon or plastic flat-blade tool) Part Location Preliminary Steps Before you begin, remove the following: • Battery • Top case Keyboard PowerBook G4 (15-inch FW800) Take Apart - 35 - Apple M8760LL | Service Guide - Page 38
icons on the F8 to F10 keys for the backlighting feature. The top case for the non-backlit keyboard does not have the fiber optics and connector. The keyboard for the non-backlit top case does not have icons on the F8 to F10 keys. 36 - PowerBook G4 (15-inch FW800) Take Apart Keyboard - Apple M8760LL | Service Guide - Page 39
1. Turn the top case over and carefully remove the black insulator film. If new film was not provided with the replacement part, reserve the film for reinstallation. Important: If the remove the black insulator around the optics and cables. Keyboard PowerBook G4 (15-inch FW800) Take Apart - 37 - Apple M8760LL | Service Guide - Page 40
2. Gently pull up on the keyboard flex cable to release the adhesive at its base. 3. Remove the thirteen screws. Note: The non-backlit top case shown. 38 - PowerBook G4 (15-inch FW800) Take Apart Keyboard - Apple M8760LL | Service Guide - Page 41
keyboard begins to separate from the top case. Work your way along through successive screw holes until a black stick can be inserted under the keyboard from the top. Important: To avoid damaging the screw boss threads, do not use a metal tool. Keyboard PowerBook G4 (15-inch FW800) Take Apart - 39 - Apple M8760LL | Service Guide - Page 42
up the keyboard and guide out its flex cable (shown below). Important: Be careful not to strain or tear the keyboard flex cable. 6. If adhesive residue is left by the keyboard in the keyboard bay, and on the fiber optics (if present), carefully rub it off. 40 - PowerBook G4 (15-inch FW800) Take - Apple M8760LL | Service Guide - Page 43
replacement keyboard, insert its flex cable through the slot in the top case and rest the bottom of the keyboard evenly along the bottom edge of the the boss holes. 3. Use a black stick to guide the sides of the keyboard into the keyboard well. Keyboard PowerBook G4 (15-inch FW800) Take Apart - 41 - Apple M8760LL | Service Guide - Page 44
raised screw boss (one on each side) to start the alignment. Avoid wrinkles or bulges. On the power button side, run your finger along the film where it folds over the edge of the keyboard bay, contact with the EMI spring on the logic board. 42 - PowerBook G4 (15-inch FW800) Take Apart Keyboard - Apple M8760LL | Service Guide - Page 45
cable to secure the adhesive. 7. Reassemble the computer. 8. Testing the computer should include powering on, checking the keyboard and trackpad function. If the computer has the optional keyboard , speaker grill openings and side ports. Keyboard PowerBook G4 (15-inch FW800) Take Apart - 43 - Apple M8760LL | Service Guide - Page 46
Backup Battery Tools This procedure requires the following tools: • Black stick (or other nonconductive nylon or plastic flat-blade tool) Part Location Preliminary Steps Before you begin, remove the following: • Battery • Top case 44 - PowerBook G4 (15-inch FW800) Take Apart Backup Battery - Apple M8760LL | Service Guide - Page 47
Procedure 1. Use a black stick to release the adhesive holding the backup battery to the optical drive then disconnect the backup battery cable. Note: The backup battery is held down by double-backed tape adhesive on its cover. Backup Battery PowerBook G4 (15-inch FW800) Take Apart - 45 - Apple M8760LL | Service Guide - Page 48
of the metal bracket along the right edge of the optical drive. Position the backup battery precisely as shown. Important: If the backup battery is not positioned correctly, sharp edges on the top case over the backup battery may cause damage. 46 - PowerBook G4 (15-inch FW800) Take Apart Backup - Apple M8760LL | Service Guide - Page 49
and disconnect the power adapter, set the system clock, put the computer to sleep, remove the main battery for five seconds and reinstall. The date and time should not reset. Also, insert an optical disc to verify that the optical drive functions properly. Backup Battery PowerBook G4 (15-inch FW800 - Apple M8760LL | Service Guide - Page 50
tape (if the backup battery will not re-stick securely) • Black stick (or other nonconductive nylon or plastic flat-blade tool) Part Location Preliminary Steps Before you begin, remove the following: • Battery • Top case • Backup battery 48 - PowerBook G4 (15-inch FW800) Take Apart Optical Drive - Apple M8760LL | Service Guide - Page 51
Procedure 1. Remove the two screws from the drive hold-down bracket. 2. Lift out the bracket. Optical Drive PowerBook G4 (15-inch FW800) Take Apart - 49 - Apple M8760LL | Service Guide - Page 52
3. Use a black stick, or the connector pull tab if present, to carefully loosen and disconnect the optical drive flex cable connector. 4. Lift up on the optical drive at its rear and remove. 50 - PowerBook G4 (15-inch FW800) Take Apart Optical Drive - Apple M8760LL | Service Guide - Page 53
at the front of the computer above the optical drive slot, then lower the back of the drive into place. Important: Verify that the front of the drive does not catch above any bracket or overhang at the front of the optical drive bay. Optical Drive PowerBook G4 (15-inch FW800) Take Apart - 51 - Apple M8760LL | Service Guide - Page 54
battery charge for half an hour. Then power on the computer and disconnect the power adapter, set the system clock, put the computer to sleep, remove the main battery for five seconds and reinstall. The date and time should not reset. 52 - PowerBook G4 (15-inch FW800) Take Apart Optical Drive - Apple M8760LL | Service Guide - Page 55
requires the following tools: • #0 Phillips screwdriver (magnetized) • Black stick (or other nonconductive nylon or plastic flat-blade tool) Part Location Preliminary Steps Before you begin, remove the following: • Battery • Top case Hard Drive PowerBook G4 (15-inch FW800) Take Apart - 53 - Apple M8760LL | Service Guide - Page 56
Procedure 1. Remove the two screws from the drive hold-down bracket. 2. Lift out the bracket. 54 - PowerBook G4 (15-inch FW800) Take Apart Hard Drive - Apple M8760LL | Service Guide - Page 57
3. Use a black stick, or the connector pull tab if present, to carefully loosen and disconnect the hard drive flex cable connector. 4. Lift up on the right side of the hard drive to remove. Hard Drive PowerBook G4 (15-inch FW800) Take Apart - 55 - Apple M8760LL | Service Guide - Page 58
from the replaced cable. 6. Install the replacement hard drive and reassemble the computer. 7. Testing the computer should include powering on, checking that the hard drive is recognized, checking for sound from the speakers and that the modem works. 56 - PowerBook G4 (15-inch FW800) Take Apart - Apple M8760LL | Service Guide - Page 59
requires the following tools: • #0 Phillips screwdriver (magnetized) • Black stick (or other nonconductive nylon or plastic flat-blade tool) Part Location Preliminary Steps Before you begin, remove the following: • Battery • Top case • Hard drive Modem PowerBook G4 (15-inch FW800) Take Apart - 57 - Apple M8760LL | Service Guide - Page 60
Procedure 1. Remove the two screws. 2. Carefully lift the modem to disconnect the flex cable connected underneath. 58 - PowerBook G4 (15-inch FW800) Take Apart Modem - Apple M8760LL | Service Guide - Page 61
3. Lift the modem up slightly and disconnect the RJ-11 cable connector. Replacement Procedure 1. Connect the RJ-11 cable to the modem. 2. Verify that the modem RJ-11 cable is routed as shown. Modem PowerBook G4 (15-inch FW800) Take Apart - 59 - Apple M8760LL | Service Guide - Page 62
on the flex connector, remove the optical drive to gain access to the cable. 4. Check that the modem cable is still secured to the modem. 5. Reassemble and test the modem. Check the battery latch to make sure nothing is interfering with its rotation. 60 - PowerBook G4 (15-inch FW800) Take Apart - Apple M8760LL | Service Guide - Page 63
• Black stick (or other nonconductive nylon or plastic flat-blade tool) Part Location Preliminary Steps Before you begin, remove the following: • Battery • Top case Note: Replacing the Bluetooth cable requires removing the Sound/DC-in board. Bluetooth PowerBook G4 (15-inch FW800) Take Apart - 61 - Apple M8760LL | Service Guide - Page 64
Procedure 1. Guide the Bluetooth 4-pin connector and antenna cables from under the bottom case hardware. 2. Lift up the Bluetooth board. 3. Disconnect the Bluetooth antenna cable. 4. Use a black stick to disconnect the 4-pin connector. 62 - PowerBook G4 (15-inch FW800) Take Apart Bluetooth - Apple M8760LL | Service Guide - Page 65
5. If replacing the Bluetooth cable, remove the cable through the space at the PC card cage button guide. 6. Install the replacement Bluetooth board. Note: Use Kapton tape if needed to secure the shield around the board. Bluetooth PowerBook G4 (15-inch FW800) Take Apart - 63 - Apple M8760LL | Service Guide - Page 66
the channel first, then the modem wire. Important: Check that cables are not routed between screw bosses or over case edge hardware. 8. Reassemble and test the computer. Testing should include using Bluetooth to connect to another computer. 64 - PowerBook G4 (15-inch FW800) Take Apart Bluetooth - Apple M8760LL | Service Guide - Page 67
) • Black stick (or other nonconductive nylon or plastic flat-blade tool) Part Location Preliminary Steps Before you begin, remove the following: • Battery • Top case Note: Replacing the right blower requires removing the logic board. Left Blower PowerBook G4 (15-inch FW800) Take Apart - 65 - Apple M8760LL | Service Guide - Page 68
Procedure 1. Disconnect the cables shown below. 2. Remove four screws. 66 - PowerBook G4 (15-inch FW800) Take Apart Left Blower - Apple M8760LL | Service Guide - Page 69
3. Lift out the blower. 4. Install replacement blower. Reassemble and test computer. Replacement Note: Make sure to reseal the tape strip along the edge of the blower. Left Blower PowerBook G4 (15-inch FW800) Take Apart - 67 - Apple M8760LL | Service Guide - Page 70
nylon or plastic flat-blade tool) Part Location Computers with the backlit keyboard configuration, only, have a left and a right ambient light sensor installed. Preliminary Steps Before you begin, remove the following: • Battery • Top case 68 - PowerBook G4 (15-inch FW800) Take Apart Ambient - Apple M8760LL | Service Guide - Page 71
Procedure 1. To remove the left ambient light sensor board, remove the two screws, and disconnect the connector from the logic board. Ambient Light Sensor Boards PowerBook G4 (15-inch FW800) Take Apart - 69 - Apple M8760LL | Service Guide - Page 72
sensor assembly consists of two pieces: the sensor board and a lens cover. Replacement Note: Assemble the replacement sensor board and lens cover before installation. 70 - PowerBook G4 (15-inch FW800) Take Apart Ambient Light Sensor Boards - Apple M8760LL | Service Guide - Page 73
3. Press, where shown here, to secure the right ambient light sensor board connector to the logic board. 4. Reassemble and test the computer. Ambient Light Sensor Boards PowerBook G4 (15-inch FW800) Take Apart - 71 - Apple M8760LL | Service Guide - Page 74
plastic flat-blade tool) Note: To organize the screws you remove from the computer, use a tray with divided compartments (such as a plastic ice cube tray). Part Location 72 - PowerBook G4 (15-inch FW800) Take Apart Logic Board - Apple M8760LL | Service Guide - Page 75
drive and hard drive to reduce the number of cables to control when replacing the logic board, if desired. Procedure Warning: Flexing of the logic board can break solder joints to parts. To prevent damage to the board, guard against flexing. 1. Disconnect the cables shown. Logic Board PowerBook G4 - Apple M8760LL | Service Guide - Page 76
board. 3. Remove the screws shown. Note: If a right ambient light sensor board was removed, that procedure already removed the upper right logic board screw. 74 - PowerBook G4 (15-inch FW800) Take Apart Logic Board - Apple M8760LL | Service Guide - Page 77
heatsink. Do not pry. Do not flex the board. 5. After the board releases, lift the left side slightly and remove the two connectors. Logic Board PowerBook G4 (15-inch FW800) Take Apart - 75 - Apple M8760LL | Service Guide - Page 78
6. Carefully lift the left side of the board and pivot along the ports side. Support the board along its sides as it lifts to avoid flexing. Warning: Do NOT flex . Note: If the DVI port catches underneath, maneuver the board until it releases. 76 - PowerBook G4 (15-inch FW800) Take Apart Logic Board - Apple M8760LL | Service Guide - Page 79
Warning: To avoid flexing the logic board, hold the board vertically along the wide sides. Do not hold the board by the ends or by the narrow neck at the blower cutout, or horizontally, as the board's weight can cause excessive flex. Logic Board PowerBook G4 (15-inch FW800) Take Apart - 77 - Apple M8760LL | Service Guide - Page 80
Replacement Procedure 1. Verify that the two rubber blocks, below, are installed on the replacement logic board. 2. Install new EMI gaskets (076-1057) onto the replacement logic board, where shown below. 78 - PowerBook G4 (15-inch FW800) Take Apart Logic Board - Apple M8760LL | Service Guide - Page 81
remove the original thermal material, shown below, then clean the surface vigorously with an alcohol pad to completely remove all of the material. Logic Board PowerBook G4 (15-inch FW800) Take Apart - 79 - Apple M8760LL | Service Guide - Page 82
present. Note: The two larger pads are interchangeable. Important: Avoid unnecessary contact with thermal pads as dirt and body oils reduce the pad's conductivity. 80 - PowerBook G4 (15-inch FW800) Take Apart Logic Board - Apple M8760LL | Service Guide - Page 83
extreme care not to damage the chip or logic board components. 7. To replace the logic board, guide the port side into the port openings on the bottom case. Note: Use care not to catch cables under the board as it is lowered into place. Logic Board PowerBook G4 (15-inch FW800) Take Apart - 81 - Apple M8760LL | Service Guide - Page 84
the logic board from the heatsink, it is OK to retain the same, new thermal material, as long as they are not handled excessively. 82 - PowerBook G4 (15-inch FW800) Take Apart Logic Board - Apple M8760LL | Service Guide - Page 85
the following tools: • #1 Phillips screwdriver (magnetized) • Black stick (or other nonconductive nylon or plastic flat-blade tool) Part Location Preliminary Steps Before you begin, remove the following: • Battery • Top case • Logic board Right Blower PowerBook G4 (15-inch FW800) Take Apart - 83 - Apple M8760LL | Service Guide - Page 86
Procedure 1. Remove the three screws, then lift off the blower. 2. Install the replacement right blower and reseal tape strip (left blower shown). 3. Reassemble the computer and test all ports, components and functions. 84 - PowerBook G4 (15-inch FW800) Take Apart Right Blower - Apple M8760LL | Service Guide - Page 87
: • #1 Phillips screwdriver (magnetized) • Black stick (or other nonconductive nylon or plastic flat-blade tool) Part Location Preliminary Steps Before you begin, remove the following: • Battery • Top case • Optical drive • Logic board Right USB Board PowerBook G4 (15-inch FW800) Take Apart - 85 - Apple M8760LL | Service Guide - Page 88
Procedure 1. Remove the two screws and guide the board out. 2. Disconnect the flex cable. 86 - PowerBook G4 (15-inch FW800) Take Apart Right USB Board - Apple M8760LL | Service Guide - Page 89
gasket, as shown. 4. Install the replacement right USB board and reassemble the computer. 5. Test all ports, components and functions of the computer. Right USB Board PowerBook G4 (15-inch FW800) Take Apart - 87 - Apple M8760LL | Service Guide - Page 90
) • 4 mm socket wrench • Black stick (or other nonconductive nylon or plastic flat-blade tool) Part Location Preliminary Steps Before you begin, remove the following: • Battery • Logic board • Left ambient light sensor board, if present 88 - PowerBook G4 (15-inch FW800) Take Apart Speakers - Apple M8760LL | Service Guide - Page 91
(if a left ambient light sensor board was not removed in the preliminary steps). 2. Carefully lift wires out of routing channels on the left speaker. Speakers PowerBook G4 (15-inch FW800) Take Apart - 89 - Apple M8760LL | Service Guide - Page 92
be helpful when reinstalling the nut. 6. Testing the computer should include using the Sound system-preference pane to test the left and right speakers. 90 - PowerBook G4 (15-inch FW800) Take Apart Speakers - Apple M8760LL | Service Guide - Page 93
requires the following tools: • #0 Phillips screwdriver (magnetized) • Black stick (or other nonconductive nylon or plastic flat-blade tool) Part Location Preliminary Steps Before you begin, remove the following: • Battery • Speakers PC Card Cage PowerBook G4 (15-inch FW800) Take Apart - 91 - Apple M8760LL | Service Guide - Page 94
Procedure 1. Remove the four screws. 2. To remove the cage, lift it off of the eject button pin. 3. Remove the eject button for replacement. 92 - PowerBook G4 (15-inch FW800) Take Apart PC Card Cage - Apple M8760LL | Service Guide - Page 95
case so that the PC card cage screws will install. 5. Install the replacement PC card cage and eject button. Replacement Note: Ensure that the pin on the PC card inserting a PC card to check that it can be locked in and that the eject button works smoothly. PC Card Cage PowerBook G4 (15-inch FW800 - Apple M8760LL | Service Guide - Page 96
screwdriver (magnetized) • Black stick (or other nonconductive nylon or plastic flat-blade tool) Part Location Preliminary Steps Before you begin, remove the following: • Battery • AirPort Extreme card • PC card cage 94 - PowerBook G4 (15-inch FW800) Take Apart AirPort Extreme Slot & Flex Cable - Apple M8760LL | Service Guide - Page 97
Procedure 1. Disconnect the AirPort Extreme antenna coupling. Grasp the coupling (not the wires) at both ends and pull to separate at the middle. 2. If replacing the AirPort Extreme flex cable, remove the two screws. AirPort Extreme Slot & Flex Cable PowerBook G4 (15-inch FW800) Take Apart - 95 - Apple M8760LL | Service Guide - Page 98
3. Remove four screws and lift out the AirPort Extreme card cage. 4. Notice the routing of the antenna cable jumper and remove. If not replacing, transfer to the replacement cage. 96 - PowerBook G4 (15-inch FW800) Take Apart AirPort Extreme Slot & Flex Cable - Apple M8760LL | Service Guide - Page 99
should include inserting an AirPort Extreme card to check that it can be fully inserted and the door closed. Use Apple System Profiler to check that the AirPort Extreme card is recognized. Test that the AirPort Extreme card is working. AirPort Extreme Slot & Flex Cable PowerBook G4 (15-inch FW800 - Apple M8760LL | Service Guide - Page 100
screwdriver (magnetized) • #0 Phillips screwdriver (magnetized) • Black stick (or other nonconductive nylon or plastic flat-blade tool) Part Location Preliminary Steps Before you begin, remove the following: • Battery • Top case 98 - PowerBook G4 (15-inch FW800) Take Apart Display Panel Assembly - Apple M8760LL | Service Guide - Page 101
the channels along the left speaker. When re-securing, insert the Bluetooth antenna wire into the channel first, then the modem wire. Display Panel Assembly PowerBook G4 (15-inch FW800) Take Apart - 99 - Apple M8760LL | Service Guide - Page 102
4. Disconnect the AirPort Extreme antenna coupling. Remove Kapton tape if present, then grasp the coupling (not the wires) at both ends and pull to separate at the middle. Replacement Note: Use Kapton tape to secure the connector. 5. Disconnect the inverter cable. 100 - PowerBook G4 (15-inch FW800) - Apple M8760LL | Service Guide - Page 103
6. On the right side of the computer, disconnect the LVDS cable. 7. Move the display to a 90-degree angle and remove the four screws. Important: Support the display from falling over before removing the last screw. Display Panel Assembly PowerBook G4 (15-inch FW800) Take Apart - 101 - Apple M8760LL | Service Guide - Page 104
8. Lift the display straight up and off of the computer without catching wires. 9. Install the replacement display panel assembly. Replacement Note: Make sure to capture the grounding loop with the back screw. 102 - PowerBook G4 (15-inch FW800) Take Apart Display Panel Assembly - Apple M8760LL | Service Guide - Page 105
10. Reassemble and test the computer. 11. Testing the computer should include the display panel. Use Bluetooth to connect to another computer and verify proper AirPort Extreme function. Check the function of the RJ-11 modem port. Display Panel Assembly PowerBook G4 (15-inch FW800) Take Apart - 103 - Apple M8760LL | Service Guide - Page 106
screwdriver (magnetized) • Thermal pad kit (076-1055), if not replacing the heatsink • Alcohol pads Part Location Preliminary Steps Before you begin, remove the following: • Battery • Display panel assembly • Logic board 104 - PowerBook G4 (15-inch FW800) Take Apart Heatsink and Blowers Assembly - Apple M8760LL | Service Guide - Page 107
Procedure Note: The heatsink and blowers are one assembly part. 1. Remove the screws and lift out the heatsink and blower assembly. Important: Do not : Do not install a heatsink with damaged or missing thermal pads. Heatsink and Blowers Assembly PowerBook G4 (15-inch FW800) Take Apart - 105 - Apple M8760LL | Service Guide - Page 108
4. To install the replacement heatsink, install the screws in the order shown. 5. Reassemble and test all ports, components and functions of the computer. 106 - PowerBook G4 (15-inch FW800) Take Apart Heatsink and Blowers Assembly - Apple M8760LL | Service Guide - Page 109
nonconductive nylon or plastic flat-blade tool) Part Location Preliminary Steps Before you begin, remove the following: • Battery • PC card cage • Heatsink Note: Replacing the RJ-11 port and wire requires removing the hard drive. Sound/DC-In Board PowerBook G4 (15-inch FW800) Take Apart - 107 - Apple M8760LL | Service Guide - Page 110
Procedure 1. Remove the screws. 2. Disconnect the power and flex cables. 108 - PowerBook G4 (15-inch FW800) Take Apart Sound/DC-In Board - Apple M8760LL | Service Guide - Page 111
3. Guide out the sound/DC-in board. Replacement Note: Install the "TO MLB" side of the flex cable to the logic board. Sound/DC-In Board PowerBook G4 (15-inch FW800) Take Apart - 109 - Apple M8760LL | Service Guide - Page 112
push it with the flat blade of a black stick, until it begins to move, then use a black stick to create leverage behind the port. 110 - PowerBook G4 (15-inch FW800) Take Apart Sound/DC-In Board - Apple M8760LL | Service Guide - Page 113
board. 7. Install the replacement sound/DC-in board. Replacement Note: Verify that the port EMI metal rests above the port plastic. Sound/DC-In Board PowerBook G4 (15-inch FW800) Take Apart - 111 - Apple M8760LL | Service Guide - Page 114
PC card cage screws can install properly. 8. Connect the speaker, power, and flex cables. 9. Reassemble and test the computer. 10. Testing should include using Bluetooth to connect to another computer. Check the function of the modem port, DC-in port and the left USB port. 112 - PowerBook G4 (15 - Apple M8760LL | Service Guide - Page 115
Bottom Case Assembly Part Location Preliminary Steps Before you begin, remove the following: • Battery • Optical drive • Modem • AirPort Extreme card cage and flex cable • DC-in board • Bluetooth board Bottom Case Assembly PowerBook G4 (15-inch FW800) Take Apart - 113 - Apple M8760LL | Service Guide - Page 116
are on the replacement bottom case: • EMI shields • Display latch assembly • Battery latch assembly • Sleep LED and wire connector assembly 2. Remove the battery connector and cable from the removed bottom case; transfer to the replacement bottom case. 114 - PowerBook G4 (15-inch FW800) Take Apart - Apple M8760LL | Service Guide - Page 117
3. Remove two screws and remove the hard drive holder; transfer to the replacement bottom case. 4. Reassemble and test all ports, components and functions of the computer, including battery operation. Bottom Case Assembly PowerBook G4 (15-inch FW800) Take Apart - 115 - Apple M8760LL | Service Guide - Page 118
Service Source Troubleshooting PowerBook G4 (15-inch FW800) © 2003 Apple Computer, Inc. All rights reserved. - Apple M8760LL | Service Guide - Page 119
blower Hard drive control, data, and power High voltage for backlight Display backlight control AirPort radio signal Bluetooth radio signal Power to keyboard backlight LEDs Keyboard data and status lines Video data to display panel General Information PowerBook G4 (15-inch FW800) Troubleshooting - Apple M8760LL | Service Guide - Page 120
Left USB connector Left ambient light sensor Digital audio in/out Power to system and main battery Left speaker Right speaker Mid range speaker Internal microphone Trackpad data and power Power on button Keyboard backlight power 2 - PowerBook G4 (15-inch FW800) Troubleshooting General Information - Apple M8760LL | Service Guide - Page 121
that points to the right. 5. Follow the on-screen instructions. Note: Apple Hardware Test 2.0.1 and later is not backwards compatible with PowerBook computers prior to the PowerBook G4 (1Ghz/867Mhz). Apple Service Diagnostic (ASD) Since the PowerBook G4 (15-inch FW800) is a Mac OS X only system - Apple M8760LL | Service Guide - Page 122
Apple Service Diagnostic Main screen Apple Service Diagnostic Select test tab 4 - PowerBook G4 (15-inch FW800) Troubleshooting General Information - Apple M8760LL | Service Guide - Page 123
tab Apple Service Diagnostic Test log tab Resetting the Power Manager power button. Do not press the fn (Function) key while using this combination of keystrokes. 3. Wait 5 seconds. 4. Press the power button to restart the computer. General Information PowerBook G4 (15-inch FW800) Troubleshooting - Apple M8760LL | Service Guide - Page 124
) is the equivalent to pushing the power-on button. These pads are located near the edge of the logic board, just above center of the hard drive. It is marked POWER BUTTON. The pads are separated with a vertical white line. 6 - PowerBook G4 (15-inch FW800) Troubleshooting General Information - Apple M8760LL | Service Guide - Page 125
logic board. After pressing the caps lock key and perhaps other methods of waking it up fails, hold the power button down for six seconds to force a shut down of the computer. Restart the system to check if it boots up normally. General Information PowerBook G4 (15-inch FW800) Troubleshooting - 7 - Apple M8760LL | Service Guide - Page 126
Follow the on-screen instructions. Safe Mode The Mac OS X that shipped with the PowerBook G4 (15-inch FW800), has a new startup state called Safe Mode. Safe Mode is the state Mac OS X is in after a Safe Boot. A Safe Boot is a special way to start Mac OS X when troubleshooting. Starting up into Safe - Apple M8760LL | Service Guide - Page 127
shut down. 2. Press the power button. 3. Immediately after you troubleshooting articles can be searched from http://www.apple.com/support. 106692 Mac OS X: Troubleshooting Installation and Software Updates 106693 Mac OS X: Troubleshooting Installation From CD-ROM General Information PowerBook G4 - Apple M8760LL | Service Guide - Page 128
symptom persists, replace any modules you removed, go to the next step, and test again. Continue down the list until the symptom is solved. 10 - PowerBook G4 (15-inch FW800) Troubleshooting Hardware Symptom Charts - Apple M8760LL | Service Guide - Page 129
the Apple 65W Power Adapter by its markings (see photo). Under low battery or no battery situations, the 45 watt power adapter may not be able to provide enough power to properly support the system. Although you may have used the 45 watt adapter with a PowerBook G4 (1Ghz/867Mhz) without trouble - Apple M8760LL | Service Guide - Page 130
power adapters (see Knowledge Base article 88231 PowerBook and iBook: Apple Power Adapter) are plug compatible with the PowerBook G4 (15-inch FW800), it may not provide sufficient power during some activities and power may be drawn temporarily from the battery. 4. Try powering up without the battery - Apple M8760LL | Service Guide - Page 131
• Hard drive flex cable • Optical drive flex cable • PC card cage memory connector for damage (retention arms broken, connectors bent or missing, connector lifted from logic board). If damage is detected replace the logic board. Hardware Symptom Charts PowerBook G4 (15-inch FW800) Troubleshooting - Apple M8760LL | Service Guide - Page 132
card with known-good RAM card. • If symptom does not repeat, replace top RAM card with known-good RAM card and restart. For assistance in software troubleshooting, go to Knowledge Base article 106464: Mac OS X: Troubleshooting a Startup Issue. 14 - PowerBook G4 (15-inch FW800) Troubleshooting - Apple M8760LL | Service Guide - Page 133
Resetting the power manager will permanently remove a RAM disk, if present, and all of its contents. You will also need to reset the date and time (using the Date & Time system preferences pane). 2. Replace the logic board. Hardware Symptom Charts PowerBook G4 (15-inch FW800) Troubleshooting - 15 - Apple M8760LL | Service Guide - Page 134
down intermittently Important: This issue can be a result of not using the 65W power adapter with the PowerBook G4 (15-inch FW800) computers. Confirm with the customer which adapter they were using when having this problem. The adapter can be identified by 65W in the name and markings, and the metal - Apple M8760LL | Service Guide - Page 135
the RAM slots. 2. Put the original RAM that came with the computer back in, or put in known-good and compatible RAM and restart. • If symptom does not repeat, replace RAM card(s). • If symptom repeats, replace logic board. Hardware Symptom Charts PowerBook G4 (15-inch FW800) Troubleshooting - 17 - Apple M8760LL | Service Guide - Page 136
RAM card(s) with known-good and compatible RAM and restart. • If symptom repeats, replace logic board. Related Knowledge Base articles: 58442: Power On Self-Test Beep Definition - Part 2 95132: PowerBook G4: Installing or Replacing Memory 18 - PowerBook G4 (15-inch FW800) Troubleshooting Hardware - Apple M8760LL | Service Guide - Page 137
cable. 9. Replace with known-good AirPort Extreme Card. 10. Check AirPort Extreme antenna wire coming from display panel for nicked insulator or crimped wire. If bad, replace display panel assembly. 11. Replace logic board. Hardware Symptom Charts PowerBook G4 (15-inch FW800) Troubleshooting - 19 - Apple M8760LL | Service Guide - Page 138
over the computer and press the battery button. The battery lights should glow green and stay on if the power adapter is operating correctly. Important: The Apple 65W Power Adapter is highly recommended be used with the PowerBook G4 (15-inch FW800) computer. The adapters can be identified by 65W in - Apple M8760LL | Service Guide - Page 139
sure under the Settings tab that Discoverable is checked. 2. Check the Bluetooth antenna is connected to Bluetooth card. 3. Replace with known-good Bluetooth card. 4. Replace display panel assembly. 5. Replace logic board. Hardware Symptom Charts PowerBook G4 (15-inch FW800) Troubleshooting - 21 - Apple M8760LL | Service Guide - Page 140
operation by using a small low-power magnet to exercise the latch mechanism. not operate properly, replace the top case assembly. When displaying a single color Knowledge Base article 112125: Service Diagnostics Matrix, has the PowerBook G4 (15-inch FW800) Troubleshooting Hardware Symptom Charts - Apple M8760LL | Service Guide - Page 141
apply to all manufacturers using LCD technology-not just Apple products. Hard Drive Internal hard drive will not initialize: 1. Start up from the : Hard Drive Data Recovery & Warranty Implications, for important information. Hardware Symptom Charts PowerBook G4 (15-inch FW800) Troubleshooting - - Apple M8760LL | Service Guide - Page 142
any connected peripherals and eject any PC card. 2. Attach an external USB keyboard, possible) to verify that it is not a software problem. 5. Replace keyboard. 6. Replace logic board. No case. 3. Replace logic board. 24 - PowerBook G4 (15-inch FW800) Troubleshooting Hardware Symptom Charts - Apple M8760LL | Service Guide - Page 143
connections look good, change the top case. Microphone The microphone is not working the gain. 3. Reset PRAM (Press the power button, then hold down the Option-Command-P-R Resetting the PRAM will permanently remove a RAM disk, if present and all of its PowerBook G4 (15-inch FW800) Troubleshooting - 25 - Apple M8760LL | Service Guide - Page 144
Verify RJ-11 telephone cable is firmly installed in the modem port. 7. If using Apple Remote Access, select Ignore Dial Tone in the Modem control panel. If the modem connects with . 4. Replace modem. 5. Replace logic board. 26 - PowerBook G4 (15-inch FW800) Troubleshooting Hardware Symptom Charts - Apple M8760LL | Service Guide - Page 145
optical drive that supports writing drive will use a generic writing algorithm to write the disc. In this case, the writability and readability may not be optimal. 3. Replace optical drive flex cable. 4. Replace optical drive. Hardware Symptom Charts PowerBook G4 (15-inch FW800) Troubleshooting - Apple M8760LL | Service Guide - Page 146
are fine, replace the Sound/DC-in board for the left USB port or the backup battery board for the right port. 5. Use Apple System Profiler to verify that the computer is recognizing the bus. If not replace the logic board. 28 - PowerBook G4 (15-inch FW800) Troubleshooting Hardware Symptom Charts - Apple M8760LL | Service Guide - Page 147
Try known-good Apple USB keyboard or check the backup battery flex cable internal hard drive volume. powered make sure that the power supply is connected and device's LED indicates that it is getting power. 6. Replace logic board. Hardware Symptom Charts PowerBook G4 (15-inch FW800) Troubleshooting - Apple M8760LL | Service Guide - Page 148
(Press the power button, then hold RAM disk, if present, and all of its contents. You will also need to reset the date and time (using the Date & Time system preference pane). 8. Verify that the speaker cable is connected properly to sound board. 30 - PowerBook G4 (15-inch FW800) Troubleshooting - Apple M8760LL | Service Guide - Page 149
is actually distorted. 4. Check speaker wire. If damaged, replace speaker assembly. 5. Replace sound board. 6. Replace sound board flex cable. 7. Replace logic board. Hardware Symptom Charts PowerBook G4 (15-inch FW800) Troubleshooting - 31 - Apple M8760LL | Service Guide - Page 150
optical disc drive, press the start button and hold down the "C" key. Check the cursor movement, to see if the problem is software. 6. Check trackpad flex cable connection to the logic board. 7. Replace top case. 8. Replace logic board. 32 - PowerBook G4 (15-inch FW800) Troubleshooting Hardware - Apple M8760LL | Service Guide - Page 151
previous 45W power adapters (see Knowledge Base article 88231 PowerBook and iBook: Apple Power Adapter) are plug compatible with the PowerBook G4 (15-inch FW800), it may not have sufficient power to operate the system during some activities and may draw power from the battery. 6. Verify inverter - Apple M8760LL | Service Guide - Page 152
a USB mouse. Short the power on pads on the logic board to boot the system and use the mouse to sleep from the menu. Measure the voltage at the LED connector. If power is present, replace bottom case. 5. Replace logic board. 34 - PowerBook G4 (15-inch FW800) Troubleshooting Hardware Symptom Charts
-
 1
1 -
 2
2 -
 3
3 -
 4
4 -
 5
5 -
 6
6 -
 7
7 -
8
-
9
-
10
-
11
-
12
-
13
-
14
-
15
-
16
-
17
-
18
-
19
-
20
-
21
-
22
-
23
-
24
-
25
-
26
-
27
-
28
-
29
-
30
-
31
-
32
-
33
-
34
-
35
-
36
-
37
-
38
-
39
-
40
-
41
-
42
-
43
-
44
-
45
-
46
-
47
-
48
-
49
-
50
-
51
-
52
-
53
-
54
-
55
-
56
-
57
-
58
-
59
-
60
-
61
-
62
-
63
-
64
-
65
-
66
-
67
-
68
-
69
-
70
-
71
-
72
-
73
-
74
-
75
-
76
-
77
-
78
-
79
-
80
-
81
-
82
-
83
-
84
-
85
-
86
-
87
-
88
-
89
-
90
-
91
-
92
-
93
-
94
-
95
-
96
-
97
-
98
-
99
-
100
-
101
-
102
-
103
-
104
-
105
-
106
-
107
-
108
-
109
-
110
-
111
-
112
-
113
-
114
-
115
-
116
-
117
-
118
-
119
-
120
-
121
-
122
-
123
-
124
-
125
-
126
-
127
-
128
-
129
-
130
-
131
-
132
-
133
-
134
-
135
-
136
-
137
-
138
-
139
-
140
-
141
-
142
-
143
-
144
-
145
-
146
-
147
-
148
-
149
-
150
-
151
-
152
 |
 |

© 2003 Apple Computer, Inc. All rights reserved.
Service Source
PowerBook G4 (15-inch FW800)
16 September 2003