Apple M8760LL Service Guide - Page 44
of the keyboard bay, to help secure the adhesive and prevent light leakage., On the power button side
 |
UPC - 718908426234
View all Apple M8760LL manuals
Add to My Manuals
Save this manual to your list of manuals |
Page 44 highlights
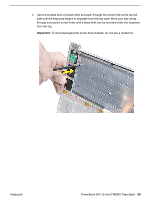
4. Install the keyboard screws in the order shown. 5. Install new or reinstall the insulator film. Remove any protective cover from the adhesive and fit the small round hole in the film over the raised screw boss (one on each side) to start the alignment. Avoid wrinkles or bulges. On the power button side, run your finger along the film where it folds over the edge of the keyboard bay, to help secure the adhesive and prevent light leakage. Important: The film must be installed and in the same location to protect against contact and electrical shorting in certain areas and to allow contact with the EMI spring on the logic board. 42 - PowerBook G4 (15-inch FW800) Take Apart Keyboard
-
 1
1 -
2
-
3
-
4
-
5
-
6
-
7
-
8
-
9
-
10
-
11
-
12
-
13
-
14
-
15
-
16
-
17
-
18
-
19
-
20
-
21
-
22
-
23
-
24
-
25
-
26
-
27
-
28
-
29
-
30
-
31
-
32
-
33
-
34
-
35
-
36
-
37
-
38
-
 39
39 -
 40
40 -
 41
41 -
 42
42 -
 43
43 -
 44
44 -
 45
45 -
 46
46 -
 47
47 -
 48
48 -
 49
49 -
50
-
51
-
52
-
53
-
54
-
55
-
56
-
57
-
58
-
59
-
60
-
61
-
62
-
63
-
64
-
65
-
66
-
67
-
68
-
69
-
70
-
71
-
72
-
73
-
74
-
75
-
76
-
77
-
78
-
79
-
80
-
81
-
82
-
83
-
84
-
85
-
86
-
87
-
88
-
89
-
90
-
91
-
92
-
93
-
94
-
95
-
96
-
97
-
98
-
99
-
100
-
101
-
102
-
103
-
104
-
105
-
106
-
107
-
108
-
109
-
110
-
111
-
112
-
113
-
114
-
115
-
116
-
117
-
118
-
119
-
120
-
121
-
122
-
123
-
124
-
125
-
126
-
127
-
128
-
129
-
130
-
131
-
132
-
133
-
134
-
135
-
136
-
137
-
138
-
139
-
140
-
141
-
142
-
143
-
144
-
145
-
146
-
147
-
148
-
149
-
150
-
151
-
152
 |
 |

42 -
PowerBook G4 (15-inch FW800) Take Apart
Keyboard
4.
Install the keyboard screws in the order shown.
5.
Install new or reinstall the insulator film. Remove any protective cover from the
adhesive and fit the small round hole in the film over the raised screw boss (one on
each side) to start the alignment. Avoid wrinkles or bulges.
On the power button side, run your finger along the film where it folds over the edge
of the keyboard bay, to help secure the adhesive and prevent light leakage.
Important:
The film must be installed and in the same location to protect against
contact and electrical shorting in certain areas and to allow contact with the EMI
spring on the logic board.