Apple M8760LL Service Guide - Page 43
bottom of the keyboard flush against the bottom of the keyboard bay, rotate
 |
UPC - 718908426234
View all Apple M8760LL manuals
Add to My Manuals
Save this manual to your list of manuals |
Page 43 highlights
Replacement Procedure 1. To install the keyboard or replacement keyboard, insert its flex cable through the slot in the top case and rest the bottom of the keyboard evenly along the bottom edge of the keyboard bay. 2. Remove any protective cover from adhesive strips on the keyboard. While keeping the bottom of the keyboard flush against the bottom of the keyboard bay, rotate the keyboard into place so that the screw bosses fit into the boss holes. 3. Use a black stick to guide the sides of the keyboard into the keyboard well. Keyboard PowerBook G4 (15-inch FW800) Take Apart - 41
-
 1
1 -
2
-
3
-
4
-
5
-
6
-
7
-
8
-
9
-
10
-
11
-
12
-
13
-
14
-
15
-
16
-
17
-
18
-
19
-
20
-
21
-
22
-
23
-
24
-
25
-
26
-
27
-
28
-
29
-
30
-
31
-
32
-
33
-
34
-
35
-
36
-
37
-
 38
38 -
 39
39 -
 40
40 -
 41
41 -
 42
42 -
 43
43 -
 44
44 -
 45
45 -
 46
46 -
 47
47 -
 48
48 -
49
-
50
-
51
-
52
-
53
-
54
-
55
-
56
-
57
-
58
-
59
-
60
-
61
-
62
-
63
-
64
-
65
-
66
-
67
-
68
-
69
-
70
-
71
-
72
-
73
-
74
-
75
-
76
-
77
-
78
-
79
-
80
-
81
-
82
-
83
-
84
-
85
-
86
-
87
-
88
-
89
-
90
-
91
-
92
-
93
-
94
-
95
-
96
-
97
-
98
-
99
-
100
-
101
-
102
-
103
-
104
-
105
-
106
-
107
-
108
-
109
-
110
-
111
-
112
-
113
-
114
-
115
-
116
-
117
-
118
-
119
-
120
-
121
-
122
-
123
-
124
-
125
-
126
-
127
-
128
-
129
-
130
-
131
-
132
-
133
-
134
-
135
-
136
-
137
-
138
-
139
-
140
-
141
-
142
-
143
-
144
-
145
-
146
-
147
-
148
-
149
-
150
-
151
-
152
 |
 |

PowerBook G4 (15-inch FW800) Take Apart -
41
Keyboard
Replacement Procedure
1.
To install the keyboard or replacement keyboard, insert its flex cable through the slot in
the top case and rest the bottom of the keyboard evenly along the bottom edge of the
keyboard bay.
2.
Remove any protective cover from adhesive strips on the keyboard. While keeping the
bottom of the keyboard flush against the bottom of the keyboard bay, rotate the
keyboard into place so that the screw bosses fit into the boss holes.
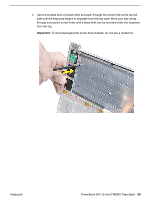
3.
Use a black stick to guide the sides of the keyboard into the keyboard well.