Asus Nexus 7 Nexus 7 GuideBook E-manual - Page 83
Install client & CA certificates, Settings > Personal > Security > Credential storage - root
 |
View all Asus Nexus 7 manuals
Add to My Manuals
Save this manual to your list of manuals |
Page 83 highlights
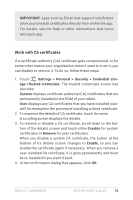
Android also supports X.509 certificates saved in PKCS#12 key store files with a .p12 or .pfx extension. If your key store has some other extension, you much change it to .p12 or .pfx or you won't be able to install it. When you install a certificate from a PKCS#12 key store, Android also installs any accompanying private key or certificate authority certificates. Install client & CA certificates To install a certificate from your tablet's internal storage: 1. Copy the certificate or key store from your computer to the root of your device's internal storage (that is, not in a folder). 2. Touch Settings > Personal > Security > Credential storage > Install from storage. 3. Touch the filename of the certificate or keystore to install. Only certificates that you haven't already installed are displayed. 4. If prompted, enter the key store password and touch OK. 5. Enter a name for the certificate and touch OK. Typically, a CA certificate included with a client certificate is installed at the same time. You can also install separate CA certificates using the same steps. If you have not already set a pattern, PIN, or password for your device, you're prompted to set one up. The type of lock that's acceptable may be predetermined by your system administrator. You can now use the certificate that you installed when connecting to a secure network or for client authentication with Email, Browser, and third-party apps. After a certificate is installed successfully, the copy in storage is deleted. Nexus 7 Guidebook secure your tablet 77
-
 1
1 -
2
-
3
-
4
-
5
-
6
-
7
-
8
-
9
-
10
-
11
-
12
-
13
-
14
-
15
-
16
-
17
-
18
-
19
-
20
-
21
-
22
-
23
-
24
-
25
-
26
-
27
-
28
-
29
-
30
-
31
-
32
-
33
-
34
-
35
-
36
-
37
-
38
-
39
-
40
-
41
-
42
-
43
-
44
-
45
-
46
-
47
-
48
-
49
-
50
-
51
-
52
-
53
-
54
-
55
-
56
-
57
-
58
-
59
-
60
-
61
-
62
-
63
-
64
-
65
-
66
-
67
-
68
-
69
-
70
-
71
-
72
-
73
-
74
-
75
-
76
-
77
-
 78
78 -
 79
79 -
 80
80 -
 81
81 -
 82
82 -
 83
83 -
 84
84 -
 85
85 -
 86
86 -
 87
87 -
 88
88 -
89
-
90
-
91
-
92
-
93
-
94
-
95
-
96
-
97
-
98
-
99
-
100
-
101
-
102
-
103
-
104
-
105
-
106
 |
 |
