Asus Nexus 7 Nexus 7 GuideBook E-manual - Page 88
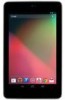
Set up your tablet, Power button/lock key, Volume, Front-facing camera., Micro USB port.
 |
View all Asus Nexus 7 manuals
Add to My Manuals
Save this manual to your list of manuals |
Page 88 highlights
Set up your tablet Your Nexus 7 has the following hardware: • Power button/lock key. The Power button is located on the right side of your tablet. • Volume. The Volume key is directly under the Power button. • Front-facing camera. The camera is located at the top center of your screen. • Micro USB port. The USB is at the bottom of your tablet. • Headset jack. The headset jack is in the lower right side at the bottom of your tablet. When you turn on your tablet for the first time, you'll arrive at a Welcome screen. • To turn on TalkBack and Explore by Touch, place two fingers slightly apart on your screen. You'll hear spoken feedback when your tablet recognizes the gesture. Keep holding your fingers for two more seconds to enable TalkBack and Explore by Touch. After turning on these features, the Explore by Touch tutorial starts, giving you a chance to experience navigating on Android. When you've completed the tutorial, the tablet displays the Welcome screen again. • To choose a different language, swipe right and double-tap the menu. • To finish setting up your tablet, swipe right and double-tap Start towards the center of the screen. A series of screens takes you through the setup process. When prompted, you can sign in using the email address and password for your Google Account. When you sign in with a Google Account, all the email, contacts, Calendar events, and other data associated with that account are automatically synced with your tablet. If you have multiple Google Accounts, you'll be able to add the others later. Nexus 7 Guidebook Accessibility 82
-
 1
1 -
2
-
3
-
4
-
5
-
6
-
7
-
8
-
9
-
10
-
11
-
12
-
13
-
14
-
15
-
16
-
17
-
18
-
19
-
20
-
21
-
22
-
23
-
24
-
25
-
26
-
27
-
28
-
29
-
30
-
31
-
32
-
33
-
34
-
35
-
36
-
37
-
38
-
39
-
40
-
41
-
42
-
43
-
44
-
45
-
46
-
47
-
48
-
49
-
50
-
51
-
52
-
53
-
54
-
55
-
56
-
57
-
58
-
59
-
60
-
61
-
62
-
63
-
64
-
65
-
66
-
67
-
68
-
69
-
70
-
71
-
72
-
73
-
74
-
75
-
76
-
77
-
78
-
79
-
80
-
81
-
82
-
 83
83 -
 84
84 -
 85
85 -
 86
86 -
 87
87 -
 88
88 -
 89
89 -
 90
90 -
 91
91 -
 92
92 -
 93
93 -
94
-
95
-
96
-
97
-
98
-
99
-
100
-
101
-
102
-
103
-
104
-
105
-
106
 |
 |
