Brother International XL-3010 Users Manual - English - Page 42
Fruncido, Zurcido
 |
View all Brother International XL-3010 manuals
Add to My Manuals
Save this manual to your list of manuals |
Page 42 highlights
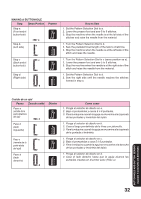
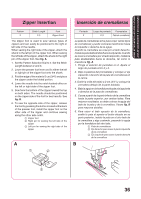
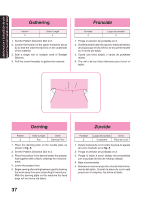
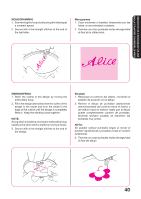
USING ATTACHMENTS AND APPLICATIONS USO DE ACCESORIOS Y APLICACIONES Gathering Pattern 2 Stitch Length 4 1. Set the Pattern Selection Dial to 2. 2. Loosen the tension of the upper thread (to about 2) so that the lower thread lies on the underside of the material. 3. Sew a single row or multiple rows of Straight Stitches. 4. Pull the lower thread(s) to gather the material. Fruncido Puntada 2 Largo de puntada 4 1. Ponga el selector de puntadas en 2. 2. Suelte la tensión del hilo superior (hasta alrededor de 2) para que el hilo inferior se encuentre tirante en el revés del tejido. 3. Cuesa una línea simple o varias de puntadas rectas. 4. Tire del o de los hilos inferiores para fruncir el tejido. Darning Pattern 2 Stitch Length Any Other Darning Plate 1. Place the darning plate on the needle plate as shown in fig. A. 2. Set the Pattern Selection Dial to 2. 3. Place the portion to be darned under the presser foot together with a fabric underlay for reinforcement. 4. Lower the presser foot. 5. Begin sewing alternating between gently drawing the work away from you and pulling it toward you. With the darning plate on the machine the feed dogs will not move the fabric. Zurcido Puntada 2 Largo de puntada Otros Cualquiera Placa de zurcir 1. Instale la placa de zurcir sobre la placa de agujas tal como ilustrado en la fig. A. 2. Ponga el selector de puntadas en 2. 3. Ponga el tejido a zurcir debajo del prensatelas con una pieza de tela de refuerzo debajo. 4. Baje el prensatelas. 5. Empiece a coser empujando y tirando alternativamente del tejido. Cuando la placa de zurcir está puesta en la máquina, los sobre el tejido. 378
-
 1
1 -
2
-
3
-
4
-
5
-
6
-
7
-
8
-
9
-
10
-
11
-
12
-
13
-
14
-
15
-
16
-
17
-
18
-
19
-
20
-
21
-
22
-
23
-
24
-
25
-
26
-
27
-
28
-
29
-
30
-
31
-
32
-
33
-
34
-
35
-
36
-
 37
37 -
 38
38 -
 39
39 -
 40
40 -
 41
41 -
 42
42 -
 43
43 -
 44
44 -
 45
45 -
 46
46 -
 47
47 -
48
-
49
-
50
-
51
-
52
-
53
-
54
-
55
-
56
-
57
-
58
-
59
 |
 |
