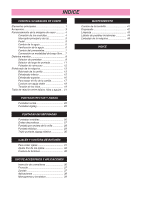
Brother International XL-3010 Users Manual - English - Page 7
Porta Bobinas
 |
View all Brother International XL-3010 manuals
Add to My Manuals
Save this manual to your list of manuals |
Page 7 highlights
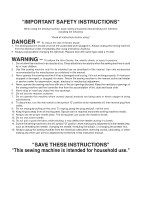
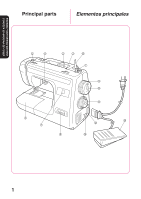
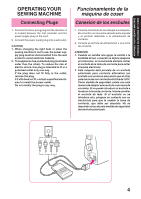
KNOWING YOUR SEWING MACHINE CONOZCA SU MAQUINA DE COSER 1 BOBBIN WINDING ASSEMBLY Winds the thread onto the bobbin to be used for the lower thread. 2 SPOOL HOLDER Holds the sewing thread. 3 STITCH LENGTH DIAL Controls the length of the stitches. 4 PRESSER FOOT LEVER Raises and lowers the presser foot. 5 UPPER TENSION CONTROL DIAL Controls the tension of the upper thread. 6 EXTENSION TABLE & ACCESSORIES COMPARTMENT Converts from the free-arm into a flat bed machine. 7 PATTERN INDICATION WINDOW Shows the stitch to be performed. 8 REVERSE SEWING BUTTON Push for stitching in the reverse direction. 9 BALANCE WHEEL Turn toward you (counterclockwise) to raise and lower the needle. 0 CLUTCH RELEASE SWITCH Switches from bobbin-winding mode to sewing mode. A PATTERN SELECTION DIAL Turn in either direction to select the desired stitch. B FOOT CONTROLLER RECEPTACLE Insert the foot controller plug for operation. C FOOT CONTROLLER Used to control sewing speed start and stop. D MAIN POWER/SEWING LIGHT SWITCH Turns the main power and sewing light on and off. E VERTICAL SPOOL HOLDER Used to hold a second spool of thread for twin needle sewing. 1 Porta Bobinas Hace bobina para la canilla que va a ser utilizada como hilo inferior. 2 Porta carretes Soporta el hilo de coser. 3 Selector de largo de puntada Controla el largo de las puntadas. 4 Palanca de elevación del prensatelas Levanta y baja el prensatelas. 5 Disco de control de la tensión superior Controla la tensión del hilo superior. 6 Soporte y compartimento de accesorios Cambia la máquina de brazo libre en una máquina plana. 7 Ventana de indicación de puntada Muestra la puntada que va a realizarse. 8 Pulsador de retroceso Apriete el botón para retroceder. 9 Ruedecilla Gírela hacia usted (contra el sentido de las manecillas de un reloj) para levantar y bajar la aguja. 0 Conmutador bobina-aguja Permite pasar del modo de bobinado al modo de costura. A Selector de puntadas Gírelo en cualquier dirección para seleccionar la puntada deseada. B Conectar el pedal Insertar la clavija del pedal para conectarlo. C Pedal Sirve para controlar la velocidad de costura, el arranque y la parada. D Interruptor principal y de luz Apaga y enciende la alimentación principal así como la luz de costura. E Porta carretes vertical Sirve para sujetar un segundo carrete de hilo, para costuras con aguja doble. 32
-
 1
1 -
 2
2 -
 3
3 -
 4
4 -
 5
5 -
 6
6 -
 7
7 -
 8
8 -
 9
9 -
 10
10 -
 11
11 -
 12
12 -
13
-
14
-
15
-
16
-
17
-
18
-
19
-
20
-
21
-
22
-
23
-
24
-
25
-
26
-
27
-
28
-
29
-
30
-
31
-
32
-
33
-
34
-
35
-
36
-
37
-
38
-
39
-
40
-
41
-
42
-
43
-
44
-
45
-
46
-
47
-
48
-
49
-
50
-
51
-
52
-
53
-
54
-
55
-
56
-
57
-
58
-
59
 |
 |