Brother International HL-2270DW Network Users Manual - English - Page 27
Brother Peer-to-Peer Network Printer - wireless printer
 |
UPC - 012502626749
View all Brother International HL-2270DW manuals
Add to My Manuals
Save this manual to your list of manuals |
Page 27 highlights
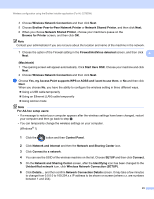
Wireless configuration using the Brother installer application (For HL-2270DW) 4 Choose Wireless Network Connection and then click Next. 5 Choose Brother Peer-to-Peer Network Printer or Network Shared Printer, and then click Next. 6 When you choose Network Shared Printer, choose your machine's queue on the Browse for Printer screen, and then click OK. Note Contact your administrator if you are not sure about the location and name of the machine in the network. 7 Choose the option of the Firewall setting in the Firewall/AntiVirus detected screen, and then click Next. 4 (Macintosh) 4 1 The opening screen will appear automatically. Click Start Here OSX. Choose your machine and click Next. 2 Choose Wireless Network Connection and then click Next. c Choose Yes, my Access Point supports WPS or AOSS and I want to use them. or No and then click Next. When you choose No, you have the ability to configure the wireless setting in three different ways. Using a USB cable temporarily Using an Ethernet (LAN) cable temporarily Using Ad-hoc mode Note For Ad-hoc setup users: • If a message to restart your computer appears after the wireless settings have been changed, restart your computer and then go back to step b. • You can temporarily change the wireless settings on your computer. (Windows® 7) 1 Click the button and then Control Panel. 2 Click Network and Internet and then the Network and Sharing Center icon. 3 Click Connect to a network. 4 You can see the SSID of the wireless machine on the list. Choose SETUP and then click Connect. 5 On the Network and Sharing Center screen, after the Identifying icon has been changed to the Unidentified network icon, click Wireless Network Connection (SETUP). 6 Click Details... and then confirm Network Connection Details screen. It may take a few minutes to change from 0.0.0.0 to 169.254.x.x IP address to be shown on screen (where x.x. are numbers between 1 and 254). 23
-
 1
1 -
2
-
3
-
4
-
5
-
6
-
7
-
8
-
9
-
10
-
11
-
12
-
13
-
14
-
15
-
16
-
17
-
18
-
19
-
20
-
21
-
 22
22 -
 23
23 -
 24
24 -
 25
25 -
 26
26 -
 27
27 -
 28
28 -
 29
29 -
 30
30 -
 31
31 -
 32
32 -
33
-
34
-
35
-
36
-
37
-
38
-
39
-
40
-
41
-
42
-
43
-
44
-
45
-
46
-
47
 |
 |