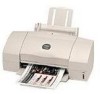
Canon BJC 6100 User Guide
Canon BJC 6100 - Color Inkjet Printer Manual
 |
View all Canon BJC 6100 manuals
Add to My Manuals
Save this manual to your list of manuals |
Canon BJC 6100 manual content summary:
- Canon BJC 6100 | User Guide - Page 1
only. Indicates information for iMac and Power Macintosh G3 users only. Trademark Notices • Canon® is a registered trademark of Canon Inc. • BJ™ and BJC™ are trademarks of Canon Inc. • MS-DOS®, Microsoft®, Windows® and Windows NT® are registered trademarks of Microsoft Corporation in the U.S. and - Canon BJC 6100 | User Guide - Page 2
Utility Guide for Macintosh Users (book): Describes how to use the printer driver, scanner driver and scanner utility program for Macintosh users. If necessary, you can also refer to the on-line Help to learn more about software such as the printer driver. s In these manuals, the Microsoft Windows - Canon BJC 6100 | User Guide - Page 3
the BJ Cartridge ...48 Printing a Nozzle Check Pattern 49 Printing a Nozzle Check Pattern 50 Cleaning the Print Heads ...51 Aligning the Print Heads ...55 Aligning the Print Heads ...56 Cleaning the Printer ...57 Troubleshooting...58 Specifications ...74 For Windows 95 and Windows NT 4.0 Users The - Canon BJC 6100 | User Guide - Page 4
manual to ensure that you use the printer safely. Do not attempt to use the printer in any way not described in this manual as this could result in unforeseen printer electric shock. Never plug the printer into a power socket that is electric shock. Never use the printer while the power cord is - Canon BJC 6100 | User Guide - Page 5
very humid or dusty, in direct sunlight, or close to a heating appliance or fireplace. To avoid the risk of fires or electric shocks, install the printer in a location with an ambient temperature range of 5°C to 35°C (41°F to 95°F) and humidity of 10% to 90% (no condensation). Maintaining the - Canon BJC 6100 | User Guide - Page 6
Working around the printer Never put your hands or fingers in the printer while it is printing. The printer contains moving parts that could cause injury 60Hz Australia AC 240V, 50Hz 6 BJ Cartridges and ink cartridges For safety reasons, store BJ Cartridges and ink tanks out of the reach of small - Canon BJC 6100 | User Guide - Page 7
ink to leak out and stain your clothing or the surroundings. Never touch the metal contacts on a BJ Cartridge after printing. The metal parts may be very hot and could cause burns. Using the printer a type approved apparatus in accordance with the instructions for use of that apparatus). If you are - Canon BJC 6100 | User Guide - Page 8
error. Contact a Canon service facility. RESUME button After you have removed the cause of a printer error, press the RESUME button to resume printing. Press and hold the RESUME button for the required number of beeps and release to perform these special tasks. One beep: Cleans the print heads - Canon BJC 6100 | User Guide - Page 9
outlet. The power cord may be permanently attached to the printer, depending on the country of purchase. Inside the Printer Cartridge Lock Lever Cartridge Holder Cartridge Lock Lever Locks the BJ Cartridges onto the cartridge holder. Cartridge Holder Contains two slots. The left slot holds a Black - Canon BJC 6100 | User Guide - Page 10
the Getting Started manual. If you fail to follow the correct order, the printer driver may not be installed printer and computer may not operate properly. - While the printer driver is being installed - While the operating system (Windows 98 or Mac OS) is starting up - While the printer is printing - Canon BJC 6100 | User Guide - Page 11
install the printer driver. (When using Windows 98, install the printer driver each time you connect the printer.) For more details, please refer to the Driver and Utility Guide for Windows Users in the Reference Guide (CD-ROM) or the Driver and Utility Guide for Macintosh Users (book), depending - Canon BJC 6100 | User Guide - Page 12
switched on. POWER lamp Load a stack of plain paper into the auto sheet feeder. 3 Specify the print settings in the printer driver. ΠOpen the Printer Properties dialog box. Select the command used for printing, then click the Properties button. (Depending on the application program you use, the - Canon BJC 6100 | User Guide - Page 13
printing over the processing of another application program. ŽBJ Status Monitor The BJ Status Monitor checks the status of the printer. If an error occurs, the BJ Status Monitor displays the cause of the error and a solution. The BJ Status Monitor also detects the remaining ink of the BJ Cartridge - Canon BJC 6100 | User Guide - Page 14
to the printer. The printer driver works on processing the data so the printer can use it. This section describes the main tab in the Printer Properties dialog box. (You can specify various print settings in the Page Layout, Stamp/Background and Maintenance tabs.) Choose Print Mode BJ Cartridge - Canon BJC 6100 | User Guide - Page 15
: Cancels the current print settings in the printer driver and closes the Printer Properties dialog box. Note The Driver and Utility Guide for Windows Users section in the Reference Guide describes detailed print settings in the printer driver for Windows. Reading this on-line manual is recommended - Canon BJC 6100 | User Guide - Page 16
up properly. ΠMake sure that the printer is switched on. POWER lamp Load a stack of plain paper into the auto sheet feeder. 3 Specify the print settings in the printer driver. ΠSelect the command used for printing to open the dialog box. Normally select Print and Page Setup from the File menu - Canon BJC 6100 | User Guide - Page 17
print settings in the printer driver. (For details, see next page.) 4 Start printing from the application program. Click the Print button. Printing begins. The following screen appears during printing. - When a single Macintosh computer is connected to the printer: - While printing from the print - Canon BJC 6100 | User Guide - Page 18
the printer. The printer driver works on processing the data so the printer can use it. This section describes the Printer Properties dialog box when you select Print from the File menu. (You can also specify other print settings by selecting Page Setup from the File menu.) BJ Cartridge Print Mode - Canon BJC 6100 | User Guide - Page 19
when printing on the print media such as thick paper through the manual feed slot. Media Type: Specifies the type of print media to use. Note The Driver and Utility Guide for Macintosh Users (book) describes detailed print settings in the printer driver for Macintosh users. Reading this manual is - Canon BJC 6100 | User Guide - Page 20
the right side of the auto sheet feeder and insert it into the auto sheet feeder. (You can print on either side of plain paper.) Load limit mark Print side Paper guide Slide the paper guide to the left side of the stack until it is snug. Note Make sure that the top of - Canon BJC 6100 | User Guide - Page 21
and the entire area where the printer can technically print. Printing area (dark shade): Canon recommends that you print within this area. Printable area (light shade): The area in which it is possible to print. However, printing in this area can adversely affect the print quality or the paper feed - Canon BJC 6100 | User Guide - Page 22
images in vibrant colours. For best results when printing photographs, use the Photo BJ Cartridge. s Canon Special Media q Bubble Jet Paper LC-301 Provides the standard print quality. Plain paper exclusively designed for Canon's bubble jet printers. q High Resolution Paper HR-101S Provides more - Canon BJC 6100 | User Guide - Page 23
it in a level place. • After printing, do not touch the print side until the ink has dried. If water gets on the printed media, do not touch the print side until the ink has dried. The following are guidelines on how long ink takes to dry on individual print media. - Glossy Photo Paper GP-301 - Canon BJC 6100 | User Guide - Page 24
. The Color BJ Cartridge BC-31 is composed of four distinct parts, the print head and three replaceable ink tanks. When a colour runs out, only that colour's ink tank needs to be replaced. Ink tank InBkCTaI-n3kC InBkCTIa-n3kM InBkCTaI-n3kY Cyan Magenta Yellow Ink Tank Ink Tank Ink Tank BCI-3C - Canon BJC 6100 | User Guide - Page 25
The Color BJ Cartridge BC-32 Photo is composed of the print head and three replaceable ink tanks. When a colour runs out, only that colour's ink tank needs to be replaced. BInCkPIT-3haPnoPktBBhoKloatcokIBnkCPTIh-a3noPPktChoCoyatonIBnCkPTI-ha3noPMPkthaoMgoetnota Ink Tank Ink Tank Ink Tank BCI-3PBK - Canon BJC 6100 | User Guide - Page 26
graphics or standard colour printing of charts and text. Left: Black BJ Cartridge BC-30 Right: Color BJ Cartridge BC-31 For more details, refer to the Getting Started manual. Ink Tank BCI-3BK Black Ink Tank Ink Tank Ink Tank BCI-3C BCI-3M BCI-3Y Cyan Magenta Yellow s Photo colour combination Use - Canon BJC 6100 | User Guide - Page 27
from the right side.) Left: Color Image Scanner Cartridge IS-32 Right: Color BJ Cartridge BC-31 Using the Scanner (¬ p.36) Ink Tank Ink Tank Ink Tank BCI-3C BCI-3M BCI-3Y Cyan Magenta Yellow IS-32 BC-31 Note Discard empty ink tanks immediately according to the local laws and regulations - Canon BJC 6100 | User Guide - Page 28
or scanner which requires fine halftone colours. Important For a print job using the Photo BJ Cartridge, be sure to install the Photo BJ Cartridge and ink tanks in the right positions as shown in the following figures. 1 Make sure that the printer is switched on and open the front cover of the - Canon BJC 6100 | User Guide - Page 29
BJ Cartridge for the first time... You need to align the print heads and select the appropriate print settings in the printer driver. ¬ Aligning the Print Heads (¬ p.55) ¬ Driver and Utility Guide for Windows Users (CD-ROM) ¬ Aligning the Print Heads (¬ p.56) ¬ Driver and Utility Guide for - Canon BJC 6100 | User Guide - Page 30
. - For Black BJ Cartridge BC-30 Ink Tank BCI-3BK - For Color BJ Cartridge BC-31 Ink Tank BCI-3C Ink Tank BCI-3M Ink Tank BCI-3Y - For Color BJ Cartridge BC-32 Photo Ink Tank BCI-3PBK Photo Ink Tank BCI-3PC Photo Ink Tank BCI-3PM Photo 1 Make sure that the printer is switched on and open - Canon BJC 6100 | User Guide - Page 31
show the correct array of ink tanks in the BJ Cartridges. Standard colour combination Black BJ Cartridge BC-30 Centre : BCI-3BK (Black) Color BJ Cartridge BC-31 Left : BCI-3C (Cyan) Centre : BCI-3M (Magenta) Right : BCI-3Y (Yellow) Ink Tank BCI-3BK Black Ink Tank Ink Tank Ink Tank BCI-3C BCI-3M - Canon BJC 6100 | User Guide - Page 32
Magenta Ink Tank Ink Tank Ink Tank BCI-3C BCI-3M BCI-3Y Cyan Magenta Yellow 6 To lock the ink tank in place, press down on top of the ink tank. Press down until you hear the ink tank lock in place. 7 Close the front cover. The cartridge holder returns to the home position and print head cleaning - Canon BJC 6100 | User Guide - Page 33
even after replacing the ink tanks and cleaning the print heads, the print heads are worn out and you must replace the BJ Cartridge. Note Canon recommends the following BJ Cartridges for use with this printer. Black BJ Cartridge BC-30 Color BJ Cartridge BC-31 Color BJ Cartridge BC-32 Photo 1 Make - Canon BJC 6100 | User Guide - Page 34
BJ Cartridge with the ink tanks in place. Note • If you are removing a partially used BJ Cartridge, store it in the BJ Cartridge container. • Always hold the BJ Cartridge by the circles embossed on the left and right sides of the BJ Cartridge. Never touch the metal contacts or the print head on - Canon BJC 6100 | User Guide - Page 35
in place. You can use new ink tanks or remove the ink tanks in the old BJ Cartridge and install them in the new BJ Cartridge. Replacing the Ink Tanks (¬ p.30) 9 Close the front cover. The cartridge holder returns to the home position and print head cleaning starts automatically. Do not open the - Canon BJC 6100 | User Guide - Page 36
the Color Image Scanner Cartridge IS-32 in the printer makes it possible to scan and save images such as your favourite photographs and greeting cards. The Color Image Scanner Cartridge IS-32 operates in combination with the special IS Scan Software (i.e., IS Scan scanner driver and IS Scan Plus - Canon BJC 6100 | User Guide - Page 37
container Used for storing the Color Image Scanner Cartridge IS-32 or other BJ Cartridges when not in use. The BJ Cartridge container comes with the printer. (If you need additional containers, the BJ Cartridge container may be optionally available depending on the country of purchase.) s Paper - Canon BJC 6100 | User Guide - Page 38
printing. 1 Install the IS Scan scanner driver. ¬Installing the IS Scan Software (p.40) 2 Install the Color Image Scanner Cartridge IS-32. Remove the BJ Cartridge installed on the left side of the cartridge application program, double-click IS Scan BJC-6100 in the folder you specified during the - Canon BJC 6100 | User Guide - Page 39
again and click Scan. Save the scanned image. 6 Install the BJ Cartridge(s) and print the scanned image. Note For more details on how to use IS Scan and IS Scan Plus, refer to the Driver and Utility Guide for Windows Users (CD-ROM) or the Driver and Utility Guide for Macintosh Users (book). 39 - Canon BJC 6100 | User Guide - Page 40
. 1 Load the Setup Software & Reference Guide CD-ROM into the CD-ROM drive. Also make sure that the printer is switched on. The CD-ROM starts automatically and a menu screen is displayed. (If the CD-ROM does not start automatically, click the My Computer icon on the Windows desktop and then double - Canon BJC 6100 | User Guide - Page 41
. This installs the IS Scan scanner driver and IS Scan Plus utility program. For the rest of the installation procedure, follow the instructions on the screen. 1 Load the Setup Software & Reference Guide CD-ROM into the CD-ROM drive. Also make sure that the printer is switched on. 2 Double-click the - Canon BJC 6100 | User Guide - Page 42
launching the IS Scan software (IS Scan Plus for Windows or IS Scan for Macintosh) to scanning and saving the image. 1 Remove the BJ Cartridge installed on the left side of the cartridge holder and then install the Color Image Scanner Cartridge IS-32. ΠMake sure that the printer is switched on and - Canon BJC 6100 | User Guide - Page 43
the IS Scan Software 3 Perform white level calibration. Note When you use the Color Image Scanner Cartridge IS-32 for then click the Custom button. Select Settings from the Menu. Note When the printer is connected using both the parallel interface and USB interface, the Select connecting cable - Canon BJC 6100 | User Guide - Page 44
ΠPlace the image in the scanning holder. Insert the scanning holder in the auto sheet feeder of the printer. Important To prevent possible damage to the scanning holder, always insert the scanning holder into the auto sheet feeder with its top edge (seamed side) - Canon BJC 6100 | User Guide - Page 45
Installing the IS Scan Software 6 When you wish to scan only a portion of the entire image, the scanned image is displayed. Note When you scan printed images from books and magazines, the scanned image may appear to be shaded. To solve the problem, use a lower resolution setting and try again. 45 - Canon BJC 6100 | User Guide - Page 46
necessary items, such as a file name and file format type, and click the Save button. 10Exit the IS Scan software. Click the Exit button. (If you wish to print the scanned image, proceed with the printing operation before you exit IS Scan Plus.) Select Exit from the File menu. (If you wish to - Canon BJC 6100 | User Guide - Page 47
front cover. After the BJ Cartridge is installed... You need to align the print heads and select the appropriate print settings in the printer driver. ¬ Aligning the Print Heads (¬ p.55) ¬ Aligning the Print Heads (¬ p.56) 2 Print the scanned image. Click the Print button. Launch the graphics - Canon BJC 6100 | User Guide - Page 48
displays an error message (when using Windows) and the printer beeps four times. See "Replacing the Ink Tanks". (¬ p.30) s Ink remains but printouts are faint, streaked or the colour tones are not correct If printouts are still unsatisfactory after replacing the ink tanks, the print heads may be - Canon BJC 6100 | User Guide - Page 49
not overlapped perfectly, see "Aligning the Print Heads". (When the Black BJ Cartridge and Color BJ Cartridge are installed) When the Photo BJ Color Cartridge and Color BJ Cartridge are installed in the printer, refer to the "Printing a Nozzle Check Pattern" section in the Reference Guide. 49 - Canon BJC 6100 | User Guide - Page 50
are not overlapped perfectly, see "Aligning the Print Heads". (When the Black BJ Cartridge and Color BJ Cartridge are installed) When the Photo BJ Color Cartridge and Color BJ Cartridge are installed in the printer, refer to 50 the "Printing a Nozzle Check Pattern" section in the Reference Guide. - Canon BJC 6100 | User Guide - Page 51
the printer is switched on. 2 Select normal print head cleaning in the printer driver. Œ Open the Printer Properties dialog box, then click the Maintenance tab. Select the normal print head cleaning icon in the Print Head Cleaning box. Ž Select either or both BJ Cartridges for print head clean - Canon BJC 6100 | User Guide - Page 52
printer driver. Œ Select Page Setup from the File menu, then click the Utilities button. Select Print head cleaning. Ž Select either or both BJ Cartridges for print head cleaning. All Colours: Cleans the print heads of both BJ Cartridges. Black: Cleans the print head of the Black BJ Cartridge - Canon BJC 6100 | User Guide - Page 53
the success of normal print head cleaning. ( p.49 or p.50) If normal print head cleaning does not correct the problem, perform deep print head cleaning. ΠOpen the Printer Properties dialog box, then click the Maintenance tab. Click the deep print head cleaning icon in the Print Head Cleaning box - Canon BJC 6100 | User Guide - Page 54
until the POWER lamp stops flashing and the deep print head cleaning operation is completed. Note For details on when to cleaning the print heads, refer to the User's Guide s Print a nozzle check pattern to confirm the success of deep print head cleaning. (¬ p.49 or p.50) If the cleaning had no - Canon BJC 6100 | User Guide - Page 55
the print heads. Normally, execute the automatic print head alignment feature of the printer driver. If this does not work for some reason, then align the print heads manually. For more details on manual print head alignment, refer to the "Aligning the Print Heads" section in the Reference Guide. 55 - Canon BJC 6100 | User Guide - Page 56
the print heads. Normally, execute the automatic print head alignment feature of the printer driver. If this does not work for some reason, then align the print heads manually. For more details on manual print head alignment, refer to the "Aligning the Print Heads" section in the Reference Guide. 56 - Canon BJC 6100 | User Guide - Page 57
parts of the printer. 1 Press the POWER button to switch the printer printer is turned on. This could cause a malfunction in the printer. Warning To avoid personal injury from touching live printer components, always unplug the printer to the printer during cleaning, the printer. For more details - Canon BJC 6100 | User Guide - Page 58
below to resolve the problem. This manual describes the symptoms of only the printer problems you are most likely to encounter. If your problem is not described here, refer to the Reference Guide on the Setup Software & Reference Guide CD-ROM. s Cannot install the printer driver ¬ p.59 s Paper jams - Canon BJC 6100 | User Guide - Page 59
follow the onscreen instructions. Note If an error occurred and you forcibly shut down the installer, you may not be able to install the printer driver because Windows is no longer stable. Restart Windows and then reinstall the printer driver. Load the Setup Software & Reference Guide CD-ROM. When - Canon BJC 6100 | User Guide - Page 60
the jammed paper, press the POWER button twice to eject the jammed paper automatically. Start the print job again. Paper misfeeds Cause: Paper is too thick. Solution: Feed manually through the manual feed slot of the printer. Paper within the range from 64 to 105 g/m2 can be loaded in the auto sheet - Canon BJC 6100 | User Guide - Page 61
Troubleshooting Cause: Paper wrinkled, curled. Solution: Check that you are using appropriate media. Paper that is folded, curled or crumpled not only feeds incorrectly, but may also cause paper jams. Cause: Auto Feeder is not selected in printer driver. Solution: Open the Printer Properties dialog - Canon BJC 6100 | User Guide - Page 62
click Uninstall. Then follow the on-screen instructions. When connecting to the USB interface running under Windows 98, refer to the "Additional Notes on Handling the USB Interface" manual provided with the printer. Cause: WPS (Windows Printing System) driver is installed on the computer. Solution - Canon BJC 6100 | User Guide - Page 63
and print it again. If there is no problem with the new document, the original file was probably faulty. If the same problem recurs with the new file, contact a Canon service facility. Cause: Installed printer driver not operating correctly. Solution: Remove the installed BJ printer driver and - Canon BJC 6100 | User Guide - Page 64
installed, install more memory. Refer to the user's manual for your computer for information on installing additional memory. q Error number (*203) displayed Cause: Installed printer driver not operating correctly. Solution: Load the Setup Software and Reference Guide CD-ROM. When the CD-ROM folder - Canon BJC 6100 | User Guide - Page 65
and wait for at least 15 minutes for the printer to cool. The print heads may occasionally overheat during a long print job. If the print heads overheat, printing will pause at the end of a pass across the page to allow time for the print heads to cool and then will restart after a brief interval - Canon BJC 6100 | User Guide - Page 66
feed error. Solution: Set the paper correctly. If paper has jammed in the printer, remove the jam and press the RESUME button. RESUME button Beeps: 3 Cause: Paper jam. Solution: If paper has jammed in the printer, remove the jam and press the RESUME button. Beeps: 4 Cause: BJ Cartridge out of ink - Canon BJC 6100 | User Guide - Page 67
again, manually align the print heads. For more details on aligning the print heads manually, refer to the "Aligning the Print Heads" section in the Reference Guide. The POWER lamp flashes orange and green alternately with beeps Cause: Service error Solution: Contact a Canon service facility. Count - Canon BJC 6100 | User Guide - Page 68
again. Cause: Not using the correct printer driver. Solution: Start the print procedure again and make sure BJC-6100 is displayed in the Name box of the Print dialog box. Select Chooser from the Apple menu. Click on the BJC-6100 icon and check that BJC-6100 is selected in the Connect to box. Cause - Canon BJC 6100 | User Guide - Page 69
was probably faulty. If the same problem recurs with the new file, contact a Canon service facility. q Printout is faint or colours are wrong Cause: The print head nozzles in one of the BJ Cartridges are clogged or one of the inks has run out. Solution: Print a nozzle check pattern and check the - Canon BJC 6100 | User Guide - Page 70
settings in the software application and the printer driver are the same. Cause: Printer cable not connected correctly. Solution: Check that the printer cable is securely fastened to the computer and the printer. For details, refer to the Getting Started manual. Cause: Printer cable fault. Solution - Canon BJC 6100 | User Guide - Page 71
should be checked. Cause: The print head nozzles in one of the BJ Cartridges are clogged or one of the inks has run out. Solution: Print a nozzle check pattern and check the status of the print heads. Cause: The printer driver settings are not correct. Solution: To print a photo, select the correct - Canon BJC 6100 | User Guide - Page 72
and excess ink is being absorbed by the paper. Solution: Print on special print media made by applying a coating to the print side, such as High Resolution Paper or Glossy Photo Paper. Cause: The print density is set to high. Solution: Reduce the print intensity in the printer driver. To change - Canon BJC 6100 | User Guide - Page 73
Troubleshooting Other problems Refer to the Reference Guide on the Setup Software & Reference Guide CD-ROM for information on how to deal with the problems listed below. q Colour document printed in monochrome q Colours not clear q Printed text rotated 90 degrees q Printing in top left corner q Text - Canon BJC 6100 | User Guide - Page 74
Print speed (printing with Canon standard pattern): Black printing using Black BJ Cartridge BC-30 Fast: 9 ppm Normal:7.1 ppm Colour printing using Color BJ Cartridge BC-31 Fast: 6 ppm Normal:4.7 ppm Photo colour printing using Color BJ Cartridge 30360 or equivalent Recommended printer cable (USB): - Canon BJC 6100 | User Guide - Page 75
Based on the number of sheets per ink tank over the printable area on A4-size plain paper. Printer driver operating environment: IBM PC/AT-compatible computer running Windows 98, Windows 95, Windows NT 4.0, or iMac or Power Macintosh G3 computer running Mac OS 8.1 or later Hard disk space: Approx
-
 1
1 -
 2
2 -
 3
3 -
 4
4 -
 5
5 -
 6
6 -
 7
7 -
8
-
9
-
10
-
11
-
12
-
13
-
14
-
15
-
16
-
17
-
18
-
19
-
20
-
21
-
22
-
23
-
24
-
25
-
26
-
27
-
28
-
29
-
30
-
31
-
32
-
33
-
34
-
35
-
36
-
37
-
38
-
39
-
40
-
41
-
42
-
43
-
44
-
45
-
46
-
47
-
48
-
49
-
50
-
51
-
52
-
53
-
54
-
55
-
56
-
57
-
58
-
59
-
60
-
61
-
62
-
63
-
64
-
65
-
66
-
67
-
68
-
69
-
70
-
71
-
72
-
73
-
74
-
75
 |
 |
1
Introduction
This User's Guide uses the following symbols to indicate important information.
Always observe the
instructions indicated by these symbols.
Warning
Caution
Important
Note
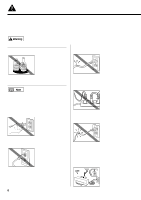
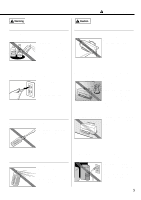
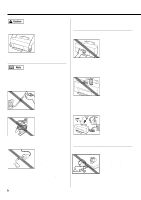
Indicates instructions that, if ignored, could result in death or serious personal injury
caused by incorrect operation of the equipment.
Instructions indicated by this symbol must be observed for safe operation.
Indicates instructions that, if ignored, could result in personal injury or material dam-
age caused by incorrect operation of the equipment.
Instructions indicated by this symbol must be observed for safe operation.
Indicates prohibited actions that, inadvertently performed, could result in equipment
damage, faults or impaired product quality.
Actions indicated by this symbol must be avoided for correct operation.
Indicates useful reference information or supplementary instructions concerning oper-
ation of the equipment.
Reading these notes is recommended.
Indicates information for Windows 98 and Windows 95 users only.
Indicates information for iMac and Power Macintosh G3 users only.
International ENERGY STAR
®
Program
AS AN ENERGY STAR PARTNER, CANON INC.HAS DETERMINED THAT THIS PRODUCT
MEETS THE ENERGY STAR GUIDELINES FOR ENERGY EFFICIENCY.
The international ENERGY STAR Office Equipment Program is a global program that promotes
energy saving through the use of computers and other office equipment.
The program backs
the development and dissemination of products with functions that effectively reduce energy
consumption.
It is an open system in which business proprietors can participate voluntarily.
The
targeted products are office equipment such as computers, monitors, printers, facsimiles and
copiers.
Their standards and logos are uniform among participating nations.
Trademark Notices
• Canon
®
is a registered trademark of Canon Inc.
•
BJ™ and BJC™ are trademarks of Canon Inc.
• MS-DOS
®
, Microsoft
®
, Windows
®
and Windows NT
®
are registered trademarks of Microsoft Corporation in the U.S.
and other countries.
•
Apple™, Macintosh™, iMac™ and Power Macintosh™ are trademarks of Apple Computer, Inc. in the U.S. and other
countries.
•
All other trademarks and registered trademarks appearing in this User's Guide are the property of their respective owners.