Canon EOS Rebel T1i EOS REBEL T1i/EOS 500D Instruction Manual - Page 124
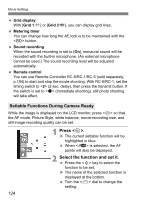
Press <, >., Select the function and set it., Settable Functions During Camera Ready
 |
View all Canon EOS Rebel T1i manuals
Add to My Manuals
Save this manual to your list of manuals |
Page 124 highlights
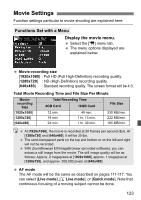
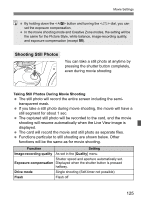
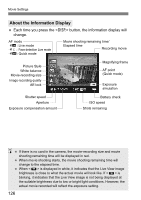
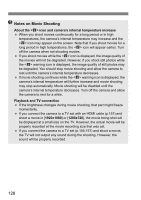
Movie Settings Grid display With [Grid 1l] or [Grid 2m], you can display grid lines. Metering timer You can change how long the AE lock is to be maintained with the button. Sound recording When the sound recording is set to [On], monaural sound will be recorded with the built-in microphone. (An external microphone cannot be used.) The sound recording level will be adjusted automatically. Remote control You can use Remote Controller RC-6/RC-1/RC-5 (sold separately, p.194) to start and stop the movie shooting. With RC-6/RC-1, set the timing switch to (2-sec. delay), then press the transmit button. If the switch is set to (immediate shooting), still photo shooting will take effect. Settable Functions During Camera Ready While the image is displayed on the LCD monitor, press so that the AF mode, Picture Style, white balance, movie-recording size, and still image-recording quality can be set. 1 Press . X The current settable function will be highlighted in blue. When is selected, the AF points will also be displayed. 2 Select the function and set it. Press the key to select the function to be set. X The name of the selected function is displayed at the bottom. Turn the dial to change the setting. 124
-
 1
1 -
2
-
3
-
4
-
5
-
6
-
7
-
8
-
9
-
10
-
11
-
12
-
13
-
14
-
15
-
16
-
17
-
18
-
19
-
20
-
21
-
22
-
23
-
24
-
25
-
26
-
27
-
28
-
29
-
30
-
31
-
32
-
33
-
34
-
35
-
36
-
37
-
38
-
39
-
40
-
41
-
42
-
43
-
44
-
45
-
46
-
47
-
48
-
49
-
50
-
51
-
52
-
53
-
54
-
55
-
56
-
57
-
58
-
59
-
60
-
61
-
62
-
63
-
64
-
65
-
66
-
67
-
68
-
69
-
70
-
71
-
72
-
73
-
74
-
75
-
76
-
77
-
78
-
79
-
80
-
81
-
82
-
83
-
84
-
85
-
86
-
87
-
88
-
89
-
90
-
91
-
92
-
93
-
94
-
95
-
96
-
97
-
98
-
99
-
100
-
101
-
102
-
103
-
104
-
105
-
106
-
107
-
108
-
109
-
110
-
111
-
112
-
113
-
114
-
115
-
116
-
117
-
118
-
 119
119 -
 120
120 -
 121
121 -
 122
122 -
 123
123 -
 124
124 -
 125
125 -
 126
126 -
 127
127 -
 128
128 -
 129
129 -
130
-
131
-
132
-
133
-
134
-
135
-
136
-
137
-
138
-
139
-
140
-
141
-
142
-
143
-
144
-
145
-
146
-
147
-
148
-
149
-
150
-
151
-
152
-
153
-
154
-
155
-
156
-
157
-
158
-
159
-
160
-
161
-
162
-
163
-
164
-
165
-
166
-
167
-
168
-
169
-
170
-
171
-
172
-
173
-
174
-
175
-
176
-
177
-
178
-
179
-
180
-
181
-
182
-
183
-
184
-
185
-
186
-
187
-
188
-
189
-
190
-
191
-
192
-
193
-
194
-
195
-
196
-
197
-
198
-
199
-
200
-
201
-
202
-
203
-
204
-
205
-
206
-
207
-
208
-
209
-
210
-
211
-
212
-
213
-
214
-
215
-
216
-
217
-
218
-
219
-
220
-
221
-
222
-
223
-
224
-
225
-
226
-
227
-
228
-
229
-
230
-
231
-
232
-
233
-
234
-
235
-
236
-
237
-
238
-
239
-
240
-
241
-
242
-
243
-
244
 |
 |