Canon EOS Rebel T1i EOS REBEL T1i/EOS 500D Instruction Manual - Page 86
Auto Exposure Bracketing
 |
View all Canon EOS Rebel T1i manuals
Add to My Manuals
Save this manual to your list of manuals |
Page 86 highlights
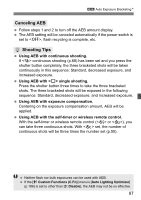
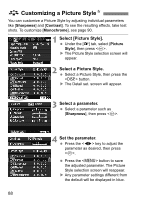
3 Auto Exposure BracketingN This feature takes exposure compensation a step further by varying the exposure automatically with three shots as shown below. You can then choose the best exposure. This is called AEB (Auto Exposure Bracketing). Standard exposure AEB amount 86 Darker exposure (Decreased exposure) Brighter exposure (Increased exposure) 1 Select [Expo. comp./AEB]. Under the [2] tab, select [Expo. comp./AEB], then press . 2 Set the AEB amount. Turn the dial to set the AEB amount. Press the key to set the exposure compensation amount. If AEB is combined with exposure compensation, AEB will be applied centering on the exposure compensation amount. Press to set it. When you press the shutter button halfway, the AEB amount will be displayed on the LCD monitor. 3 Take the picture. Focus and press the shutter button completely. The three bracketed shots will be taken in this sequence: Standard, decreased exposure, and increased exposure.
-
 1
1 -
2
-
3
-
4
-
5
-
6
-
7
-
8
-
9
-
10
-
11
-
12
-
13
-
14
-
15
-
16
-
17
-
18
-
19
-
20
-
21
-
22
-
23
-
24
-
25
-
26
-
27
-
28
-
29
-
30
-
31
-
32
-
33
-
34
-
35
-
36
-
37
-
38
-
39
-
40
-
41
-
42
-
43
-
44
-
45
-
46
-
47
-
48
-
49
-
50
-
51
-
52
-
53
-
54
-
55
-
56
-
57
-
58
-
59
-
60
-
61
-
62
-
63
-
64
-
65
-
66
-
67
-
68
-
69
-
70
-
71
-
72
-
73
-
74
-
75
-
76
-
77
-
78
-
79
-
80
-
 81
81 -
 82
82 -
 83
83 -
 84
84 -
 85
85 -
 86
86 -
 87
87 -
 88
88 -
 89
89 -
 90
90 -
 91
91 -
92
-
93
-
94
-
95
-
96
-
97
-
98
-
99
-
100
-
101
-
102
-
103
-
104
-
105
-
106
-
107
-
108
-
109
-
110
-
111
-
112
-
113
-
114
-
115
-
116
-
117
-
118
-
119
-
120
-
121
-
122
-
123
-
124
-
125
-
126
-
127
-
128
-
129
-
130
-
131
-
132
-
133
-
134
-
135
-
136
-
137
-
138
-
139
-
140
-
141
-
142
-
143
-
144
-
145
-
146
-
147
-
148
-
149
-
150
-
151
-
152
-
153
-
154
-
155
-
156
-
157
-
158
-
159
-
160
-
161
-
162
-
163
-
164
-
165
-
166
-
167
-
168
-
169
-
170
-
171
-
172
-
173
-
174
-
175
-
176
-
177
-
178
-
179
-
180
-
181
-
182
-
183
-
184
-
185
-
186
-
187
-
188
-
189
-
190
-
191
-
192
-
193
-
194
-
195
-
196
-
197
-
198
-
199
-
200
-
201
-
202
-
203
-
204
-
205
-
206
-
207
-
208
-
209
-
210
-
211
-
212
-
213
-
214
-
215
-
216
-
217
-
218
-
219
-
220
-
221
-
222
-
223
-
224
-
225
-
226
-
227
-
228
-
229
-
230
-
231
-
232
-
233
-
234
-
235
-
236
-
237
-
238
-
239
-
240
-
241
-
242
-
243
-
244
 |
 |
